You can create an S-Drive HTML Upload Widget Page for S-Drive object files (cg_S3Objectc, cgCaseFilec, MyExampleObject_c, etc.). This page can be used to add the S-Drive HTML upload widget to the page wherever you want. So, you can upload your files easily without opening object's page and clicking "Upload file(s)" button. To create a custom HTML upload page, follow these steps:
-
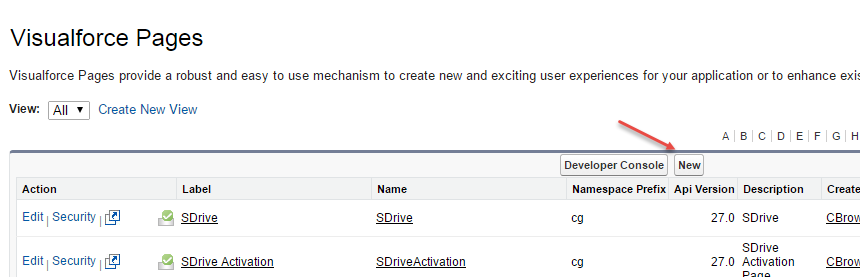
Go to Setup > App Setup -> Develop> Pages and click the New button at the top of the page
-
In the "Page Edit" screen you'll create your new page. Give an appropriate name to your page. For our example, we will use "MyCaseHtmlUploadPage" name. Type "MyCaseHtmlUploadPage" inside Label field (a). Type "MyCaseHtmlUploadPage" inside Name field(b).
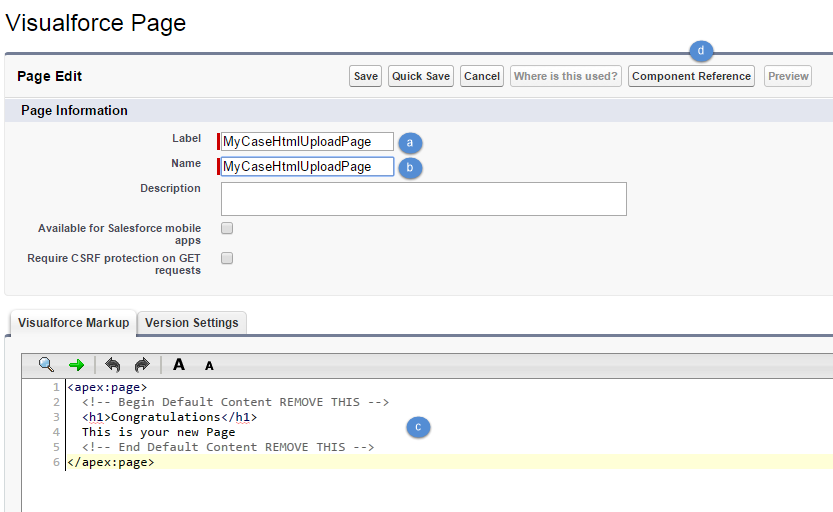
You need to set the "Salesforce.com API" version to 22.0 or above to use S-Drive 2.0 features. To set the version number click the "Version Settings" tab next to the "Visualforce Markup" tab and change the version number from drop-down
Now we need to create our page content. We will be using custom components in our page. Basically, our page skeleton will be as follows:
<apex:page standardController="Case" tabStyle="Case">
<cg:HtmlUploadComponent
objectId="{!Case.Id}"
customObjectFileName="CaseFile__c"
fileNamespacePrefix="cg__"
relationshipName="Case__r"
privateEnabled="true"
allowedFileExtensions="="*.avi;*.txt""
isUsePopup="true/false"
returnUrl="https://na6.salesforce.com/home/home.jsp"
debug="true/false"
currentFolderId = " a068000000xgAAEAA2"
/>
</apex:page>
As an example, the following will be a typical Visualforce page:
<apex:page standardController="Case" tabStyle="Case" showHeader="false" sidebar="false" standardStylesheets="false" applyHtmlTag="true" applyBodyTag="true" docType="html">
<html>
<head>
<meta charset="utf-8" />
<title>
Case Files Html Upload Page
</title>
</head>
<body>
<cg:HtmlUploadComponent
objectId="{!Case.Id}"
customObjectFileName="CaseFile__c"
fileNamespacePrefix="cg__"
relationshipName="Case__r"
privateEnabled="true"
isUsePopup="true"
debug="true"
/>
</body>
</html>
</apex:page>
currentFolderId (optional) is the Id of the parent folder for the files to be uploaded. It is not provided by default.
See the Classic Override page for an explanation of the rest of the attributes.
Click Save.
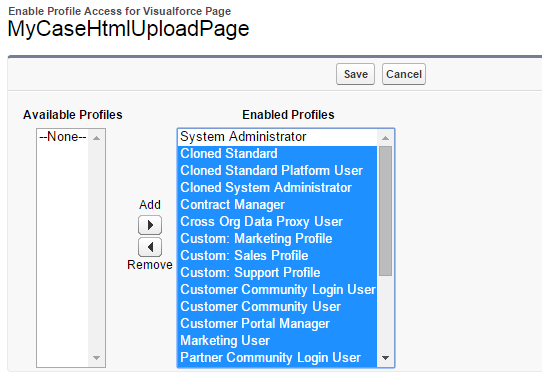
Set the security for your page on other profiles. Go to Setup -> App Setup -> Develop ->
Pages and click Security link next to your page name

Move all profiles (or select based on your needs) from "Available Profiles" to "Enabled Profiles" as shown. If you skip this step, your users that belong to the disabled profiles will see an error page.
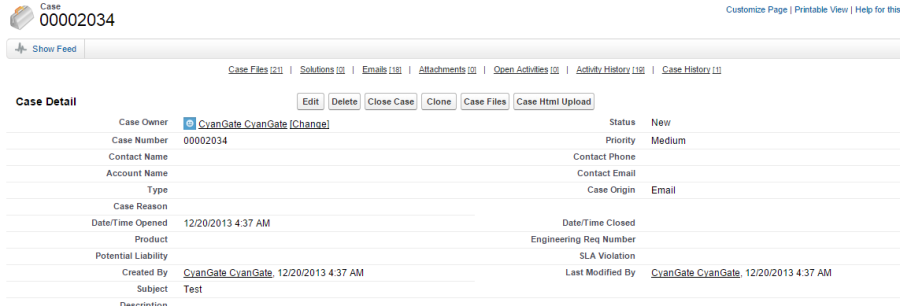
Now we have a custom HTML upload page. At this point, you can use this HTML upload page wherever you want like below figure ( Figure 7 35) if you give appropriate parameters.