INSTALLING AND ACTIVATING S-DRIVE
Install S-Drive from the AppExchange
If you are upgrading S-Drive from a previous version, see Appendix B: Upgrading S-Drive. Otherwise continue below.
Go to the AppExchange S-Drive listing and click “Get it Now.” Follow the prompts to install S-Drive in your sandbox or production org.
Activate S-Drive
After the installation is finished, go to S-Drive Configuration in your Salesforce instance:
In Classic, click on the “+” and click on S-Drive Configuration
In Lightning, click on the “App Launcher” menu which is on the left corner of the Salesforce page.
Then click on “S-Drive: Simple Secure Storage for Salesforce Users” app.
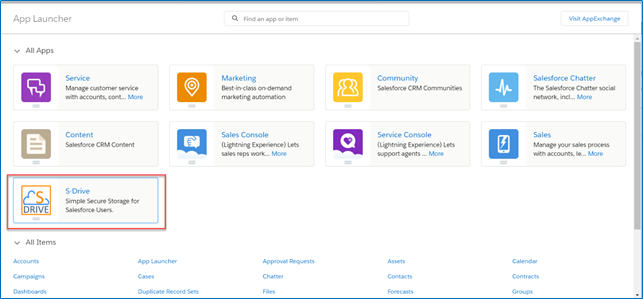
Click on S-Drive Configuration

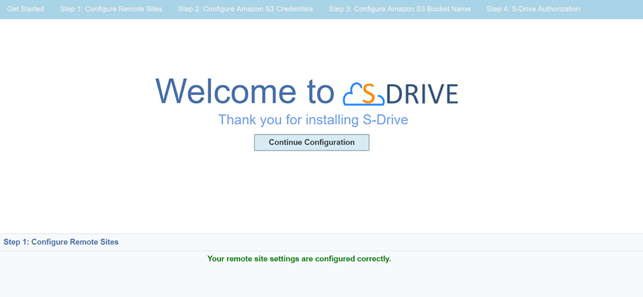
The S-Drive Configuration tab will take you to a list of instructions as follows:
Step 1: Configure Remote Sites:
If Remote Site Settings are configured correctly, you'll see "Your remote site settings are configured correctly" message. If you see an error message in Step 1, resolve the issue by following the on-screen instructions.
Step 2: Configure Amazon S3 Credentials:
This step is required to connect your Amazon S3 account with S-Drive. You need to enter a valid "Amazon Access Key" and "Secret Key". After providing keys, if you see "Amazon S3 Credentials are configured correctly," continue with the next step.
Important Note: IAM users whom assigned individual security credentials, must have some permissions to activate and use S-Drive. The minimum policy example can be seen in section 2.1.2 Identity and Access Management (IAM) Policies and Minimum Policy Example. Please apply this policy if you are planning to use this kind of user for the activation.
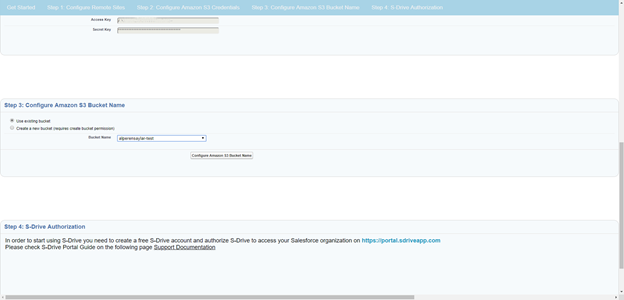
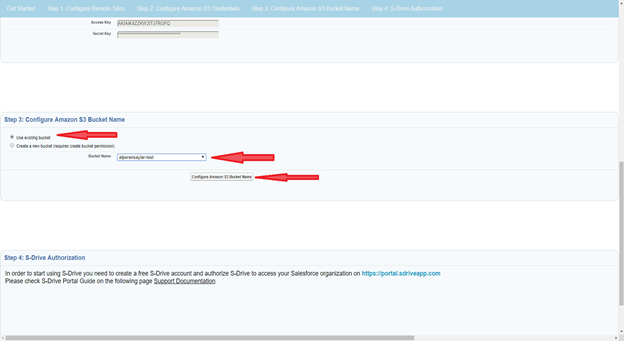
Step 3: Configure Amazon S3 Bucket Name:
This is the bucket that will be used to store your files in your Amazon S3 account. Bucket name must be unique and must comply with DNS naming conventions. Bucket names cannot have capital letters or underscores or contain dots (“.”)
You can select "Use existing bucket" or "Create a new bucket" option. (Figure 4‑4) We recommend creating your bucket here in the S-Drive Configuration, rather than directly in AWS.
If you select "Create a new bucket" option you need to provide a valid bucket name and select the region name to create the bucket on this endpoint location. (You will be prompted to create the necessary remote site settings.)
Your bucket access settings will be public by default when it is created. After it is created and you have finished the configuration process, there will be a button on the S-Drive configuration page under Authentication Settings called “Block Bucket Public Access” on the configuration page. Simply click the button to make your bucket private. This is recommended.
If you select "Use existing bucket" option you must select one of the bucket names from the list (that is retrieved from your Amazon S3 account).
Important Note: If you are using and existing bucket and are planning to use S-Drive Versioning feature, we strongly suggest you use a "versioning never enabled bucket". To ensure versioning status of your bucket, sign in to your amazon console, find your bucket from S3 service and check bucket properties.
Click "Configure Amazon S3 Bucket Name" button). If you see "Amazon S3 Bucket Name is configured correctly" message continue with the next step.
Step 4: S-Drive Authorization:
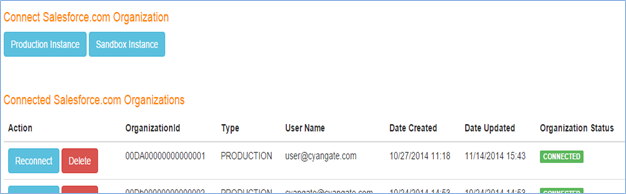
Go to https://portal.sdriveapp.com and login into the S-Drive portal account you created earlier. Authorize S-Drive to connect to your organization:
Click Connected Organizations link on the menu (Figure 4‑6). Then under "Connect Salesforce.com Organizations", click either “Production Instance” or “Sandbox Instance” based on where you installed S-Drive (Figure 4‑7). This redirects the salesforce.com login page. Login, and you’ll see your organization on the list of “Connected Salesforce.com Organizations.”

Congratulations! You are now ready to configure S-Drive to suit your needs.