Desktop Experience (Paid Feature)
With S-Drive Desktop Experience, you can save time on upload/download operations with your local file storage. You can upload files to S-Drive from the Experience without logging directly into your Salesforce org. You can sync the files and folders that are used regularly, using S-Drive Experience folder hierarchies and different sync options.
Salesforce license requirements
Desktop Experience users must also be Salesforce users. They must have a Salesforce license. The files users see on their desktops are the same files they have access to internally in Salesforce based on their permissions and sharing.
Minimum System Requirements
You have to have the following minimum system requirements to install and use S-Drive Desktop Experience:
Windows 7 or later
An Intel Pentium 4 processor or later that's SSE2 capable
512 MB of RAM
Download and Install S-Drive Desktop Experience
S-Drive Desktop Experience will require Java 11 and WinFSP as a prerequisite, but users will not need to install them themselves. Desktop Experience installation exe will cover those. Java will not be installed target machine because the Desktop Experience will use embedded java inside exe, whereas WinFSP will be installed silently during the installation of the Desktop Experience. So all you need to have to install S-Drive Desktop Experience is available space on your device and the latest S-Drive Desktop Experience exe. After installation is completed successfully, you will be able to see the installed 2-application from the control panel.
Download S-Drive Desktop Experience
Contact support to request Desktop Experience.
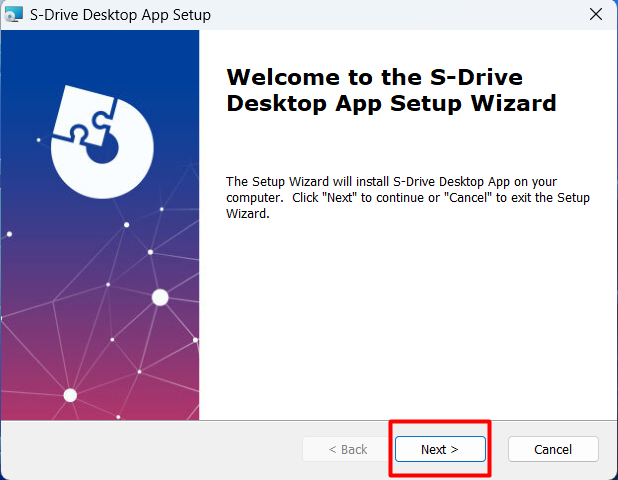
Install S-Drive Desktop Experience
After the download is complete, run the installer.
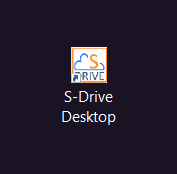
The shortcut for the S-Drive Desktop Experience will appear on your desktop.
The installer will install the following on your machine:
The installer will install the followings to your computer. You don’t need to install additional or third party softwares.
WinFSP
Embeded Java
S-Drive Desktop Experience Application
Opening and Logging into S-Drive Desktop Experience
To use the Desktop Experience, you will need to open the app, connect to your org using your org login credentials, and select which files to sync and view. Then you’ll be able to view files from the Desktop Experience drive on your computer.
Open and Connect Desktop Experience
S-Drive Desktop Experience uses your Salesforce user credentials to log in to your Salesforce organization and sync the S-Drive files and folders based on your configuration. In order to start using the application, you have to log in using your credentials.
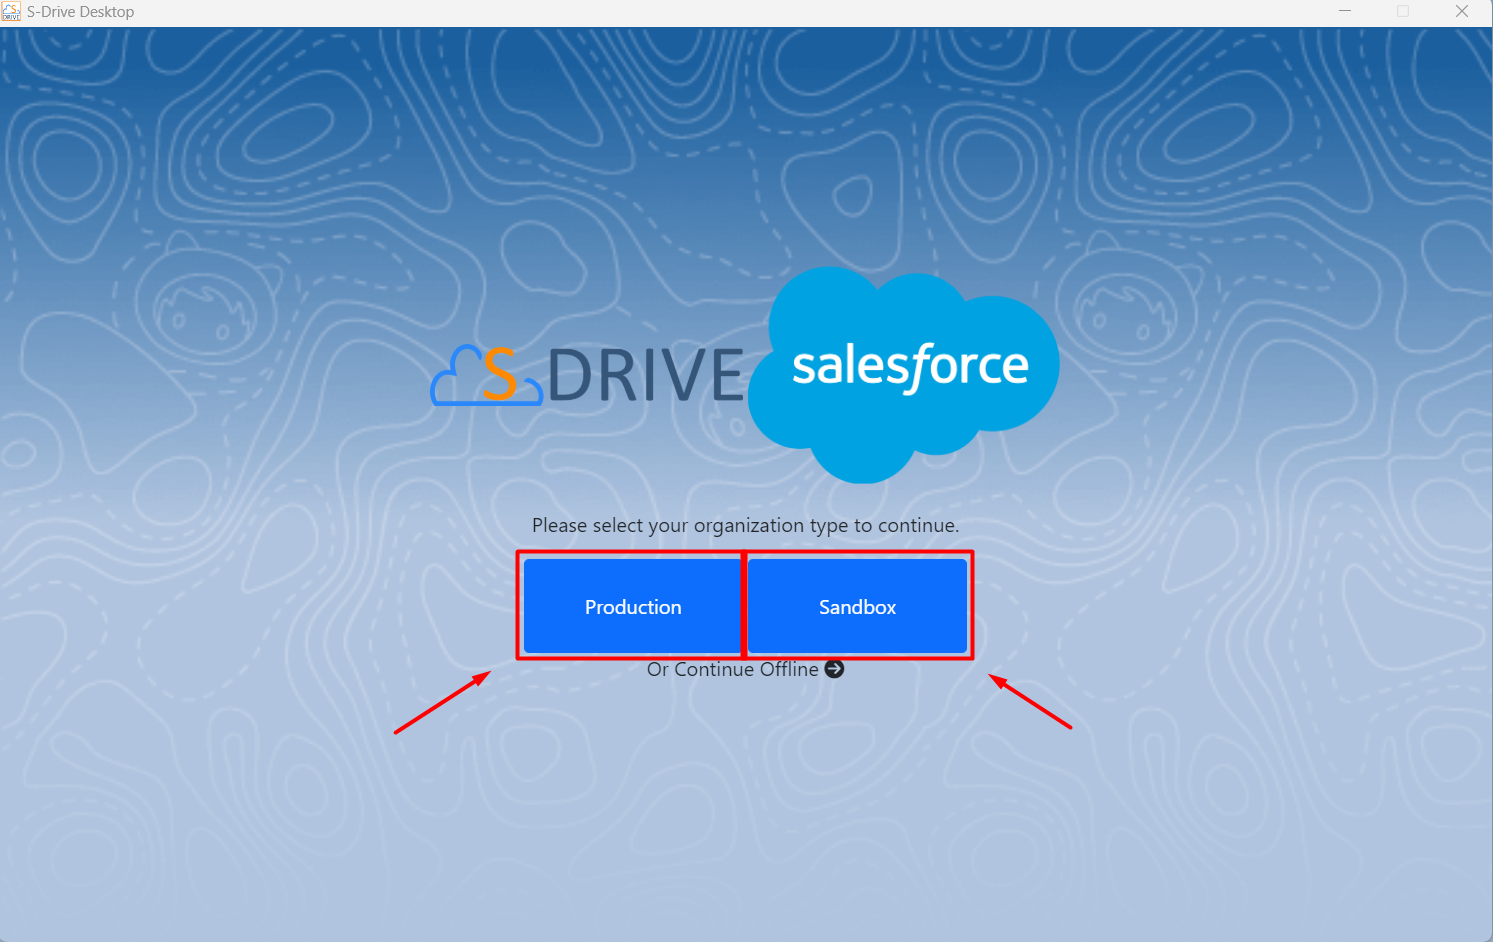
Click the Desktop Experience icon on your desktop to open
Click on Production or Sandbox according to which kind of org you’re using the Desktop Experience with.
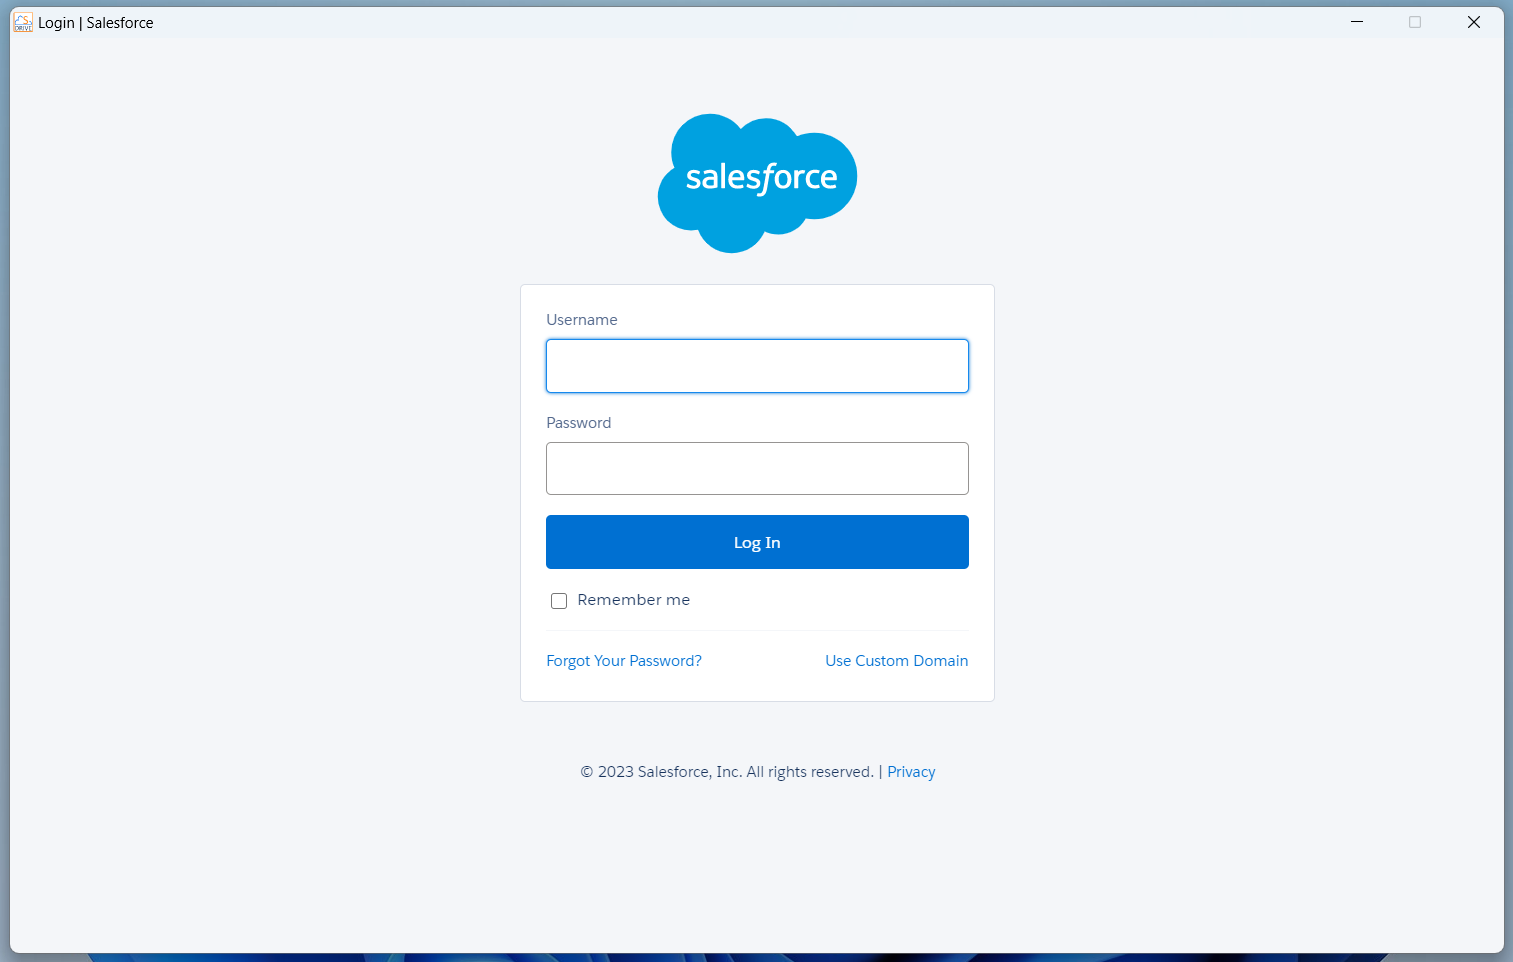
3. Enter the username and password for your org and click Log In.
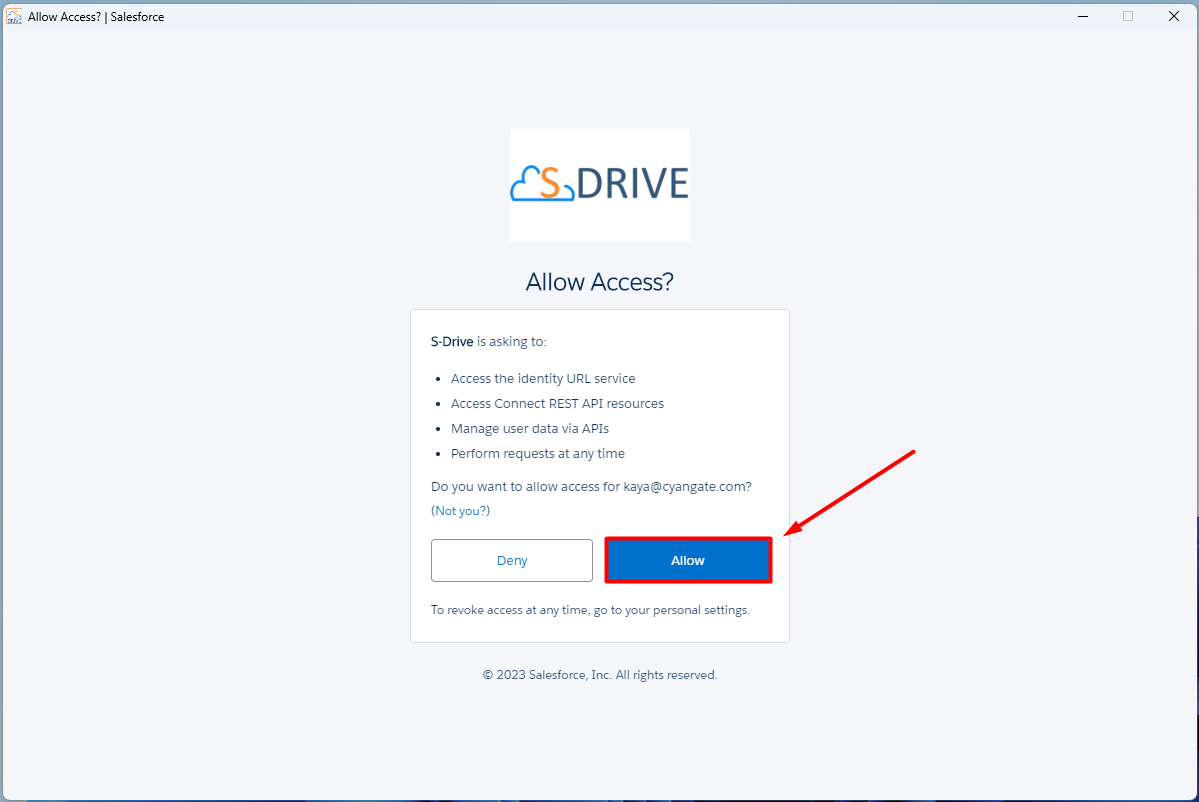
5. Click the Allow button to accept API permissions from the new window that opens.
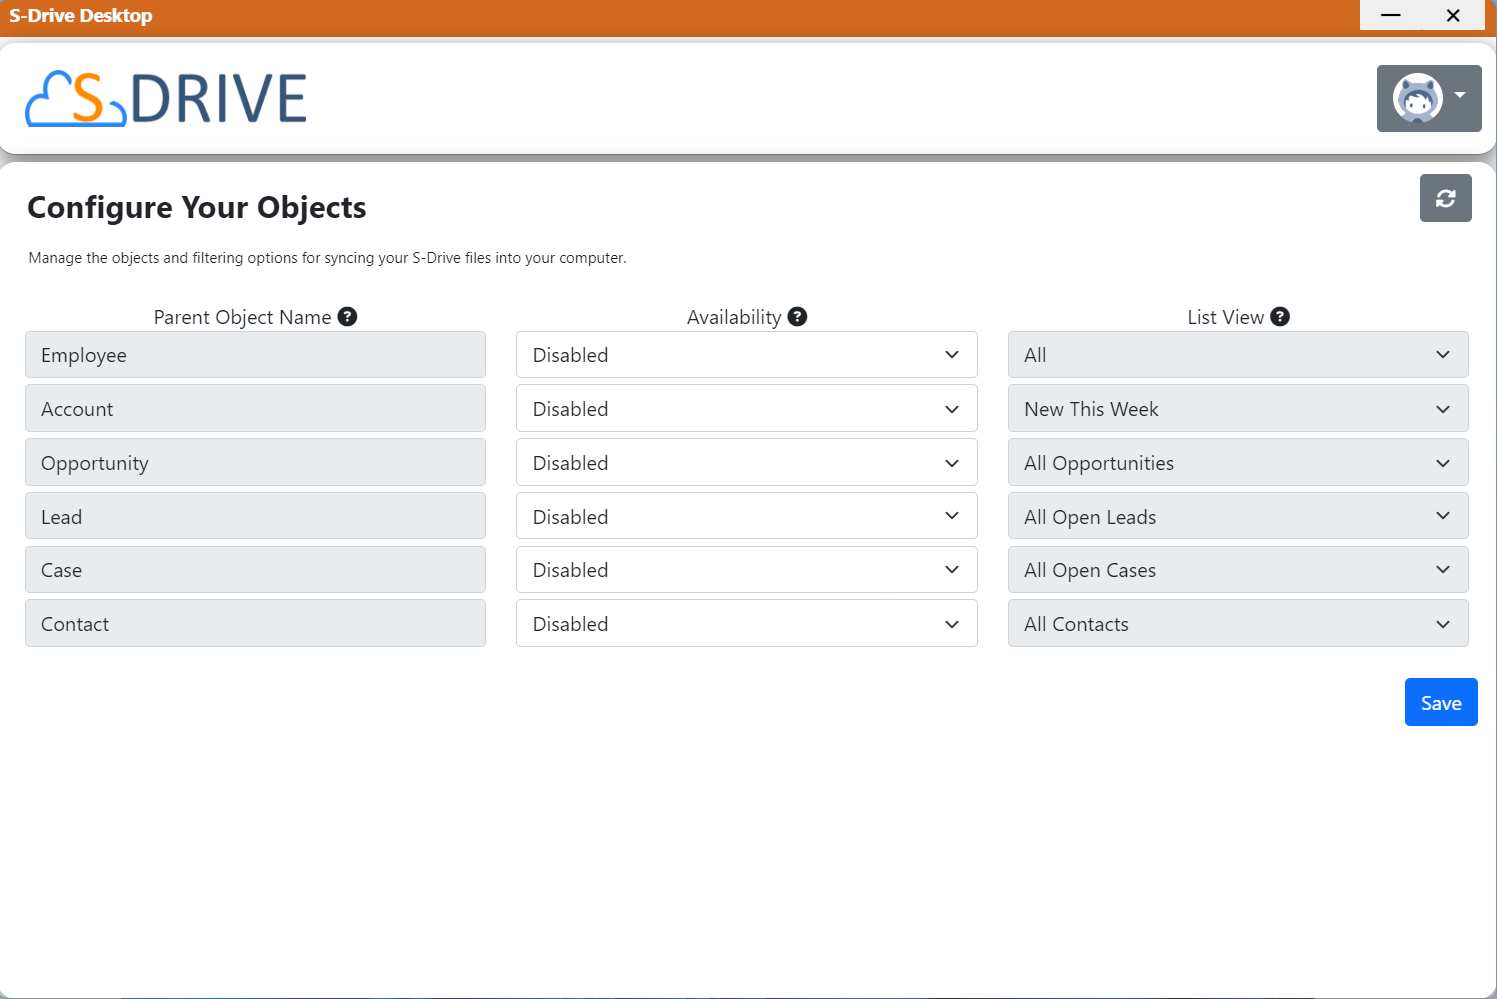
6. You will see the Desktop Experience configuration page
First Time Setup
The S-Drive App shows S-Drive files on your desktop based on the settings and filtering/syncing configurations you choose. These are described here.
Settings
Click the logo icon in the upper right corner of the Configuration Page to open the Settings window. From the dropdown menu that opens, you can select the Settings option. The Settings window opens.
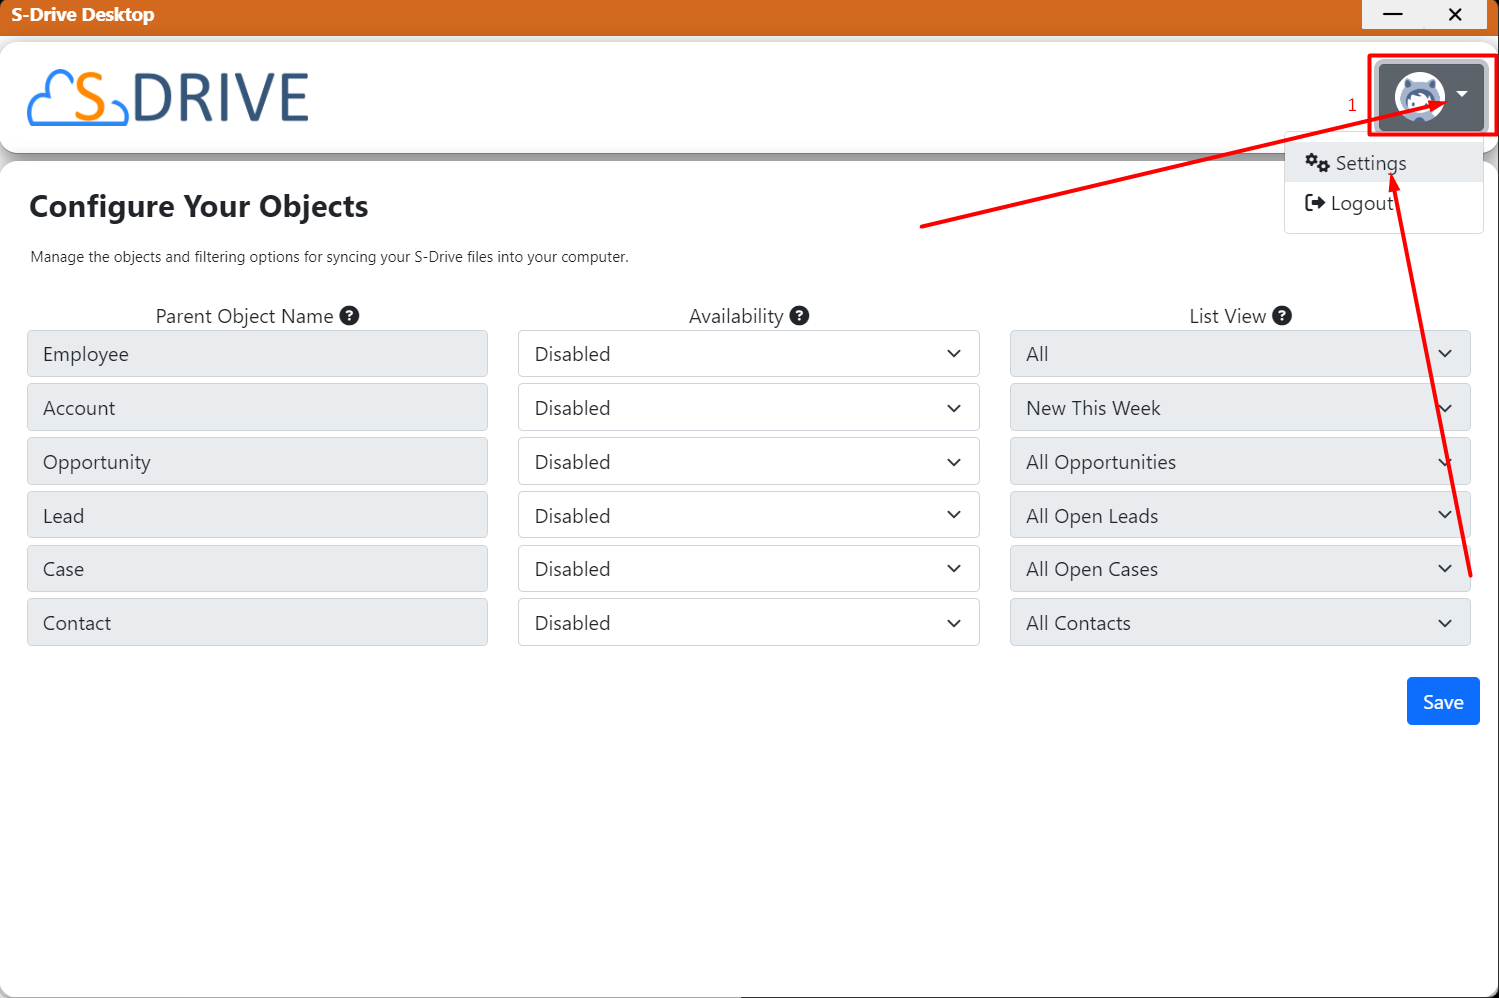
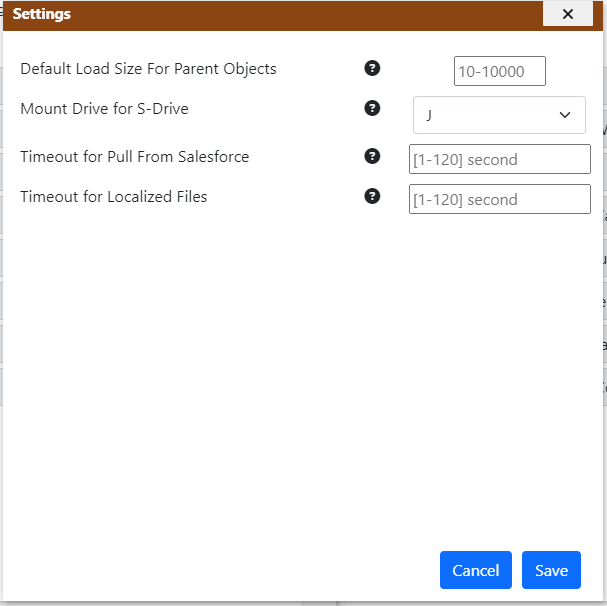
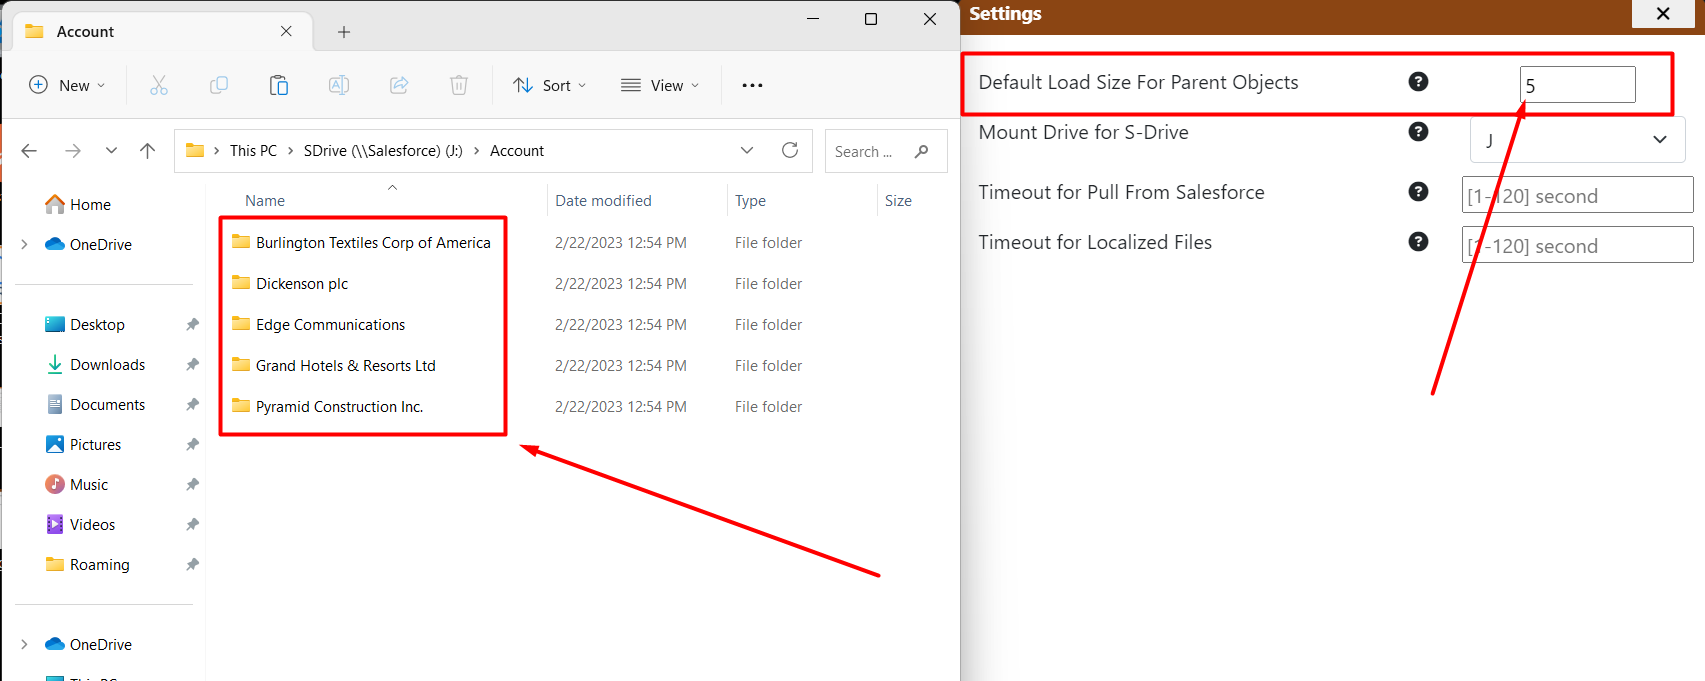
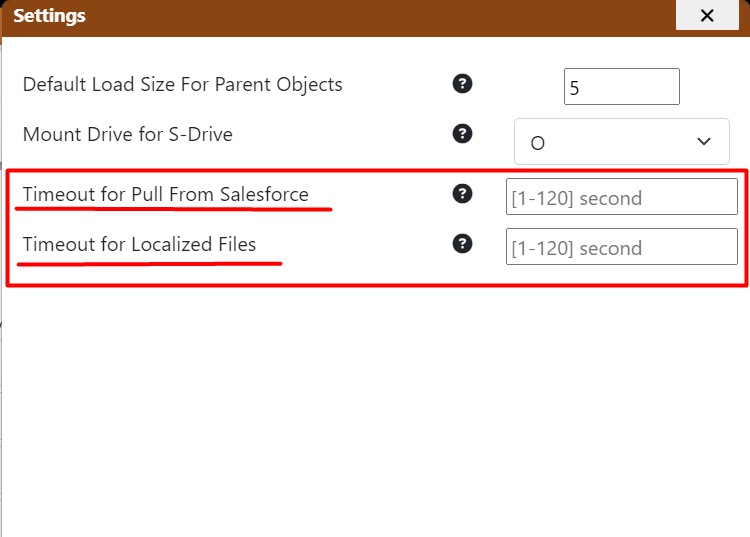
Default Load Size for Parent Object: (Default = 1000) The maximum number of Parent records that will be displayed on your Desktop Experience drive. For example, if there are 20 Account records in your selected List View (see Choose Records to Sync below) and this setting is set to 10, then only 5 Accounts will be shown.
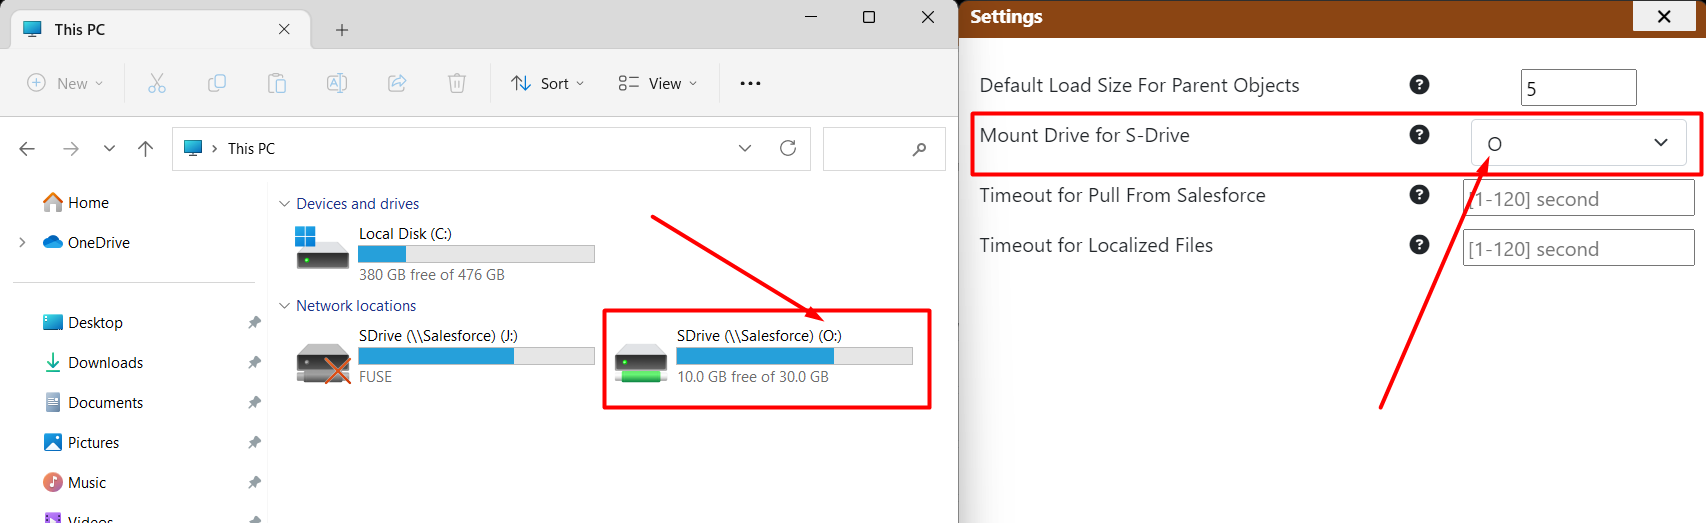
Mount Drive For S-Drive: You can change the drive for the Desktop Experience. For example, if you selects ‘O' as Mount Drive, you’ll see that the previous selection is disconnected.
Timeout for Pull From Salesforce and Timeout for Localized Files: (Default = 30) Maximum wait time before the operation times out.
If the user's response to the request from Salesforce or Local exceeds the specified time frame, the transaction becomes can be specified as a timeout.
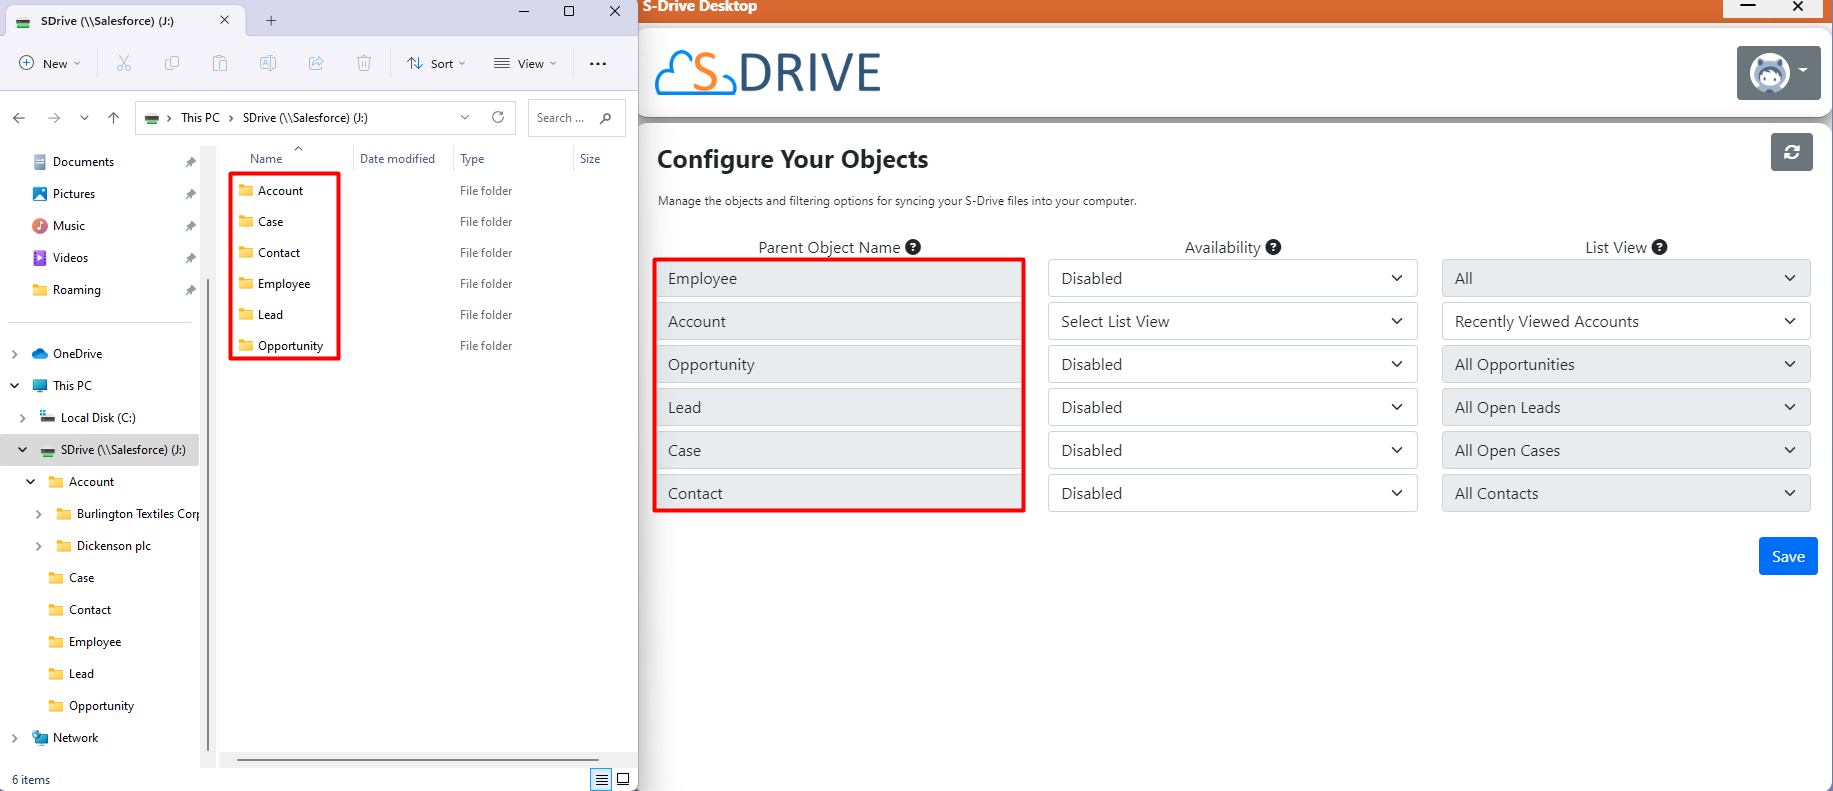
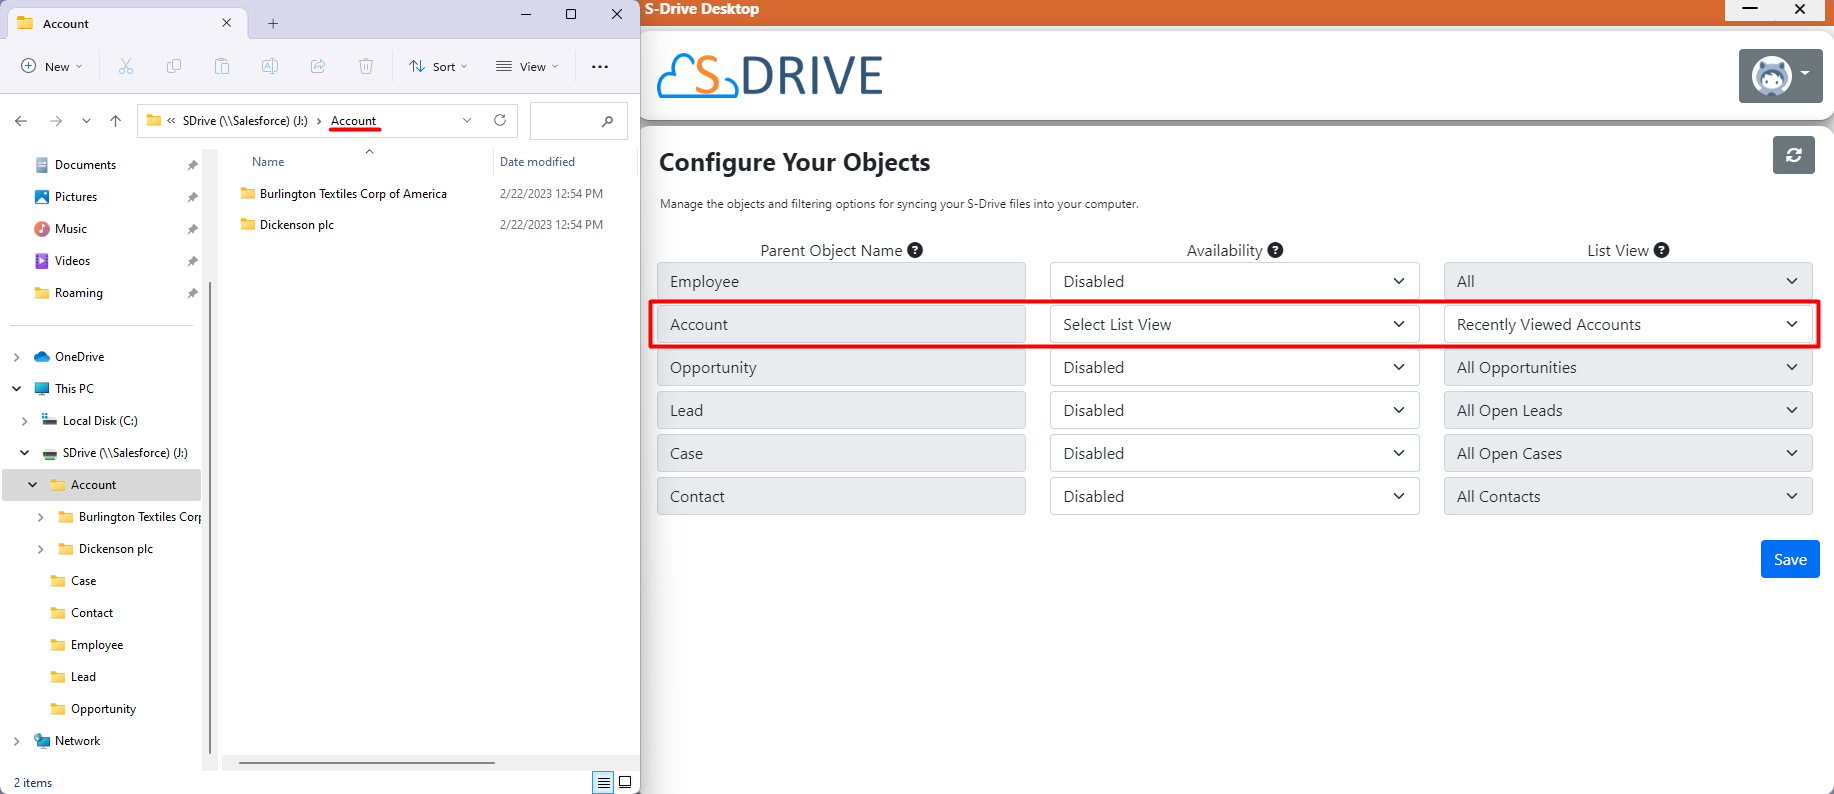
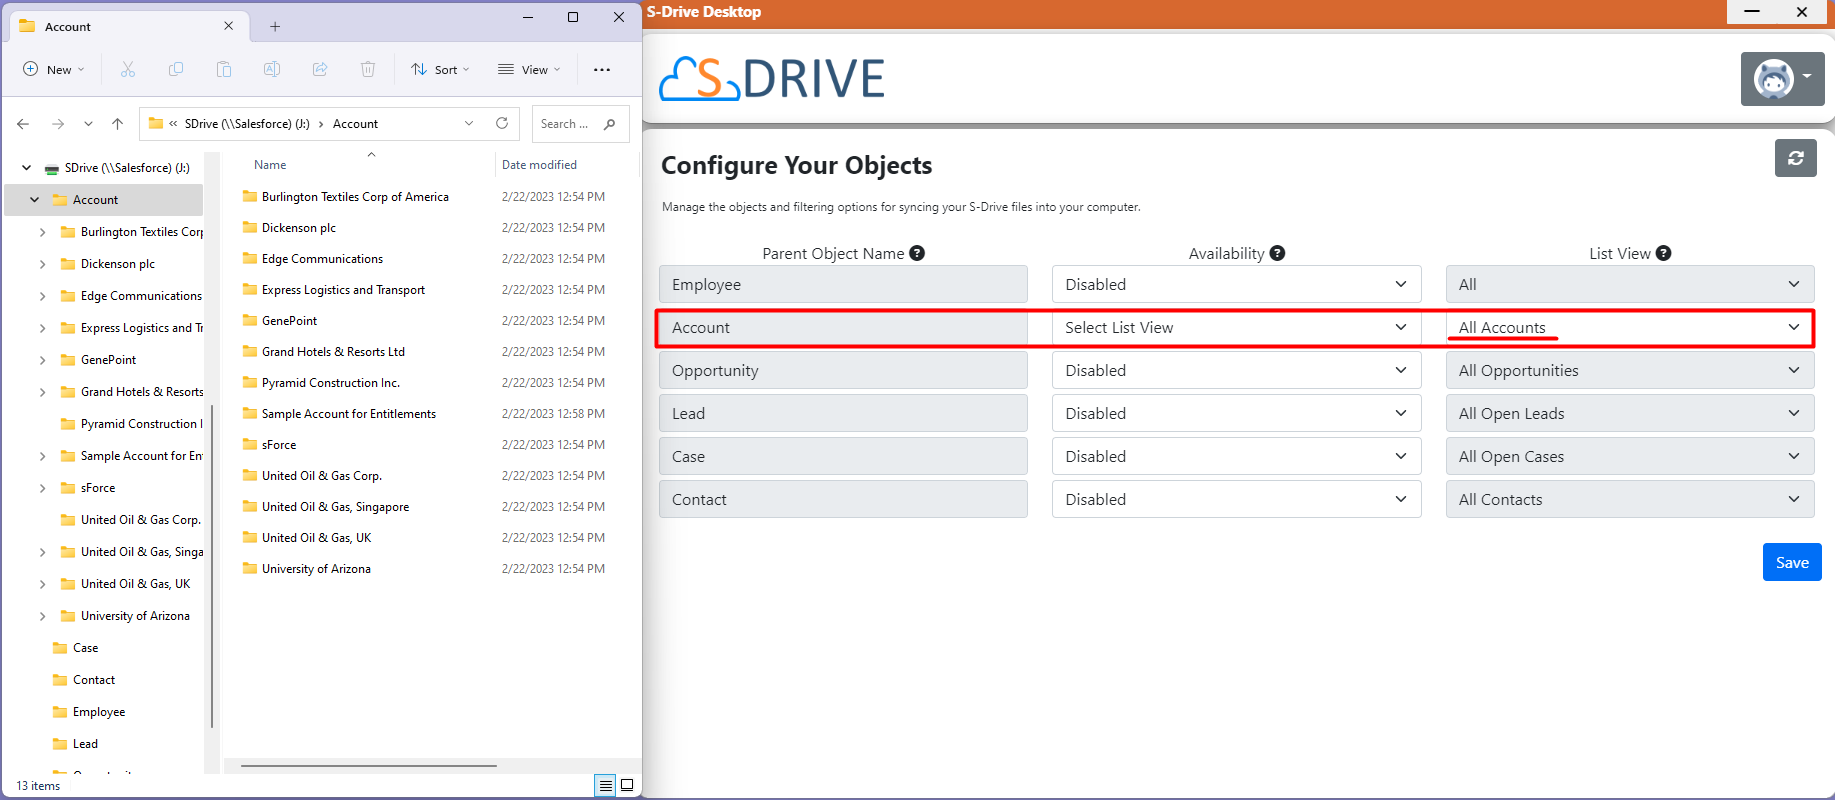
Choose Filters to Specify Records to Sync
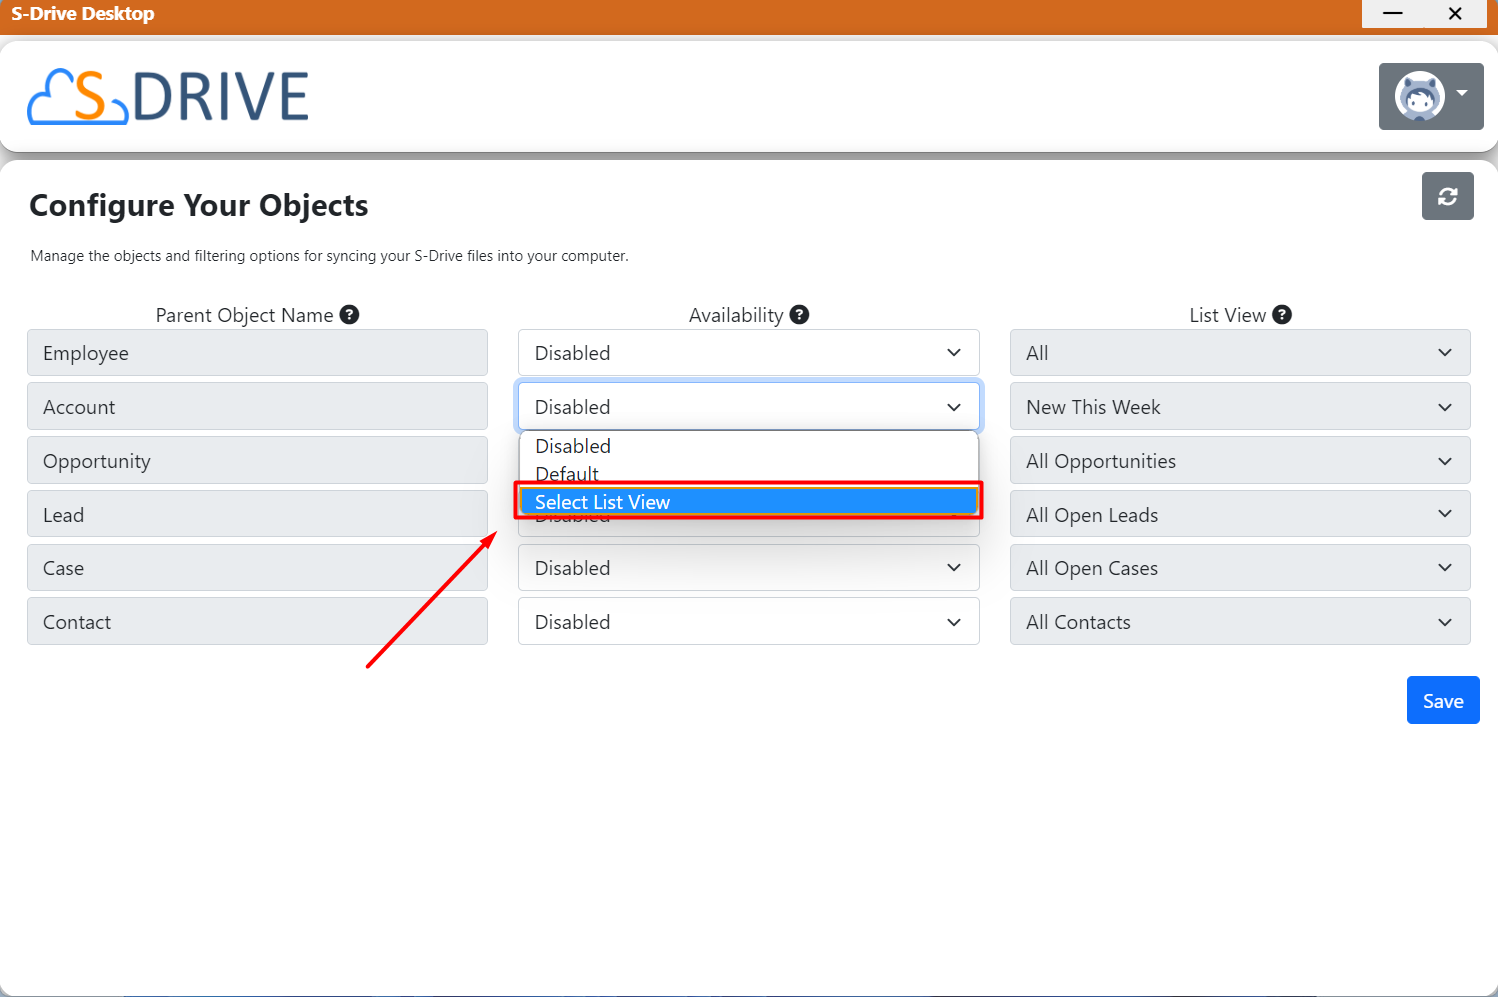
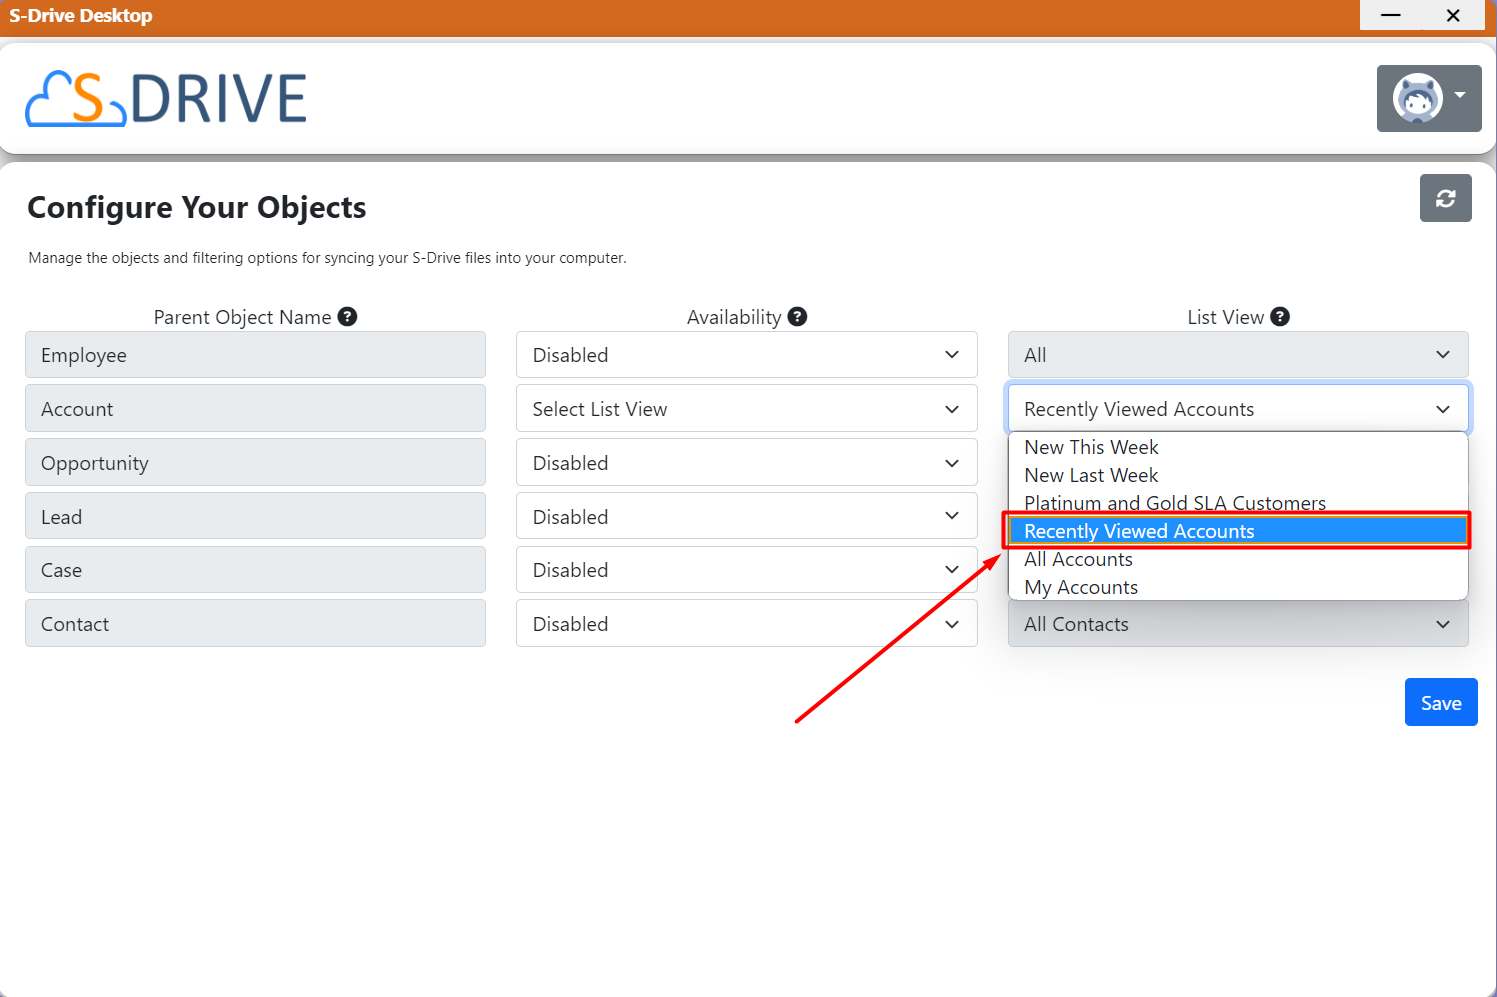
On the Configuration Page, you are shown the list of parent objects that have related S-Drive file objects.
For each object, you must choose which records to sync to the Desktop Experience. These are the records you’ll be able to view. Choosing a subset of records is necessary to avoid syncing thousands of files unnecessarily.
The maximum number of records that you can sync for an object is 10,000. You can choose the maximum number under Settings. The default setting is 1000.
You have the option to filter using list views that are set up in your Salesforce Org. The list view filters will be applied for syncing the records.
Example: If you have a list view called “My US Accounts” on Salesforce, which shows Accounts that have “Country = US”, you’ll only see the records that match that criterion.
For each object, choose the Availability:
Disabled: no records will be synced for this object. No records will be able to be viewed on your desktop.
Default: Shows the number of records specified in the settings for Default Load Size for Parent Objects.
Select List View: Allows you to choose a List View from the 3rd column. List Views are defined in your Salesforce Org. The number of records shown is limited to the number in the Default Load Size for Parent Objects setting.
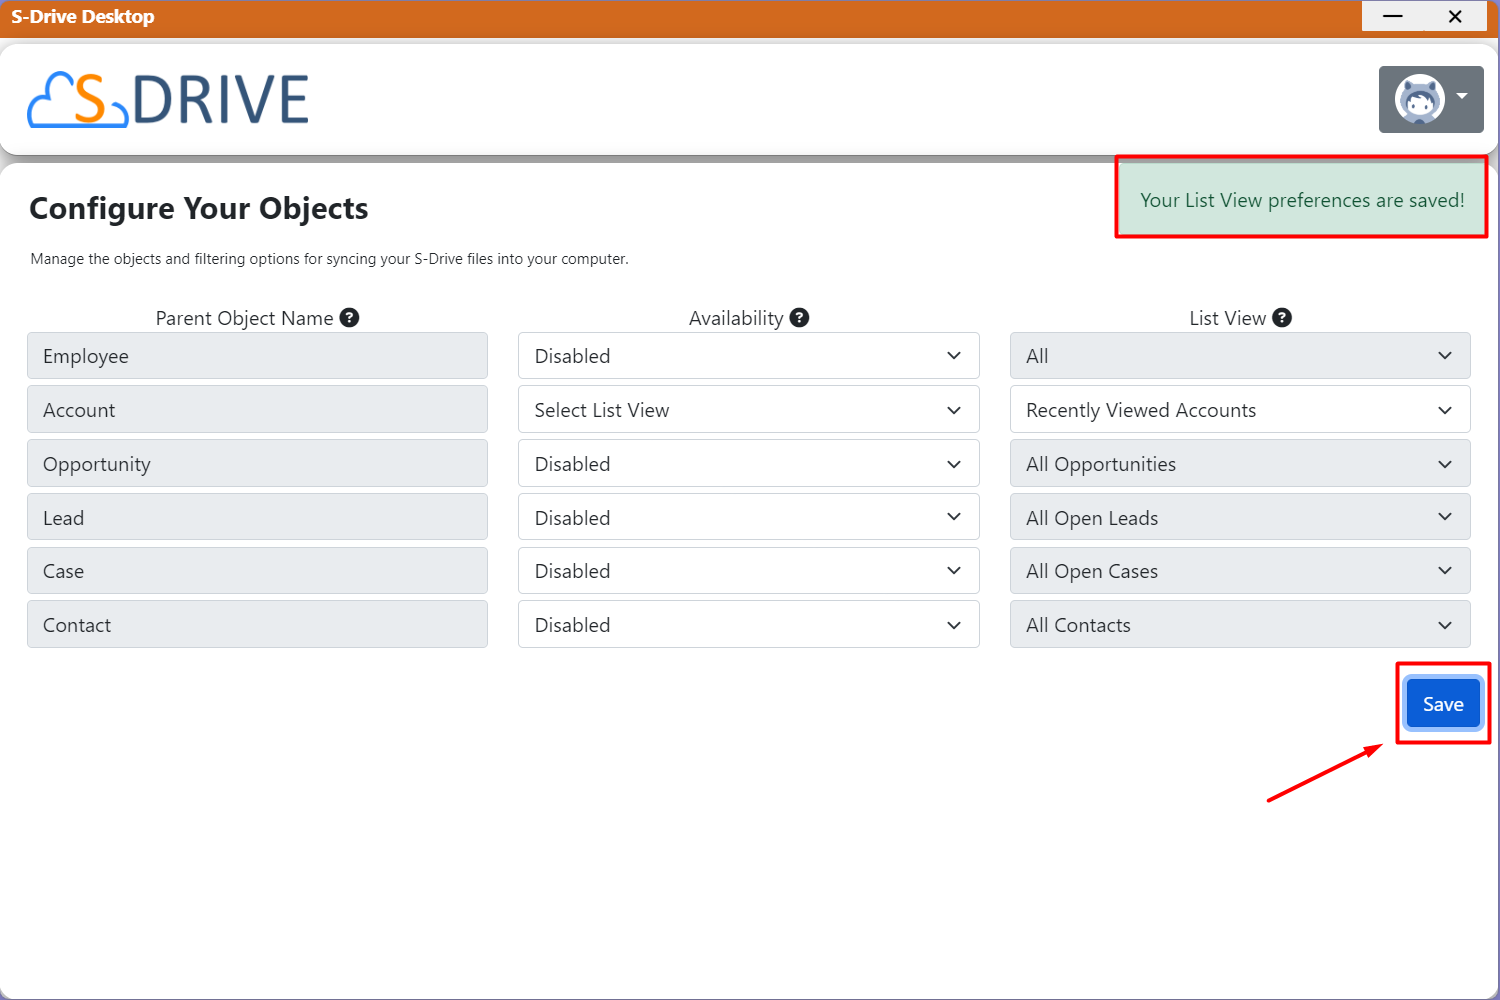
Click Save.
The maximum number of records that you can sync for an object is 10,000.
If this is the first time logging in, your files will be synced. If you’ve made a change, click the refresh button near the top right to re-sync.
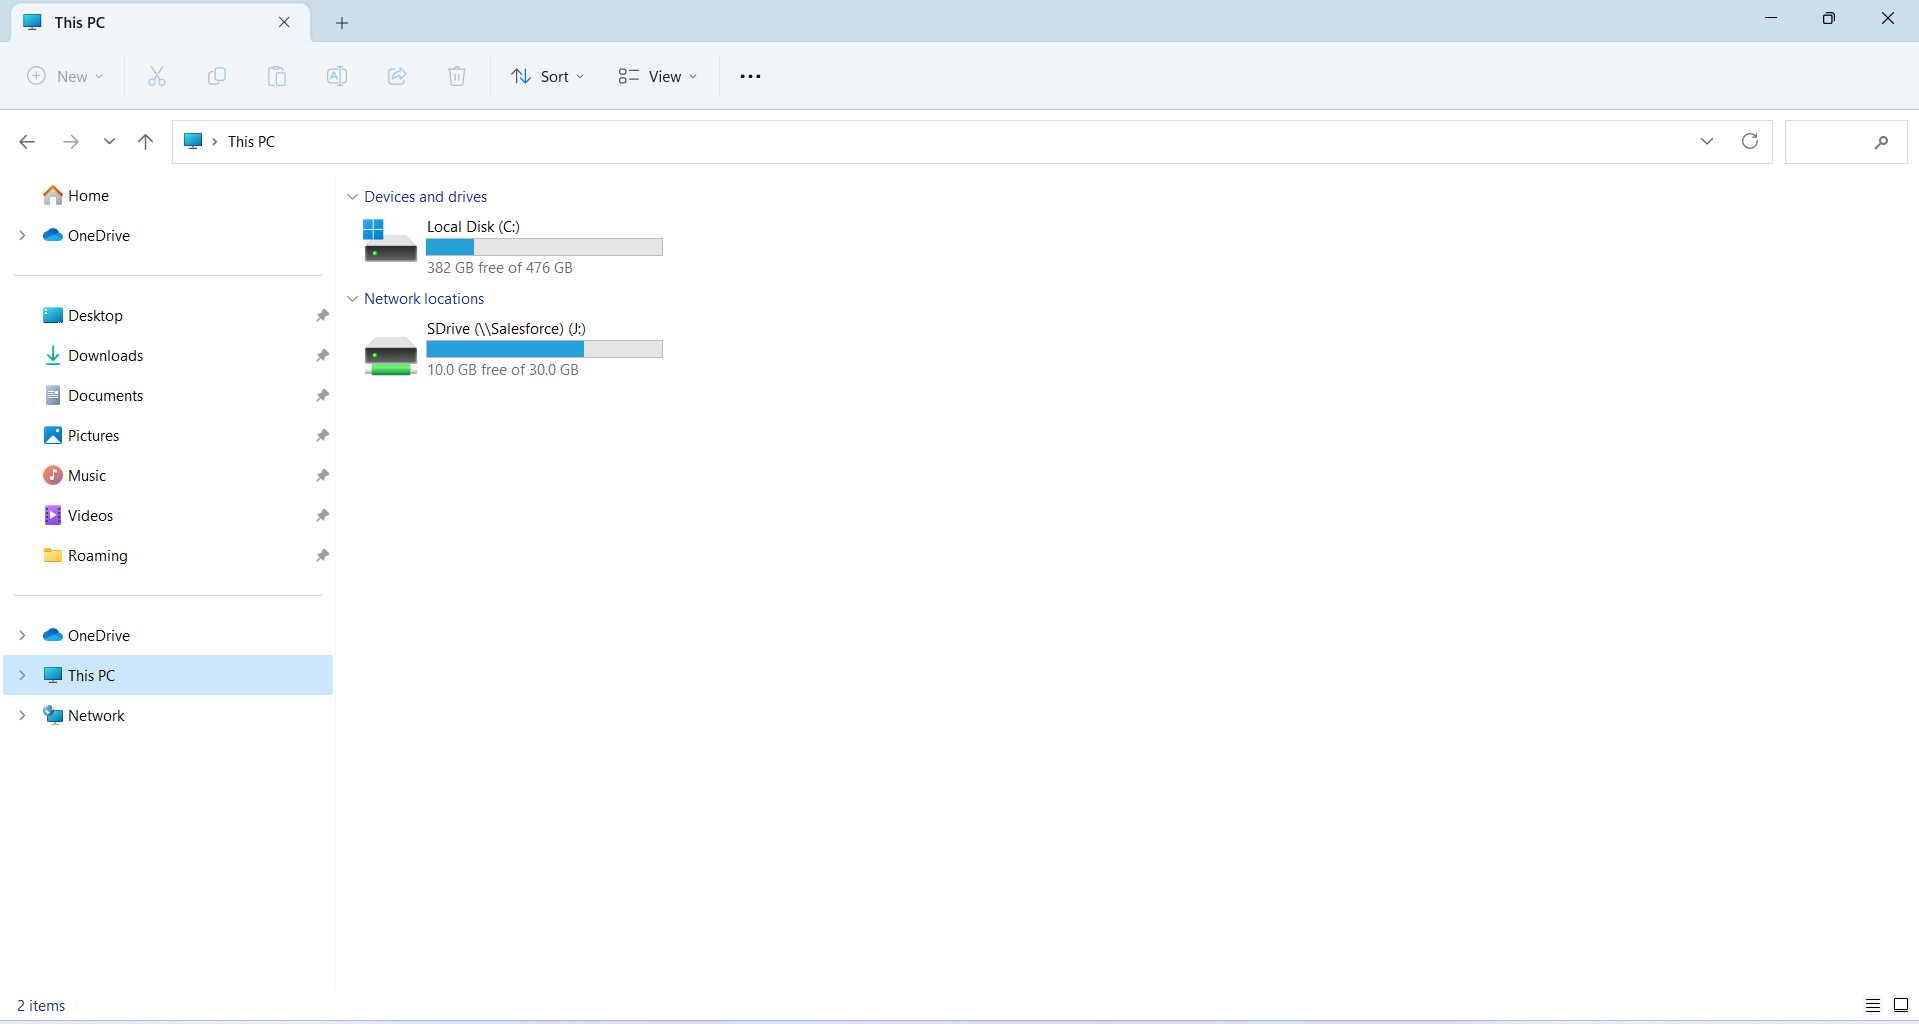
View Synced Records on your Desktop
Navigate to the S-Drive drive to view and work with your S-Drive files and folders. The hierarchy for seeing your Salesforce data is Parent Object-->File Object-->Files as shown in the following steps.
Click on the S-Drive Desktop Experience Driver.
2. See all of the parent objects related to your org.
3. See and change the list view types according to their S-Drive settings.
Allowed Operations in Desktop Experience
Operations performed in the Desktop Experience are synced to S-Drive in Salesforce and operations performed in S-Drive in Salesforce are synced to the Desktop Experience. Files uploaded in one place will show in the other and files deleted in one place will be deleted from the other.
You can perform the following S-Drive operations using the Desktop Experience.
Download
In the S-Drive Desktop Experience drive, navigate to the file you want to download. The download takes place under two conditions. 1) The file can be downloaded with a hovering action over the file. 2) The file can also be downloaded with just one click on the file (It does not matter if it is a right click or left click).
The download progress can be viewed on the upload-download tray. See Tray Icon and Notifications Panel below.
Open
Navigate to the file you want to open and either double-click on it or right-click on it and select open, just as you would in Windows.

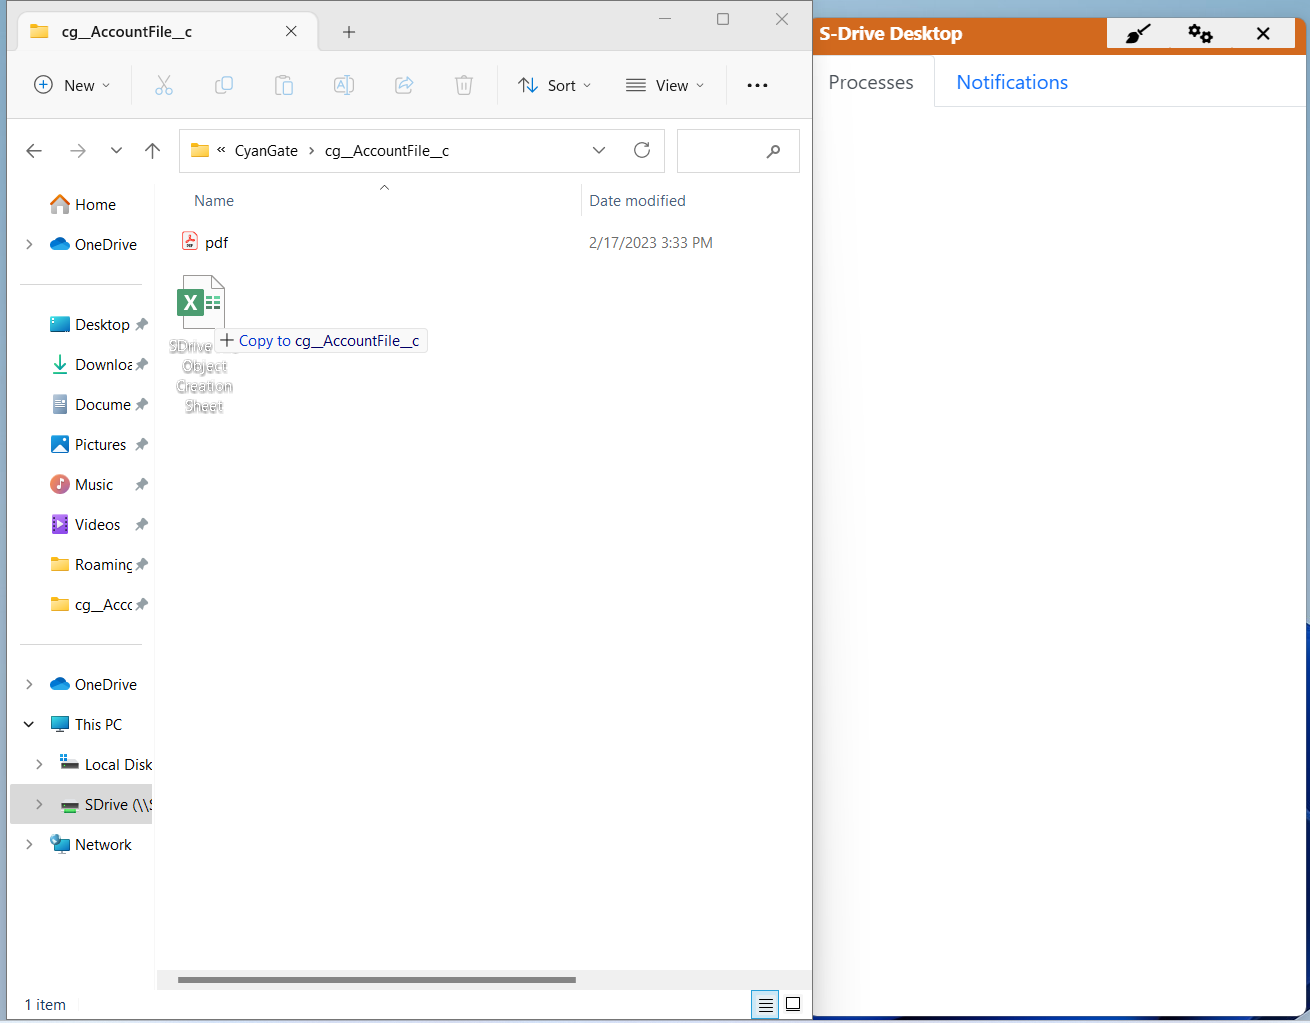
Upload
To upload, copy a file to the desired location in the Desktop Experience. You can upload with the right click and Copy function, as well as with the file drag option.
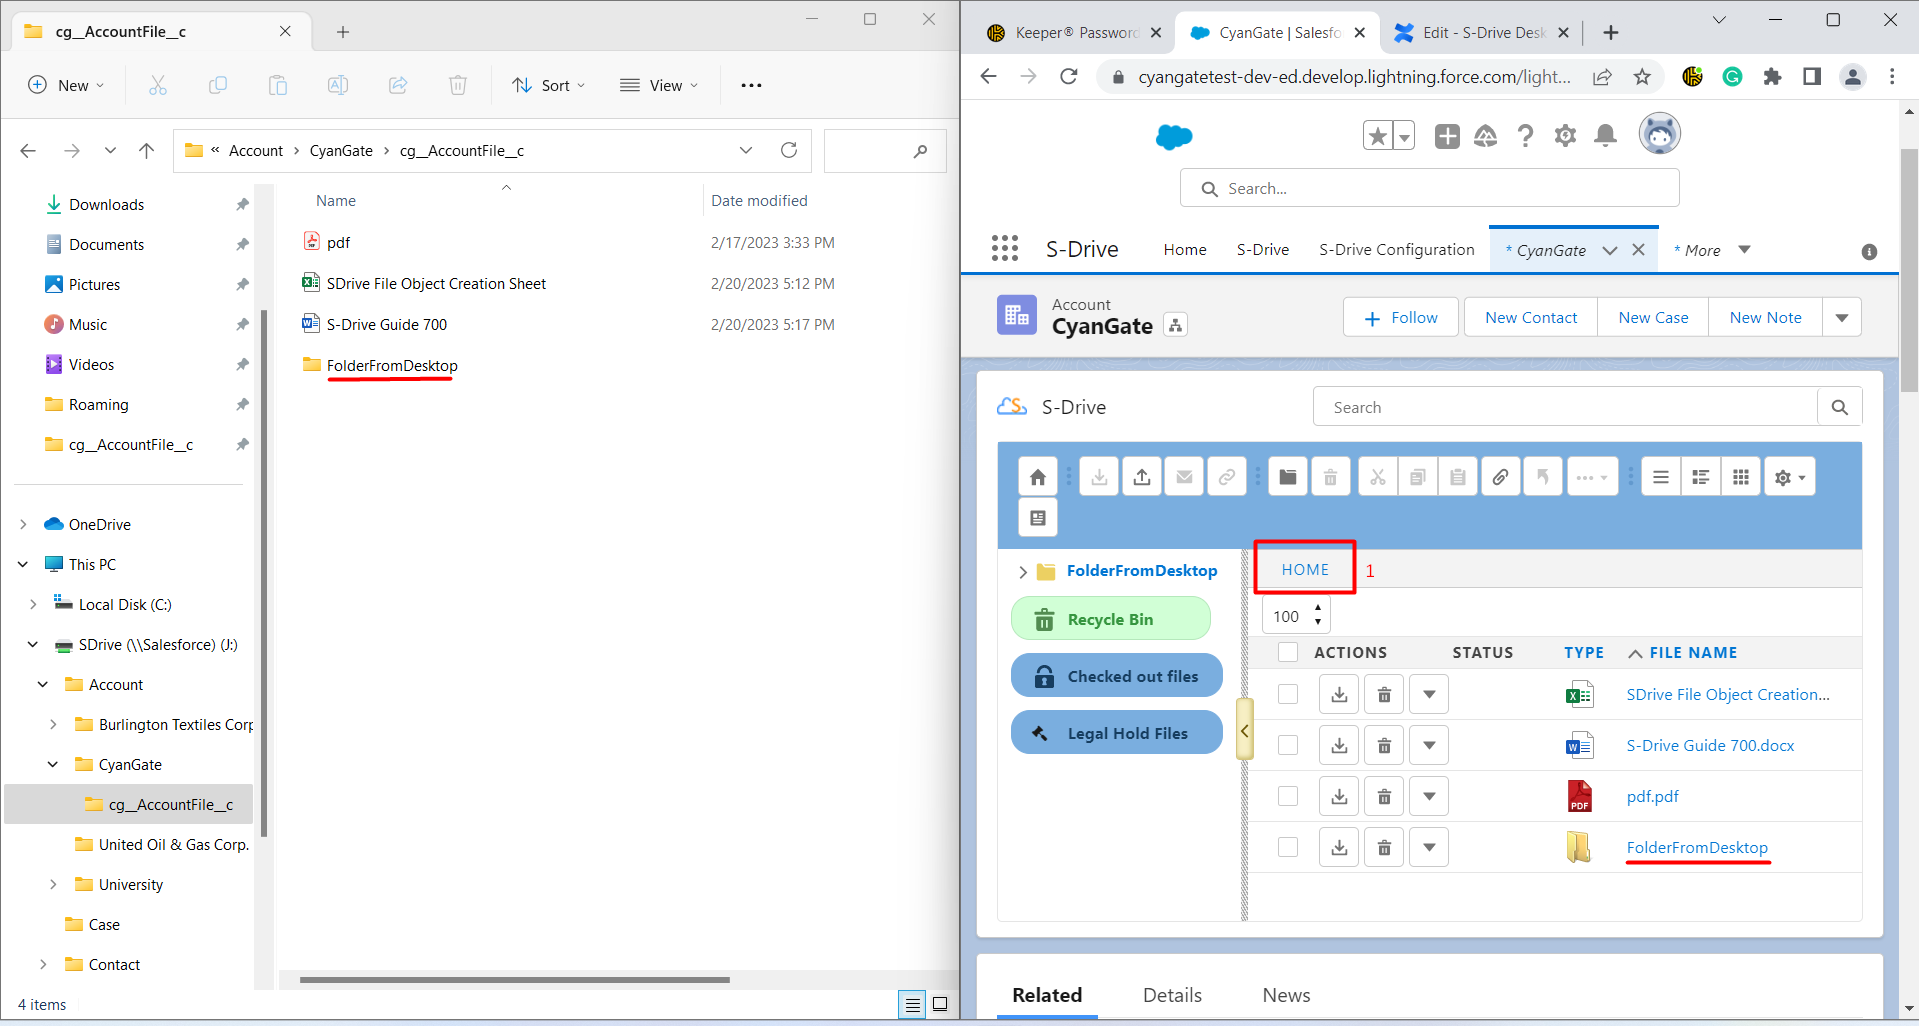
Create Folders
On the Desktop Experience, navigate to where you want to create a new folder. Create a new folder as you normally would in Windows by right-clicking and clicking New-->Folder. The folder will be synced to S-Drive on the same record internally as seen here.
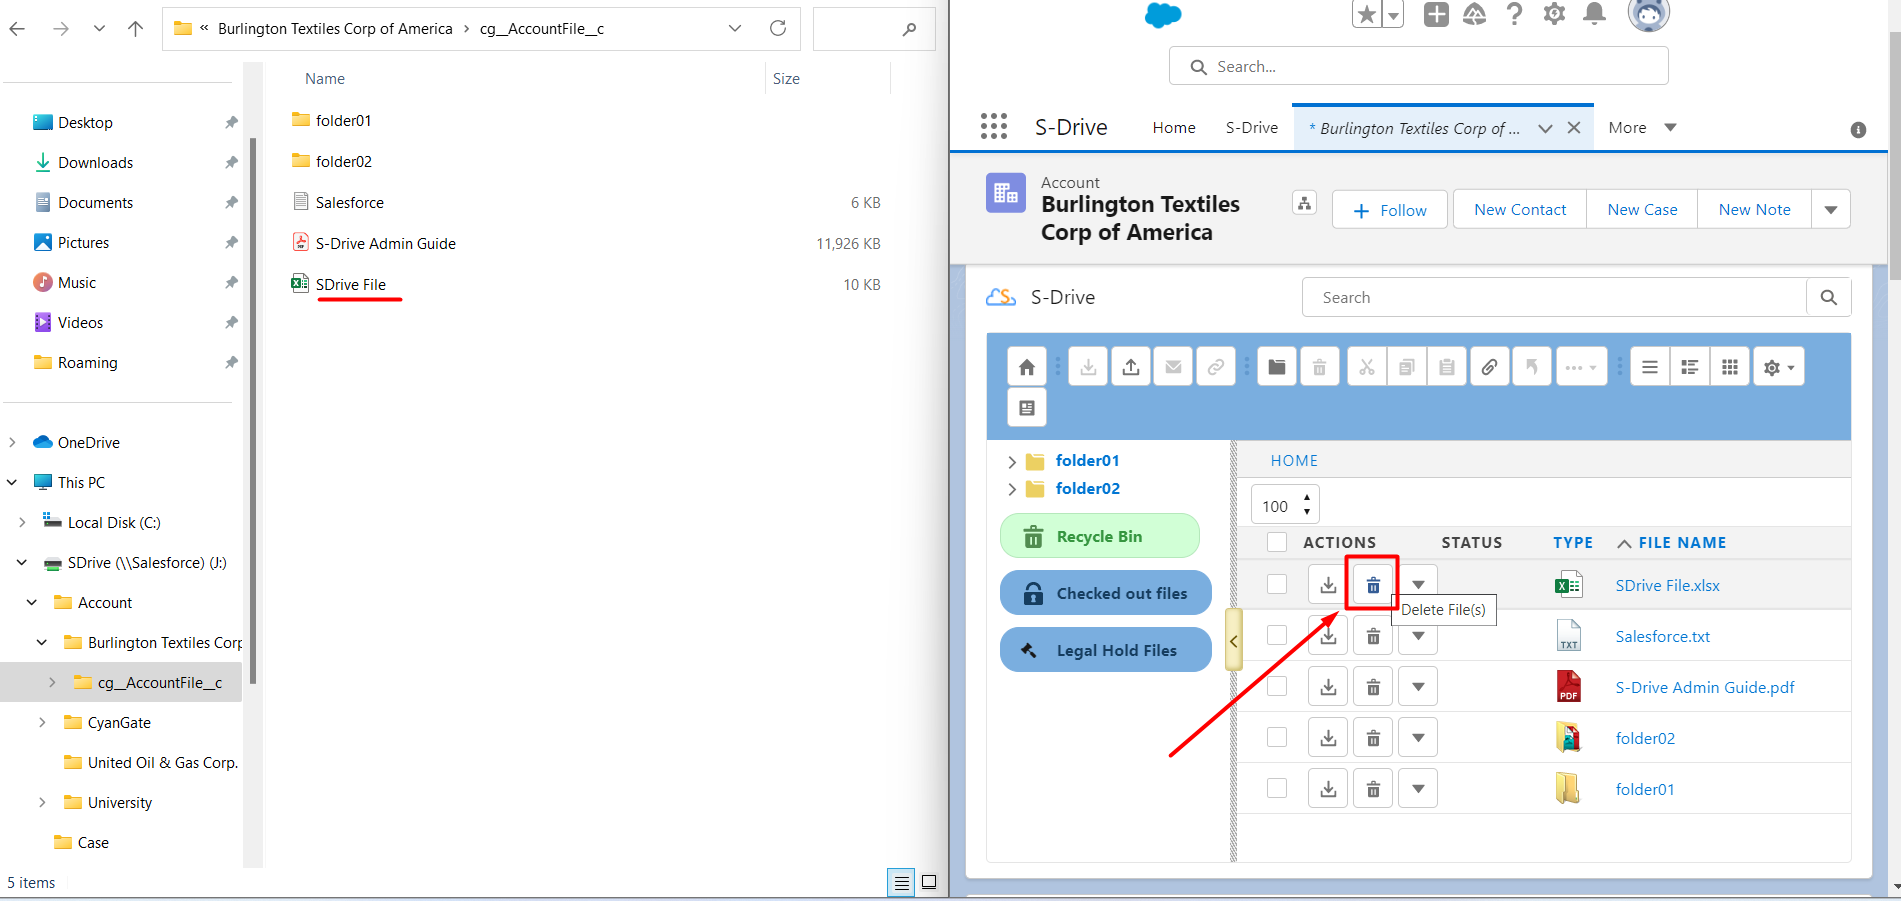
Delete
To delete a file, right-click on the file and select Delete. The file will be deleted from the view on the Desktop Experience. In Salesforce, the file will be moved to the S-Drive recycle bin.
Files can only be restored by logging into Salesforce and restoring the file from the S-Drive recycle bin. Files cannot be restored using the Desktop Experience.
Move/Copy
You can move or copy files from one folder to another on the same or different record by dragging them from one folder to another.
Settings and permissions needed for move/copy
To move files, users need DELETE permission on the file object, as it is deleted from one location and added to the new location.
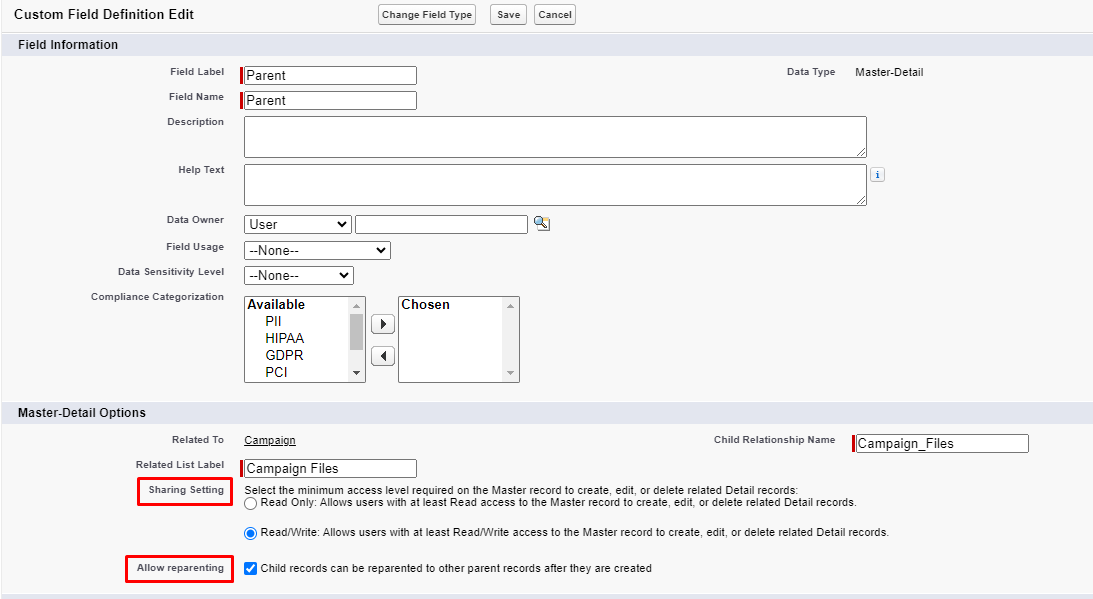
If you are using a custom file object (i.e. not our out of the box objects: Account File, Case File, Contact File, Opportunity File, Lead File) and your file object has a master-detail relationship to the parent:
You must either set the sharing setting to need read only on the Master or you must give Edit permission on the Master object in your users' profiles
You must check the Allow reparenting box
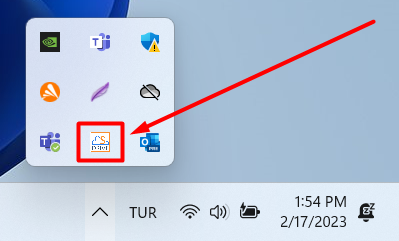
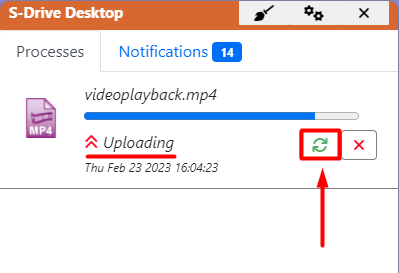
System Tray and Notifications Panel
You can check the progress of uploads and downloads from the notifications panel on the taskbar.
To open the System Tray, click on the up arrow on the taskbar.

Click on the S-Drive icon.
When you open the Tray Window and Process Panel, you will see tabs for Processes and Notifications.
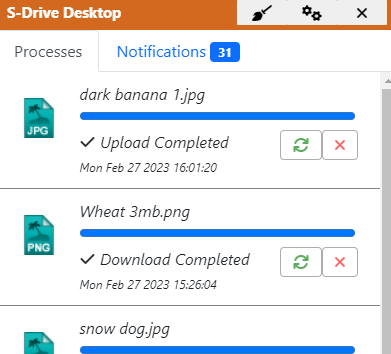
Processes show you uploads and downloads with a progress bar as they happen. Notifications show a success or failure message.
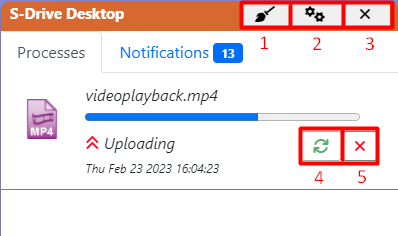
There are several buttons at the top as shown in the image below. 1) Clear Jobs: It will clear all the processes and all the notifications. 2) Open Configurations: It will open the Configure Your Objects page where you see all your objects. 3) Close: It will close Tray Window. 4) Retry: After canceling the upload process, you can re-upload with this button. 5) Cancel: You can cancel the uploading process.
If you want to proceed with the uploading process later, you can simply click on the cancel button. You should see the Upload Cancelled info message below the uploading folder.
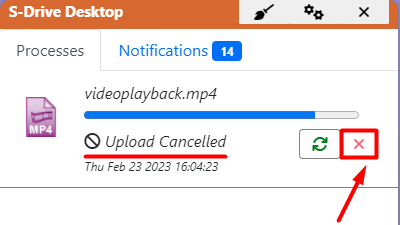
If you want to restart the uploading process, you can simply click on the Retry button next to the Cancel button. You will see the Uploading message again when the process started.
When we look at the Notifications Panel, we can see the important updates about your upload and download processes.

When you click on the Clear Jobs button, it will clear all the notifications and process files.
Limitations of the Desktop Experience
The software has some limitation that is related to Salesforce, S-Drive or Operating System.
S-Drive Desktop uses Salesforce APIs, therefore API limits on organizations are hard limit for usage
S-Drive Desktop stores the files on your computer under %appdata% when you reach them from the mounted drive. So free disk space is limitation for storing hard copy of files
S-Drive Desktop does not support Windows shortcuts or S-Drive shortcuts. We will be adding this in future releases.
Cut/Copy has some inconsistent flows that we are working on.
S-Drive Desktop does not allow the creation of parent objects (Account, Case etc.) from operating system via creating folders.