Multi-Bucket Support
Multi-Bucket Support allows multiple AWS buckets to be configured in S-Drive. Files can be uploaded to a particular bucket either on the fly or based on rules you create. Each time a file is uploaded, the user can either choose a bucket by filling in a field on the upload page, or the file will automatically be uploaded to a particular bucket based on some criteria you set up. If no bucket is specified, the file will go to the default bucket, which is defined by you.
For each file object (AccountFile, ContactFile, etc) including custom file objects, you can create a field to specify which bucket files will be uploaded to. You can use a formula field to create rules to determine what bucket to upload to, or you can use a checkbox, picklist, text field, number field, etc to select the bucket.
Each time a file is uploaded, the bucket field will be read and the file will be uploaded to the specified bucket. The bucket the file is uploaded to is then saved in Bucket Id field so the file can be retrieved.
Changing a bucket rule after files have been uploaded may have unintended consequences.
Old files will still reside in the originally-defined bucket (but will be accessible). If there is an assumption that all files on a record are in the same bucket, that may not be true if bucket rules are changed.
New version uploads do not follow bucket rules. If the rule changes, a new version will be uploaded to wherever the original file is, not where the new rule specifies.
Use Cases
Files may need to be stored in buckets based that reside in different regions, based on the region of the Account
Files may need to be in different buckets based on security classification based on the file itself.
Setting up Multiple Buckets
Setting up Multiple Buckets has three steps:
Set up your buckets
Create a field on the file object that will determine which bucket is used
Specify that field in S-Drive Configuration
1. Set up your Buckets
If you are newly installing S-Drive, multiple buckets can be set up during installation. See Installing and Activating S-Drive for more information.
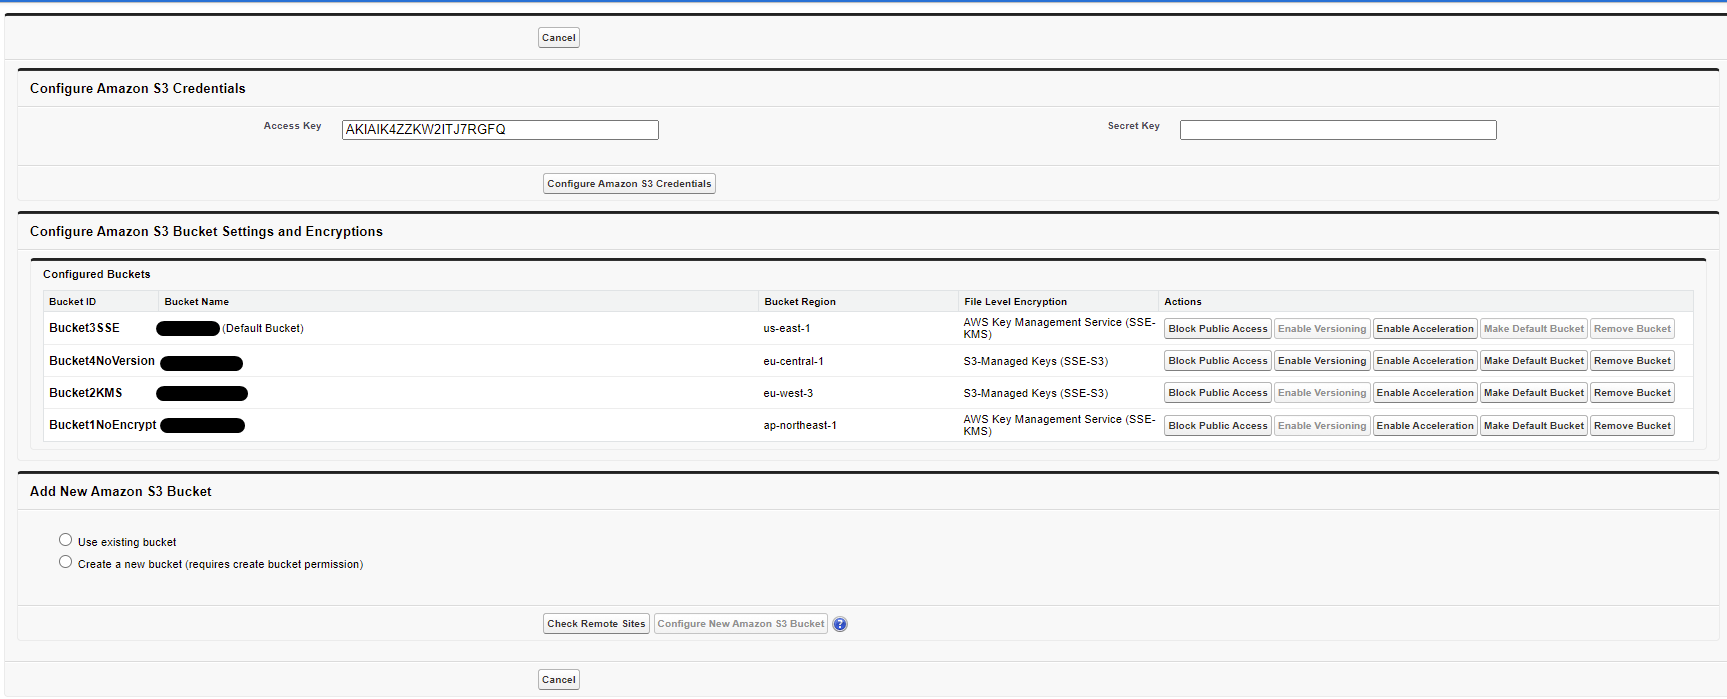
You create and manage buckets on S-Drive Configuration “S-Drive Authentication Settings” Tab

Add buckets by choosing Use existing bucket or Create a new bucket

The Bucket Id field is a text field up to 40 characters and must be unique among all your buckets. This Id will be used in the bucket field you set up on the file object. For example, if your bucket field is a picklist, the picklist values need to be the bucket ids. The bucket id can be the same as the bucket name.
2. Create a Bucket Field on the file object
The Bucket field is defined on the file object, such as Account File, Case File, etc. We’ll use Account Files as an example here. This is a different field than the Bucket Id field that already exists on our out-of-the-box file objects (Account File, Contact File, Opportunity File, Lead File, and Case File) or that you created on your Custom File Objects.
Go to Setup->Object Manager->Account Files
Go to Fields and Relationships
Click New to create a new field
Choose what type of field it is, such as Text, Formula, Picklist.
Give your field a name (ex: Bucket To Upload To)
You can choose a default value if you wish, or you can choose to populate the Bucket To Upload To field on each file you upload
Once you’ve finished, click Save
Examples of Bucket fields
Formula field based on fields on the Parent object: Your bucket field could be a formula field based on a checkbox or other field on the Parent.
You might have Accounts with government entities whose files will be stored in a government bucket, while other Accounts' files will be stored in a non-government bucket. You have two buckets with Bucked Ids of “govbucket” and “nongovbucket”. Create a checkbox on Account called “Is_government_account__c”. Your bucket field on Account File would be a formula like this:IF(cg__account__c.Is_government_account__c, govbucket, nongovbucket).
Formula field based on fields on the file object: You may have a formula based on criteria on the file itself.
For example, create a checkbox on Account Files called Restricted__c. Add that field to the upload page (via S-Drive Configuration Customization Settings) and check it if you are uploading a restricted file. Your bucket field on Account File would be a formula like this:IF(Restricted__c, restrictedt-bucket, non-restricted-bucket).Formula field based on User’s Profile: You may have have some profiles that always upload to one bucket and some that always upload to another bucket.
Files uploaded by users with one profile will go to one bucket, while files uploaded by users with another profile will go to another bucket. The formula would be:IF($Profile.Name = 'System Administrator', 'Bucket1', 'Bucket2')Picklist on file object: Your bucket field could simply be a picklist of buckets.
Have a picklist field with your bucket ids as values. Add the field to the upload page (via S-Drive Configuration Customization Settings.) When you upload a file, choose the bucket from the picklist.
3. Specify the bucket field in S-Drive Configuration
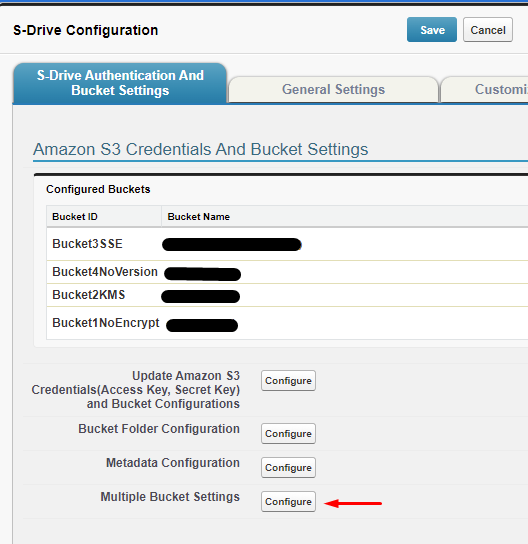
Go to S-Drive Configuration “S-Drive Authentication And Bucket Settings” Tab
Next to Multiple Bucket Setting, click Configure.

This will open the following page:

The Bucket Name Field is the field you created in step 1 above. Fill in the API field name and click the “Enabled” checkbox.
Click Save
Uploading files
When uploading files, if no bucket is selected, the file will be uploaded to the default bucket, which is chosen during bucket setup.
How Multi-Bucket support works with other features
Upload with duplicates not allowed: Duplicate names are checked on a per-record/per folder basis. If you upload a file of the same name as one that already exists, to the same folder but to a different bucket, that file will still be considered a duplicate and will give you an overwrite option. For example, if you have an Account File called FileA on AccountA in Bucket1, and you try to upload FileA on AccountA into Bucket2, you will get a duplicate warning. If you choose to “overwrite”, the old FileA will be deleted from Bucket1 and the new FileA will be uploaded to Bucket2.
Versioning: New versions are uploaded to the bucket where the original version resides.
Changing bucket rules may have unintended consequences. New version uploads do not follow bucket rules. If the rule changes, a new version will be uploaded to wherever the original file is, not where the new rule specifies.
Example:
You have an Account that specifies files are uploaded to North American bucket, and files are uploaded.
It is then determined that this Account should be using a European bucket and the bucket rule is changed.
Old files can still be retrieved, but will still reside in the NA bucket
If new versions of old files are uploaded, they will be put in the NA bucket
New files will be put in the EU bucket
File Sync: File Sync only syncs files to the Default Bucket.
File Sync does not support multiple buckets.
Preview and Thumbnail: Previews and Thumbnails are generated for files as expected and reside in the bucket along with the file.
Zip and Download: files from different buckets can be downloaded together into a zip file
Shortcuts: Shortcuts are pointers to files and are not stored in any bucket. A shortcut will point to the underlying file regardless of what bucket it is in. Note; You could have a record with files that are all in Bucket1, but that same record could have a shortcut to a file in Bucket2.
Copy/Paste: The file will be put in the bucket selected according to the bucket field when pasted.
Possible unintended results:
When a file is copied and pasted (which is only allowed between folders within the same parent record), a new file record is created and the file is uploaded to the destination folder. If the way you choose the upload bucket is by manually selecting from a picklist or using a checkbox during upload, this won’t work with copy/paste. Pasting does not give you the opportunity to select from a picklist or check a box and the bucket field from the original S-Drive file record is not copied to the new file record.
Example:
Your bucket field is a picklist field that lists your bucket ids: Bucket1, Bucket2, Bucket3. The default picklist value is Bucket1.
You have folders called Folder1, Folder2, Folder3. Users are expected to choose Bucket1 if they are uploading to Folder1, etc.
You upload a file to Folder2 and choose Bucket2.
You copy the file from Folder2 and paste it in Folder3. You are not able to choose a bucket when you paste.
Result: the file will go to Bucket1 because the default picklist value is Bucket1. If there is no default picklist value, the file will be uploaded to whichever bucket is designated as the default bucket.
Cut/Paste: The file will be put in the bucket selected according to the bucket field when pasted.
Possible unintended results:
When a file is cut and pasted, (which is only allowed between folders within the same parent record) only the Parent Folder Id field is changed to reflect the new folder. The bucket id field is not changed. A file that is cut and pasted will always remain in the same bucket.
Example:
You have a bucket field on Account File that is a formula field based on the parent folder record id.
Files uploaded to Folder1 are put in Bucket1. Files uploaded to Folder2 are put in Bucket2.
You cut a file from Folder1 and paste it in Folder2.
Result: The file remains in Bucket1, but shows up in Folder2.
Copy URL: creates a link to the file that points to the correct bucket
Public Share: Gives access to files across multiple buckets
Enable copying S-Drive files and folders when Converting Leads: Lead files that are copied to Account, Contact, and/or Opportunity using this S-Drive feature are copied to the same bucket as the original Lead File.
