
Classic Override Page for S-Drive
In order to display S-Drive files in Classic, you need to create a custom object file's Visualforce page. This page can be used to override the object's view, or it also can be used as an inline section for the object's layout. At the end of this section, use cases for both scenarios will be displayed.
To create an object file page, follow these steps:
Go to Setup > App Setup -> Develop> Pages and click the New button at the top of the page
In the "Page Edit" screen you'll create your new page. Give an appropriate name to your page. For our example, we will use "MyExamplePage". Type "MyExamplePage" inside Label field (a). Type "MyExamplePage" inside Name field (b).
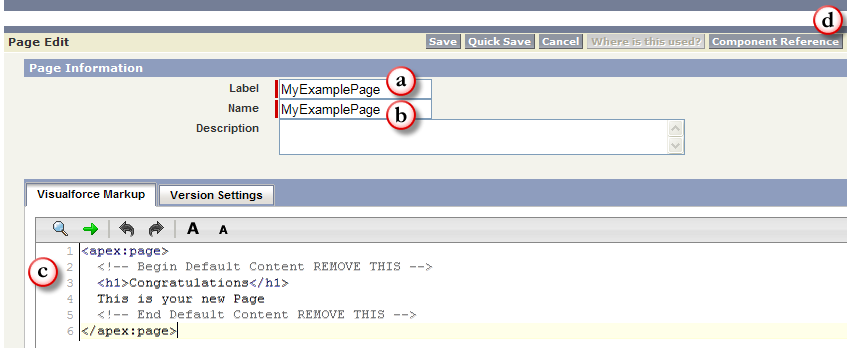
You need to set the "Salesforce.com API" version to 22.0 or above to use S-Drive 2.0 features. To set the version number click the "Version Settings" tab next to the "Visualforce Markup" tab and change the version number from drop- down.

In the Visualforce Markup, add the following code. The attributes are explained at the bottom of this page.
CODE<apex:page standardController="My_Example_Object_c" tabStyle="My_Example_Object_c"> <cg:AttachmentComponent title="My Example Object Files" customObjectName="My_Example_Object__c" customObjectFileName="My_Example_Object_File__c" objectId="{!Id}" objectNamespacePrefix="mynamespaceprefix__" fileNamespacePrefix="mynamespaceprefix __" enableCopyURL="true/false" enableDelete="true/false" enableDownload="true/false" enableEdit="true/false" enableEmail="true/false" enableUpload="true/false" enableChatter="true/false" inline="true/false" inlineEdit="true/false" legacyIdSupport="true/false" privateEnabled="true/false" orderBy="File_Name__c" allowedFileExtensions =".avi;.txt" defaultEmailAddress="user@company.com" enableAttachFromSDriveFolders="true/false" enableFolders="true/false" relationshipName="Parent__r" pageSize="100" useUploadAsPopup="true/false" /> </apex:page>Click Save.
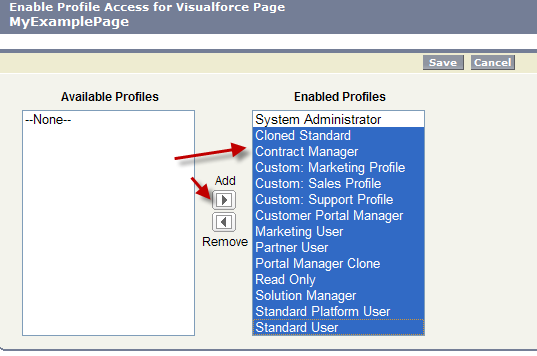
Set the security for your page on other profiles. Go to Setup -> App Setup -> Develop -> Pages and click Security link next to your page name
Move all profiles (or select based on your needs) from "Available Profiles" to "Enabled Profiles" as shown If you skip this step, your users that belong to the disabled profiles will see an “insufficient privileges” error page.
At this point, we can override the custom object's view or we can use S-Drive Attachments as an inline section in the page layout.
Overriding the View of the Object
"Overriding the view of the object" means that the page will be used as an override to the standard object page. In this case, the S-Drive Attachments section will be a section at the end of the standard page layout.
Go to Setup > App Setup -> Create> Object and click the label of your custom object. You'll see "Object Definition Detail" screen. Scroll down and find "Standard Buttons and Links" page block and click Edit action next to the View label (Figure 714-a). Then select Visualforce Page for Override With section and pick MyExampleFilePage (the custom page you created previously for this object) from the drop-down box. Click Save button to complete the override (Figure 7 14-b).

Now it will display View as Overridden in the Standard Buttons and Links section

After creating a test object, you should see "My Example Object Files" page block at the end of the object detail page (Figure 716). See "User Guide" for more information on how to use the buttons and functions in this page block.

Using as Inline Attachment
"Using as inline Attachment" means that the attachment component will be used as a section in the object's page layout. So, your customizations to the page layout won't be affected and you can append S-Drive Attachments in the page layout anywhere you would like. Please note that "inline" component attribute for the custom page must be set to "true" to use the S-Drive Attachments as inline.
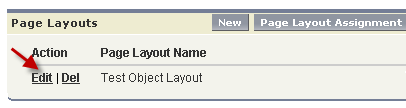
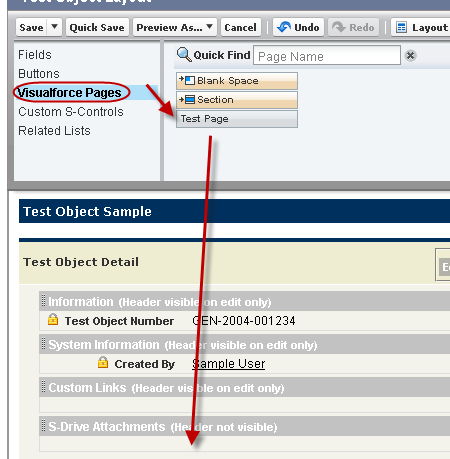
Go to Setup > App Setup -> Create> Object and click the label of your custom object. You'll see "Object Definition Detail" screen. Scroll down and find "Page Layouts" page block and click Edit action next to the main layout of the object
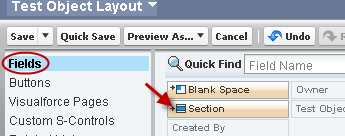
Click Fields and drag-drop a Section to an appropriate place in the layout
After dropping the "section", you'll see the properties screen for the dropped "section". Type in a section name and select if you want to display section header on "Detail Page" and "Edit Page". Also select "1-Column" for the layout. Then click OK button. You can customize these settings based on your layout needs
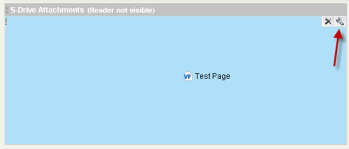
Now, go to Visualforce Pages from the top. Select the "custom page name" you created (e.g. TestPage) and drag it into the section that you created previously
fter dropping the page into the section, click the properties icon for the page on the top-right corner of the page in the section
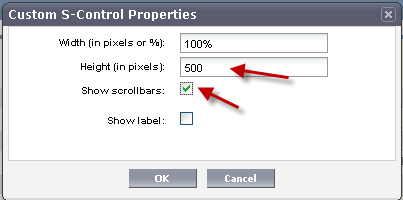
Keep "Width (in pixels or %)" as "100%", set "Height (in pixels)" to "500". And check "Show scrollbars" option. You can optionally check "Show label". Click OK button
You can use "Inline Visualforce Expander" tool to automatically resize inline S-Drive page based on the size. So if you apply this tool to inline S-Drive Attachments page, page's height will be dynamic based on the number of items in the list. For this type of a configuration we suggest you to set the "useUploadAsPopup" attachment component property to set "true". You can install the "Inline Visualforce Expander" from AppExchange: http://appexchange.salesforce.com/listingDetail?listingId=a0N30000004cEEyEAM
Save the layout by clicking the "Save" button on the left-top corner of the screen
Now if you go to your object's tab (page), you'll see the S-Drive Attachments inline in the page layout
Component Attributes
standardController You need to set this standard controller to the object that you want to use with. For our example this is the custom object name that we created: "My_Example_Object_c". As you can see from the example we appended "c" to the end of the name. This means this object is a custom object. You can use standard objects also. For standard objects you will not append "_c" at the end of the object name (e.g. Solution). Also, do not prepend your account's namespace prefix.
tabStyle This is the tab style of the page. Normally you can set it same with standardController. That means tab style will be derived from the standard controller you chose.
title (optional) This is the title of the page block inside the object page. You can set it to "Custom Object Name" Files. For our example it will be "My Example Object Files". This field is optional and if you don't provide a value for this field, it will be set as "Attached Files".
customObjectName This is the name of the custom or standard object that will be the object that the files will be attached to. For our example, it is "My_Example_Object_c". If this is a custom object you need to append "c" to the end of the name. If this is a standard object you won't append "_c" at the end of the object name (eg. Solution). Also do not prepend your account's namespace prefix.
customObjectFileName This is the name of the S-Drive file object that we created in previous sections. This object holds the information regarding the attached files. For our example, it is "My_Example_Object_File__c".
objectId You need to pass in the "{!Id}" value for this attribute. This attribute is required to retrieve object id.
objectNamespacePrefix (optional) This is the object's namespace prefix that your Salesforce.com organization uses. If your organization has a namespace prefix and you created this custom object inside your organization, your object namespace prefix is same as your organization namespace prefix. If this object belongs to a managed package, you need to use that managed package's namespace prefix. If your object does not belong to any namespace you do not need to set this attribute. If your namespace prefix is "exampleprefix" you need to set objectNamespacePrefix as "exampleprefix__".
fileNamespacePrefix (optional) This is the file object's namespace prefix that your Salesforce.com organization uses. If your organization has a namespace prefix and you created this custom object file inside this organization, your file namespace prefix is same with your organization namespace prefix. If this file object belongs to a managed package, you need to use that managed package's namespace prefix. If your file object does not belong to any namespace you do not need to set this attribute. If your namespace prefix is "exampleprefix" you need to set fileNamespacePrefix as "exampleprefix__".
enableCopyURL (optional) This option is used to enable/disable "Copy URL" link in the page. There are two possible values for this attribute: "true", "false". If "false" is set "Copy URL" links won't be displayed in this page. This field is optional and if you don't provide a value for this field, it will be set as "true", therefore "Copy URL" link will be visible for each asset. Note that security and permission set
enableDelete (optional) This option is used to enable/disable "Del" links for all attachments in the page and "Delete Selected" button for the whole page. There are two possible values for this attribute: "true", "false". If "false" is set "Del" links and "Delete Selected" button won't be displayed in this page. This field is optional and if you don't provide a value for this field, it will be set as "true" therefore, "Del" links and "Delete Selected" button will be visible. Note that security and permission settings override this option.
enableDownload (optional) This option is used to enable/disable "Download", "Open" and "Zip & Download" for all attachments in the page. There are two possible values for this attribute: "true", "false". If "false" is set "Download", "Open" and "Zip & Download" won't be displayed in this page. This field is optional and if you don't provide a value for this field, it will be set as "true" therefore, "Download", "Open" and "Zip & Download" links will be visible for each asset. Note that security and permission settings override this option.
enableEdit (optional) This option is used to enable/disable "Edit" link for all attachments in the page. There are two possible values for this attribute: "true", "false". If "false" is set "Edit" links won't be displayed in this page. This field is optional and if you don't provide a value for this field, it will be set as "true" therefore, "Edit" links will be visible for each asset. Note that security and permission settings override this option.
enableEmail (optional) This option is used to enable/disable "Email Selected" button in the page. There are two possible values for this attribute: "true", "false". If "false" is set "Email Selected" button won't be displayed in this page. This field is optional and if you don't provide a value for this field, it will be set as "true", therefore "Email Selected" button will be visible for each asset. Note that security and permission settings override this option.
enableUpload (optional) This option is used to enable/disable "Upload File(s)" button in the page. There are two possible values for this attribute: "true", "false". If "false" is set "Upload File(s)" button won't be displayed in this page. This field is optional and if you don't provide a value for this field, it will be set as "true", therefore "Upload File(s)" button will be visible for each asset. Note that security and permission settings override this option.
enableChatter (optional) This option is used to enable/disable Chatter related activities for files. There are two possible values for this attribute: "true", "false". If "false" is set, "Post to Chatter" and Chatter Feed won't be displayed in the page. This field is optional and if you don't provide a value for this field, it will be set as "true", therefore the "Post to Chatter" button and Chatter Feed in the details page will be displayed for each asset. Note that security and permission settings override this option.
inline (optional) This option is used to decide if the page is used with override for the view or as a section in the page layout. There are two possible values for this attribute: "true", "false". Set this attribute to "true" to use this component inside an inline Visualforce page. The default for this attribute is false. One important note about "inline" is it needs to be set to true for "typical custom override Visualforce page with inline edits and chatter enabled" example
because of a bug related to Salesforce.com.
inlineEdit (optional) This option is used to decide if the inline edit feature will be available for the other parts of the page or not. If inline option is set to true, inlineEdit option is ignored, meaning that inlineEdit feature can only be used when the view of the object is overridden. So, you cannot use this option with the use as inline attachment feature. Set this attribute to "true" to enable the inlineEdit feature for the Visualforce page. Also note that this feature is supported for the pages with version 21.0 and above (Spring 2011). The default for this attribute is false.
There are three possible scenarios for the usage of the inlineEdit:
If inline is set to true (using inline attachment feature), inlineEdit's value does not have any meaning (it is ignored).
If inline is set to false (default is false, using with the override for the view of the object), and we set inlineEdit to true, it means inline editing for the page elements is enabled.
If inline is set to false (default is false, using with the override for the view of the object), and we set inlineEdit to false, it means inline editing for the page elements is disabled.
legacyIdSupport (optional) This option is used for legacy id support. There are two possible values for this attribute: "true", "false". Set this attribute to true to use 18-character ids. The default for this attribute is false.
privateEnabled (optional) This option is used for enabling public/private file access to the S-Drive attachments and commonly used to limit the customer portal users' access to individual files. Before setting this property, you need to add a new field to your custom object file named 'Private' (See 'Creating Custom Object Files' section for more information). Set this attribute to true if you want to enable private/public flag. Setting the private flag on a file hides the file from customer portal users. There are two possible values for this attribute: "true", "false". The default for this attribute is "false" except for the Case Files custom page.
orderBy (optional) This option is used to order/sort S-Drive attachments based on a field. You need to set the name of the field that should be used to order the list of files with namespace prefix. This attribute is optional and leaving this empty will not order the results in any specific order. For example: "cg_File_Name_c". Note that Salesforce does not allow Long Text Area fields to be ordered/sorted. So, if you want to order/sort by a long text are field (e.g. Description__c), you need to change its type from 'Long Text Area' to 'Text Area'. This will limit your description to be 255 characters long.
allowedFileExtensions (optional) You can use this option if you want to limit the file types to be uploaded into selected object's S-Drive attachments. Semicolon separated list of file extensions that are allowed to upload. This attribute is optional and leaving this empty will allow all kind of files to be uploaded. For example: ".jpg;.txt" will limit the files to be uploaded to jpg and txt files.
defaultEmailAddress (optional) You can use this option, if you want to set a default "TO" email address for sending emails from your S-Drive Attachments. This option is automatically set for out of the box Contact, Opportunity, Case and Account S-Drive Attachments.
For example, if you select a Contact S-Drive Attachment for a contact and click "Email Selected" button, "Email Files" screen will be opened and "To…" field will be filled with the contact name.
enableAttachFromSDriveFolders (optional) This option is used to enable/disable "Attach from S-Drive Folders" button in the page. There are two possible values for this attribute: "true", "false". If "false" is set "Attach from S-Drive Folders" button won't be displayed in this page. This field is optional and if you don't provide a value for this field, it will be set as "true"; therefore "Attach from S-Drive Folders" button will be visible for each asset. Note that security and permission settings override this option. Also note that "Attach from S-Drive Folders" button is not visible for customer portal users, no matter what the enableAttachFromSDriveFolders value is.
enableFolders (optional) This option is used to enable/disable folders support for S-Drive Attachments. Set this attribute to false to disable folders. If you disable folders for S-Drive Attachments, "New Folder" button and breadcrumb will be removed from the buttons section. This
configuration won't hide/delete currently created folders. The default for this attribute is true.
relationshipName (optional) Master-detail relation used for selected standard/custom object. This attribute is optional and default value is 'Parent__r'.
pageSize (optional) Page size for pagination. Attachment items will be paginated based on this value. So, if this value is set to '30', and object has 91 total items, 4 page will be displayed. This attribute is optional and default value is 100.
useUploadAsPopup (optional) Set this attribute to true to enable drag and drop functionality and upload widget as a popup window for selected S-Drive Attachment object. The default for this attribute is false. This value overrides the "Default Upload Manager" configuration in "S-Drive Configuration".
f you want to get more information about component attributes, you can click "Component References" button and find cg:attachmentcomponent reference from the list.