Increasing security
The user installing and connecting S-Drive in the portal must have Modify All Data and Customize Application permissions. This is typically an Admin user.
To increase security, we recommend setting up a special user with its own profile that will have Modify All Data and Customize Application permissions, and after installation those permissions will be removed. You can clone the System Administrator profile and remove permissions after installation.
The steps to do this are described briefly here, but are in the instructions on this page in more detail.
-
Create a user that will be a service user that has Admin permissions, including Modify All Data and Customize Application.
-
Login as the service user and Install S-Drive and connect the org in the portal as described in the steps below.
-
Now login to Salesforce as Admin.
-
Go to S-Drive Configuration General Settings tab and scroll down to Other Settings
-
Click the Reschedule button
-
Edit the profile for the service user and remove Modify All Data and Customize Application permissions. (You can set up a permission set for these permissions.) Make sure the service user still has the necessary permissions to send outbound messages and has CRUD permissions to all S-Drive objects. This user should not have the Session Security Level Required at Login (found in the profile under Session Settings) set to High Assurance. It should be set to None.
NOTE: Anytime your org is disconnected from the portal for any reason, you will need to restore Modify All Data and Customize Application Permissions to the service user, reconnect in the portal, then remove the permissions again.
Install S-Drive from the AppExchange
Login to Salesforce as Admin or as a special service user you’ve set up for S-Drive. (See “Increasing Security” above.) If using a service user, it’s best to clone the System Admin profile and use it only for the service user.
Go to the AppExchange S-Drive listing and click “Get it Now.” Follow the prompts to install S-Drive in your sandbox or production org.
Activate S-Drive
After the installation is finished, go to S-Drive Configuration in your Salesforce instance:
-
In Classic, click on the “+” and click on S-Drive Configuration
-
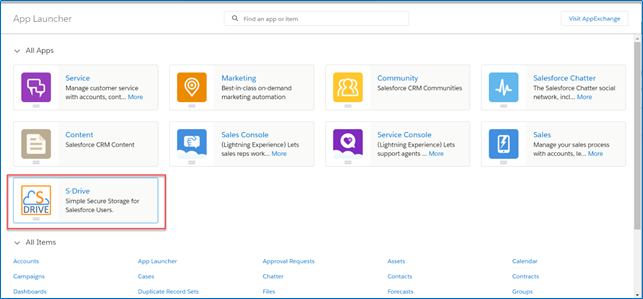
In Lightning, click on the “App Launcher” menu which is on the left corner of the Salesforce page.
-
Then click on “S-Drive: Simple Secure Storage for Salesforce Users” app.
-

-
Click on S-Drive Configuration

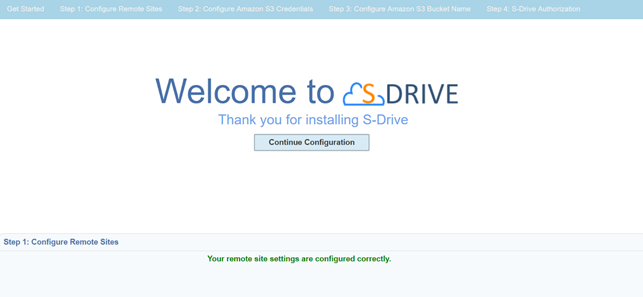
The S-Drive Configuration tab will take you to a list of instructions as follows:
Step 1: Configure Remote Sites:
If Remote Site Settings are configured correctly, you'll see "Your remote site settings are configured correctly" message. If you see an error message in Step 1, resolve the issue by following the on-screen instructions.

Step 2: Configure Amazon S3 Credentials:
This step is required to connect your Amazon S3 account with S-Drive. You need to enter a valid "Amazon Access Key" and "Secret Key". After providing keys, if you see "Amazon S3 Credentials are configured correctly," continue with the next step.

Important Note: IAM users whom assigned individual security credentials, must have some permissions to activate and use S-Drive. The minimum policy example can be seen in Getting Set Up - AWS and Portal Accounts Please apply this policy if you are planning to use this kind of user for the activation.
Step 3: Configure Amazon S3 Bucket Name:
This is the bucket that will be used to store your files in your Amazon S3 account. You can configure more than one bucket. Bucket name must be unique and must comply with DNS naming conventions. Bucket names cannot have capital letters or underscores or contain dots (“.”)
You can select "Use existing bucket" or "Create a new bucket" option. We recommend creating your bucket here in the S-Drive Configuration, rather than directly in AWS or using a bucket previously created here.
-
Create new bucket:

-
Provide a valid bucket name. It must be between 3 and 63 characters and can contain lowercase letters, numbers, and hyphens.
-
Provide a unique bucket id. This is a nickname you provide. It can be the same as the bucket name if desired. This field is used to reference the bucket when configuring Multiple Bucket Support.
-
Select the region name to create the bucket on this endpoint location
-
Click “Check Remote Sites.” You will be taken to a Remote Site Setting and need will need to save it.
-
When complete, click “Configure Amazon S3 Bucket Name”
-
You will see the page refresh and show your bucket name and the default File Upload Encryption, which is SSE-S3. This can be changed later. See S-Drive Authentication Settings for more information.
-
You can also use the Action buttons to Block Public Access (recommended), Enable Versioning, Enable Acceleration or you can click Add More Buckets to add another bucket.

-
-
Use existing bucket:

-
Select one of the bucket name from the list (that is retrieved from your Amazon S3 account).
-
Provide a unique bucket id. This can be anything and can be the same as the bucket name. This field is used to reference the bucket when configuring Multiple Bucket Support.
-
Select the File Upload Encryption Type. This can be changed later. See S-Drive Authentication Settings for more information.
-
Click “Check Remote Sites.” You will be taken to a new Remote Site Setting and will need to save it.
-
When complete, click “Configure Amazon S3 Bucket Name”
-
If your bucket is already version enabled, or if you’d like to turn on versioning, click “Enable Versioning” next to the bucket name.
-
If you are using Transfer Acceleration, click “Enable Acceleration”
-
If you would like to block public access for your bucket, click “Block Public Access.” If the bucket is already configured in AWS to block public access, you don’t need to click this.
-
If you configure more than one bucket, one must be chosen as the Default bucket. This will be used when no specific bucket is specified for upload.
Security: Your bucket access settings will be public by default when it is created. After it is created and you have finished the configuration process, there will be a button on the S-Drive configuration page under Authentication Settings called “Block Bucket Public Access” on the configuration page. Simply click the button to make your bucket private. This is recommended.
-
Repeat the steps above to add more buckets if desired. See Multi-Bucket Support for more information.
Step 4: S-Drive Authorization:
Go to https://portal.sdriveapp.com and login into the S-Drive portal account you created earlier. Authorize S-Drive to connect to your organization:
Click Connected Organizations link on the menu (Figure 4‑6). Then under "Connect Salesforce.com Organizations", click either “Production Instance” or “Sandbox Instance” based on where you installed S-Drive. This redirects the salesforce.com login page. Login, and you’ll see your organization on the list of “Connected Salesforce.com Organizations.”


The user that connects the portal to your Salesforce org can not have the Session Security Level Required at Login (found in the profile under Session Settings) set to High Assurance. It should be set to None.
Step 5: Populate S-Drive Object List

S-Drive file objects must be added into a File Object List so S-Drive knows they exist.
-
Click on the File Object List link
-
Click Find File Objects

-
You’ll see the file objects populated on the list
-
Click Go Back or close the tab
Step 6: Add CSP Trusted Sites
-
Go to Setup-->CSP Trusted Site
-
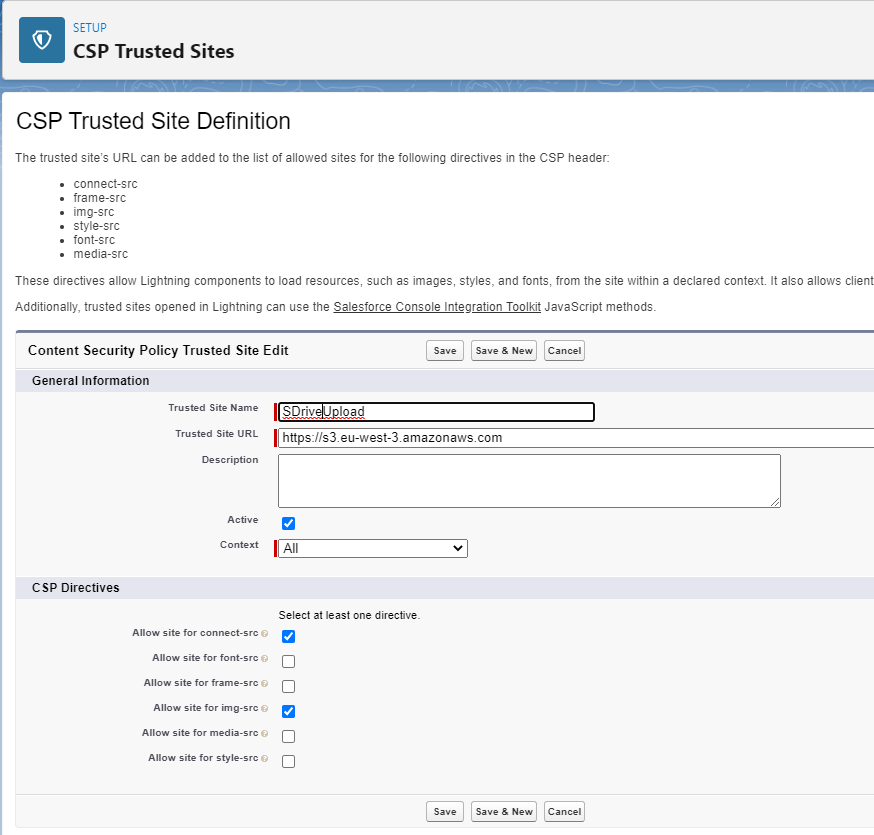
Add a url in the form https://s3.region.amazonaws.com where region is your bucket region (such as us-east-1)
-
Check the boxes as shown in the image
-
Click Save and New
-
Add a url in the form https://s3.amazonaws.com
-
Check the boxes as shown in the image
-
Click Save and New
-
Add a url for zip and download: https://zip.cyangate.com
-
Click Save

If you used a service user to install S-Drive:
-
Login to Salesforce as Admin
-
Go to S-Drive Configuration--General Settings Tab
-
Scroll down to Other Settings
-
Click “Reschedule” to start our payment calculation job.
-
Edit the profile for the service user used to install S-Drive
-
Remove Modify All Data permission
-
Remove Customize Application permission
-
A Note on Profile: Session Security Level Required at Login
Session Security Level Required at Login is a Session Setting in profiles that can be set to require 2 Factor Authentication. The profile of the user used to connect the portal must have this set to None (not High Assurance.)
Additionally, check Setup-->Outbound Messages. On each of S-Drive’s outbound messages, ensure the “user to send as” field is a user that does not have High Assurance. The outbound messages are:
-
AttachmentSync Callout
-
FileSizeRequest Callout
-
FileSync Callout
-
Preview Callout
Set up notifications to Admins when org is disconnected
If your org gets disconnected (for example, if there is a payment issue), S-Drive will no longer work until you reconnect. You can receive an email notification if this happens.
-
Got to Setup-->Custom settings
-
Find SDriveEmailNotificationSettings and click Manage
-
If there is not already a setting called EmailList, create it
-
Click New
-
Name=EmailList
-
Value: add email addresses separated by a semi-colon, for example jane@abc.com;bob@abc.com
-
Click Save
-
Congratulations! You are now ready to configure S-Drive to suit your needs.
