
File/Attachment Sync (Free)
File/Attachment Sync takes files that are uploaded to Salesforce Files or Salesforce Attachments and syncs them with S-Drive for the selected object. Sync is processed based on a queue, so new items will appear in S-Drive in a few seconds/minutes.
After configuring File/Attachment Sync, new file/attachment will be uploaded to S-Drive automatically. You can also configure deleting the Salesforce files/attachments after successful configuration.
To sync file/attachments to S-Drive, click the "configure sync" button. You will see a message that it is processing objects. This is processing that is done in order to display next configuration screen shown below.
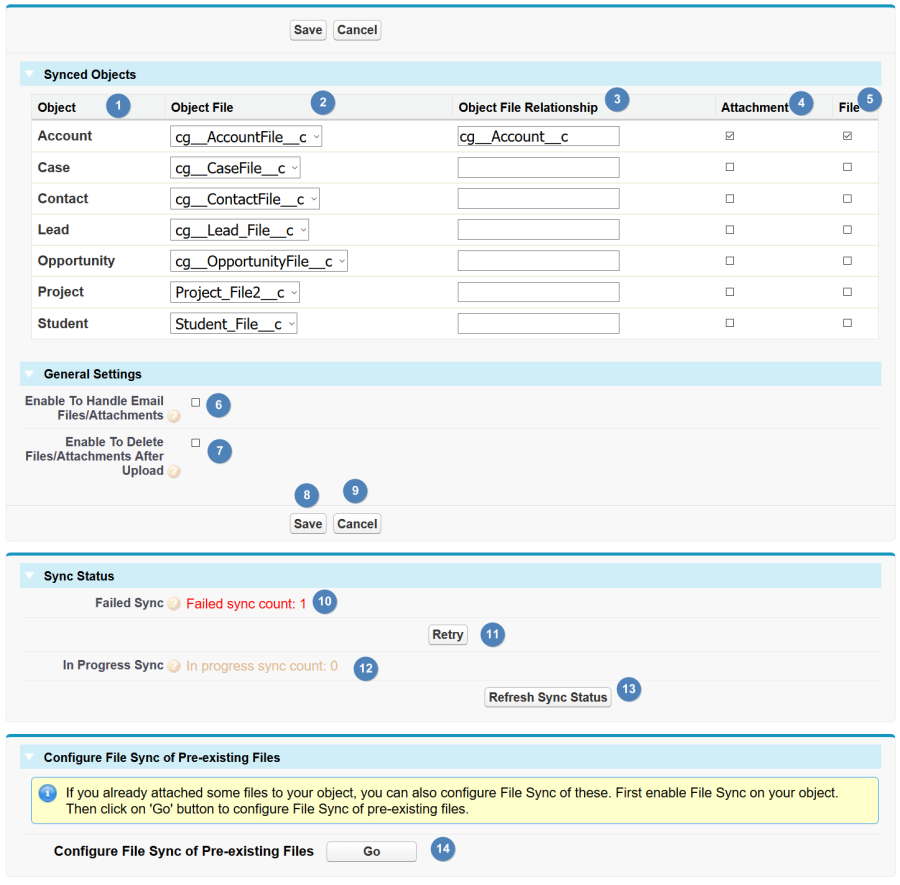
For each Object (1) for which you want to sync files or attachments, select the S-Drive file object you want to use for syncing from the dropdown list (2). There will usually only be one choice.
In the Object File Relationship field (3), enter the API name of the field that relates to the parent object. For the S-Drive File Objects that come bundled with S-Drive, these will be cg_Account__c, cg__Case__c, cg__Contact__c, cg__Lead__c, cg__Opportunity__c. For S-Drive file objects created by you (those that didn't come standard with S-Drive), it will be Parent_c.
Check the checkboxes (4) and/or (5) to indicate whether you want to sync files, attachments, or both.
Click Save.
In "General Settings" section you can enable handling files/attachments in email messages by checking "Enable to Handle Email Files/Attachments" (6). You can check "Enable to Delete Files/Attachments After Upload" configuration, if you want to delete the Salesforce Files/Attachments after successfully syncing to S-Drive(7). If you uncheck this option, both Salesforce Files/Attachments and S-Drive will be available after syncing.
File Sync and Attachment Sync use the AttachmentSync object. AttachmentSync records are created and then deleted once the sync is complete.
If you have failed or hung AttachmentSync records and you delete them manually while “Enable to Delete Files/Attachments After Upload” is checked, you may lose files that were not yet synced to S-Drive. If you wish to delete old AttachmentSync records, first uncheck “Enable to Delete Files/Attachments After Upload.”
Click Save (8).
In "Sync Status" section, you can see failed sync job (10) and progressing sync job (12) counts and can click to retry failed jobs (11). After clicking this button, you can see updated sync status You can refresh the failed and progressing file/attachment sync count status by clicking "Refresh Sync Status" (13) button.
In "Configure File Sync of Pre-existing Files" section, you can sync older Salesforce Files with SDrive. If you want to enable pre-existing Salesforce file sync for an object, you just need to select the "Object File", fill the "Object File Relationship" field and check the related "File" checkbox. You can go to the configuration page by clicking "Go" button (14). This takes you to the screen below.
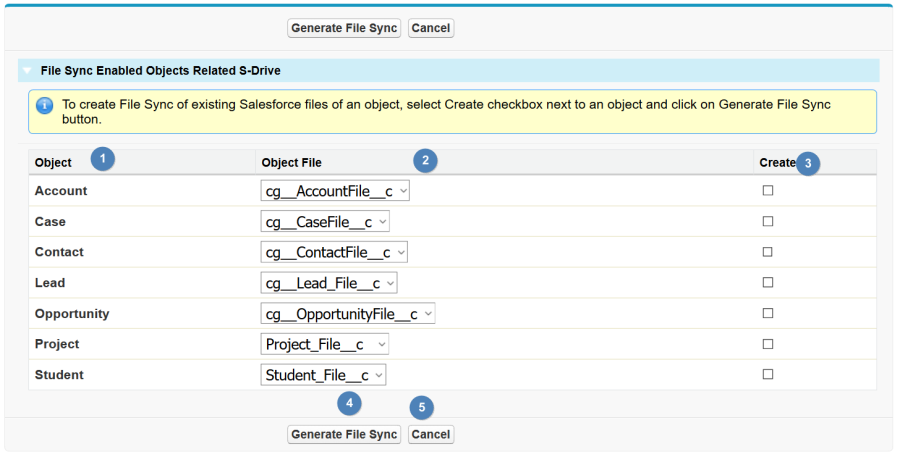
If you want to sync pre-existing Salesforce Files for an object, Look for the desired object in the Object section (1) and select the "Object File"(2) to be used for syncing. Check "Create" (3) checkbox. Click "Generate File Sync" button (4).
You can inspect individual "AttachmentSync" objects to see more details and see "File/Attachment Sync" section of this document for more details about the sync process.
A note about Permissions
File Sync and Attachment Sync use a callout to sync the file or attachment to S-Drive. So you must configure the outbound message user correctly:
Check Setup>outbound Messages for the following 3 items
AttachmentSync
FileSync Callout
Preview Callout
Check the "user to send as" profile. It must have
Customize Application permission
Send Outbound Messages permission
Query All Files permission (which can only be applied using a permission set.)
Users who upload files that will be synced must also have profile permission for the Attachment Sync object.