
DocuFetch
DocuFetch provides document collection by providing a way to:
Create a request asking for particular documents to be uploaded
Send the request link to a user outside of Salesforce, which will provide an upload button for each requested document
Allow the user to upload one or more documents, including documents that are pre-filled in via merge fields and documents that have been signed via e-signature by the user
Approve or reject the received documents, and request another document if one is rejected
Store the user-uploaded documents in S-Drive
Create document request templates to be used over and over again
Overview
Use Case: Requesting Documents
Let’s say you run a company that provides temporary workers for other companies. You need applicants to submit several different documents to your program:
Application
Driver’s license or other ID
List of references
Resume
Sign a form with some information
With DocuFetch, you can create a Request template that has each of those items in it. You can then use the template to create a Request, and send the Request link to an applicant, asking them to upload the required documents and sign the document that needs a signature. When you receive the documents, you can take a look at them and either accept them or reject them. If rejected, you can send the request back to the applicant and ask them to try again.
When the documents are uploaded, they are stored in S-Drive for easy, organized access.
Providing Documents Requested
When the requestee receives a DocuFetch request link, they can click the link and see a page with each item that is requested. For each item they can click the corresponding button to complete the request--upload, fill in form, or e-sign.
They will see a progress bar for the request and a status for each item as they complete the request.
For information on how to use DocuFetch after it is configured, see DocuFetch User Guide
Requirements
S-Drive 2.25 or later
For Generate Document, Complete Form, and Complete E-Signature features*
Formstack - Native form builder & data collection for Salesforce (AppExchange)- use for building data collection forms including prefilling data on web forms
Formstack Documents (formerly WebMerge) - Document Generation (AppExchange)- automatically generate documents from your Salesforce data
Formstack Sign (Included in Formstack Documents) - routing documents for Signature
*Formstack is not needed for document upload requests
DocuFetch Setup in Salesforce
DocuFetch can be used out-of-the-box on Accounts, Cases, Opportunities, Contacts, and Leads. If you are creating document requests from any of those objects, skip to Step 2.
1. Add a lookup field if using a custom object
Skip this step if you are using DocuFetch on Accounts, Cases, Contacts, or Opportunities.
You must define a relationship between your object and DocuFetch with a lookup field on SDrive Document Intake Request:
Go to Setup
In Object Manager, find SDrive Document Intake Request object
Go to Fields and Relationships and click New
Add a Lookup field to your custom object
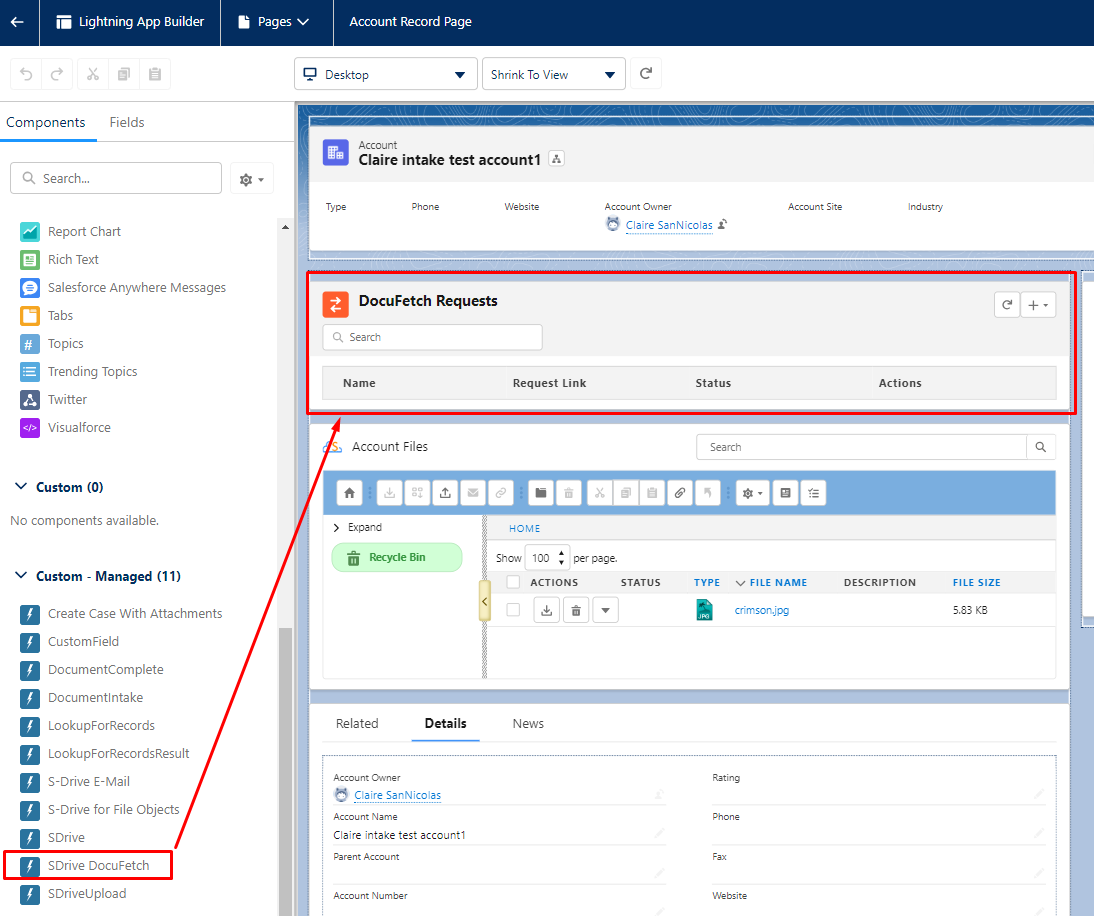
2. Add DocuFetch to your object Lightning page
Edit the Lightning Record Page of an object you want to use DocuFetch with. In the example, we’ll use Account.
Drag the SDrive DocuFetch component onto the Page.
Click into the component and fill in the configuration.
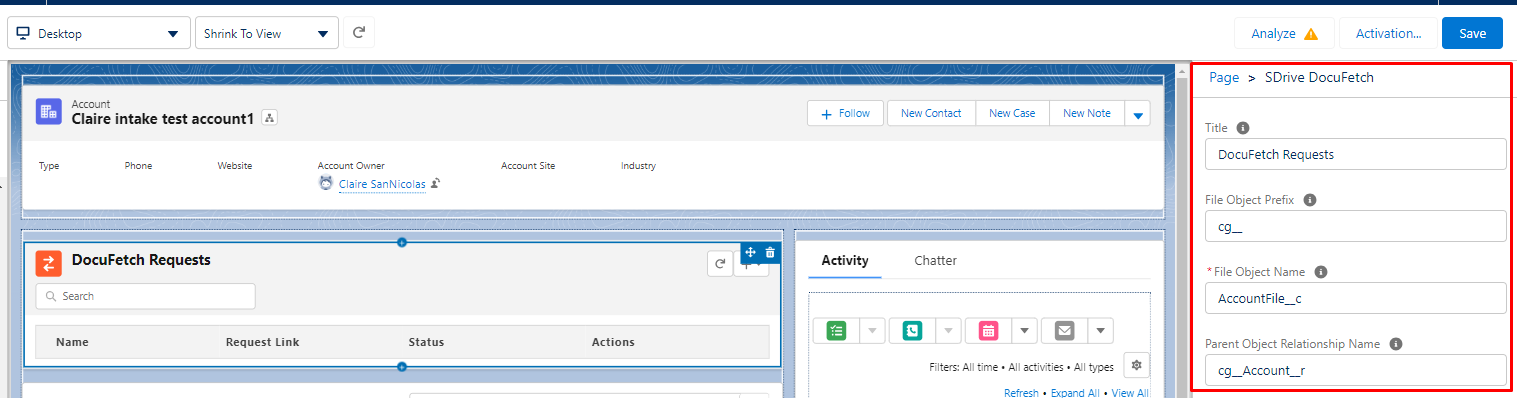
Title: The heading that will show on the component. If blank, the heading will be DocuFetch Requests
File Object Prefix: For S-Drive out-of-the-box objects (Account File, Case File, Contact File, Lead File, Opportunity File) this will be cg__. For Custom object files, it will be blank unless the object is part of another managed package.
File Object Name: the S-Drive File object where DocuFetch files will be stored, such as AccountFile__c.
Parent Object Relationship Name: The API name of the lookup field from Document Request object to the object you’re relating it to. In this example, we’re using DocuFetch on Account, so the lookup field is cg__Account__r. For a custom object, it’s the name of the field you set up in Step 1.
Save the settings and Go Back to the Account Page. Now you’re ready to create a Request Item.
Permissions
DocuFetch users (those who create requests) need profile permission on all DocuFetch objects as well as the S-Drive object they’re using S-Drive on.
SDrive Document Intake Requests
SDrive Document Intake Request Items
SDrive Intake Request Item Templates
SDrive Intake Request Templates
DocuFetch request links are accessed via S-Drive Public Share. Therefore the Public Share user needs profile permission on all the above objects also. See S-URL and Public Share Setup for how to set up Public Share.
Formstack Configuration for DocuFetch
Some features of DocuFetch require Formstack integration.
For Generate Document, Complete Form, and Complete E-Signature features*
Formstack - Native form builder & data collection for Salesforce (AppExchange)- use for building data collection forms including prefilling data on web forms
Formstack Documents (formerly WebMerge) - Document Generation (AppExchange)- automatically generate documents from your Salesforce data
Formstack Sign (Included in Formstack Documents) - routing documents for Signature
Formstack Installation:
Formstack - Native form builder & data collection for Salesforce can be installed directly from AppExchange. It is only needed if you want to generate pre-filled forms.
Formstack Documents (formerly WebMerge) - Document Generation + Formstack Sign can also be installed directly from AppExchange. It is needed to generate forms with merge fields and send requests for e-signature.
Read more about Formstack integration with Salesforce.
Documents + Sign:
Once installed, you will get invited to your Formstack.com account where the Documents & Sign products are housed
Then follow these instructions for setting up Formstack Documents which include using the Formstack Documents API key to setup in the Salesforce org
Set up your Formstack Sign delivery to deliver a document for digital signature and save that document back to Salesforce. Note that a Formstack Sign is tied to a specific email address, so that when licensing Formstack Sign for this use case you’d typically do so with a single Formstack Sign account.
Document Intake Component Setup in Salesforce
Enable Formstack for file object that will use Document Intake
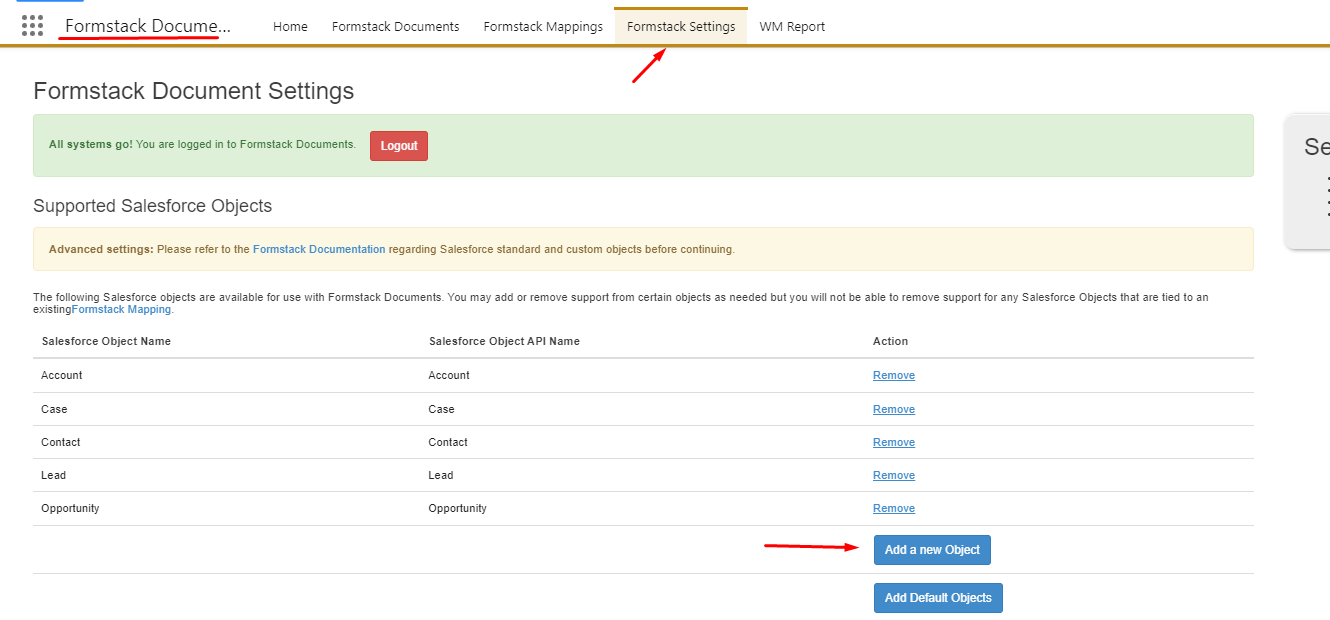
Use the same API credentials of Formstack account that you’ll use in the 2nd step of Formstack Setup.
S-Drive SURL/Public Share setup in Salesforce
This is needed in order to create the SURL Portal your requestees will interact with, follow the instructions here: S-URL and Public Share Setup
In Step 2 of “S-URL and Public Share Setup” from the link above, give the created user Create/Read/Edit/Delete access to the following objects as well.
SDriveDocumentIntakeRequest,
DriveDocumentIntakeRequestItem,
cg__SDriveIntakeRequestItem_Template__c,
cg__SDriveIntakeRequest_Template__c
cg__SURL__c.cg__Document_Request_Info__c
cg__SURL__c.cg__SUrl_Type__c
webm__Field_Mapping__c
webm__Webmerge_Mapping__c