S-URL and Public Share Setup
S-Drive 2.7.12 and later
If you have already been using S-URL and your self-signed certificate is expiring and needs to be updated please see S-URL - How to update your self-signed certificate
This page explains how to set up and use S-URL which works by using Salesforce communities (“Digital Experience” sites) and allows use of Public Share links where users can open, download, upload or delete files, as well as edit file meta-data.
To use Legacy S-URL (not recommended) see Legacy S-URL: How to Activate Public Share Link & S-URL.
If you previously used File links that were created using Legacy S-URL, those links will continue to work. However links created once this S-URL configuration is set up will not work if you switch back to Legacy S-URL.
Updating Surl after Refreshing Sandboxes
When you refresh a sandbox, there are some updates you need to make to the surl/public share configuration in the sandbox to get it to work. See S-Url/Public Share after sandbox refresh
This page explains how to set up S-Drive so that short url links (S-URL or surl) can be used. S-URL is needed in order to create public share links to share files with users outside of Salesforce. S-URL can also be used to open and download files internally in Salesforce if desired.
S-URL uses a Salesforce Digital Experience Site (formerly known as Salesforce Community) to access the file. It requires a dedicated user that will use passwordless login to the community.
To use this feature, you will need to do the following:
We will go through the steps below.
STEP 1: Create a Digital Experience (Community)
If you do not already have Digital Experiences enabled
Go to Setup > Feature Settings > Digital Experiences > Settings
Check Enable Digital Experiences checkbox.
Choose a domain name. (This will be used for all your Digital Experience sites, not just S-Drive or S-URL. It can be something like your company name)
Click Save.
Click OK on the prompt.
You will be redirected in another tab into Setup > Feature Settings> Digital Experiences > All Sites with a success message “Success! You can now create new experiences.”.
Click New.
Select Build Your Own. (There are 2 Build Your Own options. Be sure to select the Aura option.)
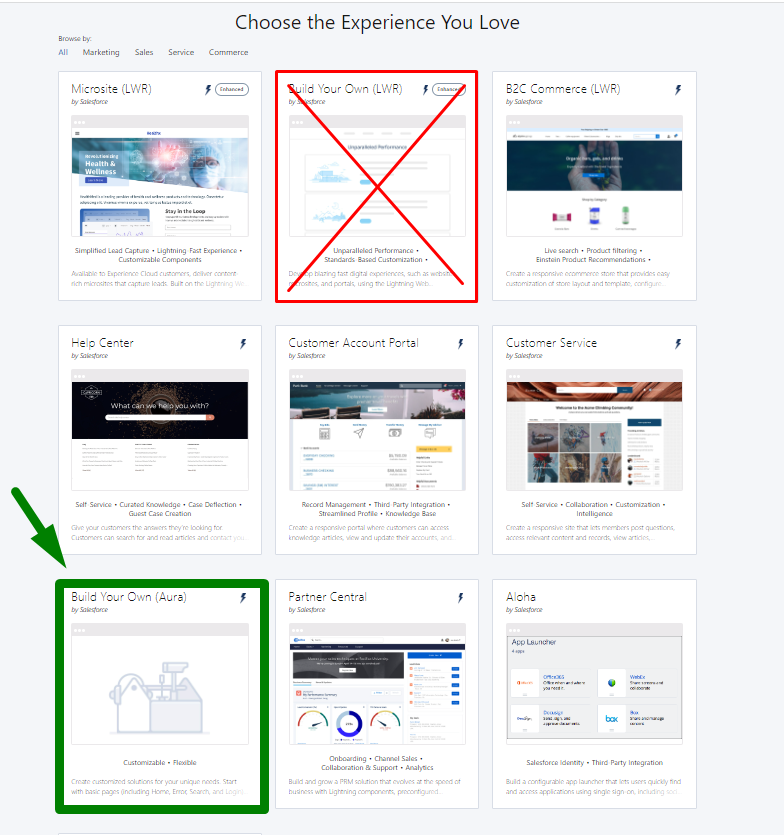
Click Get Started.
Give it a name such as SURL.
For the URL, set it as surl.
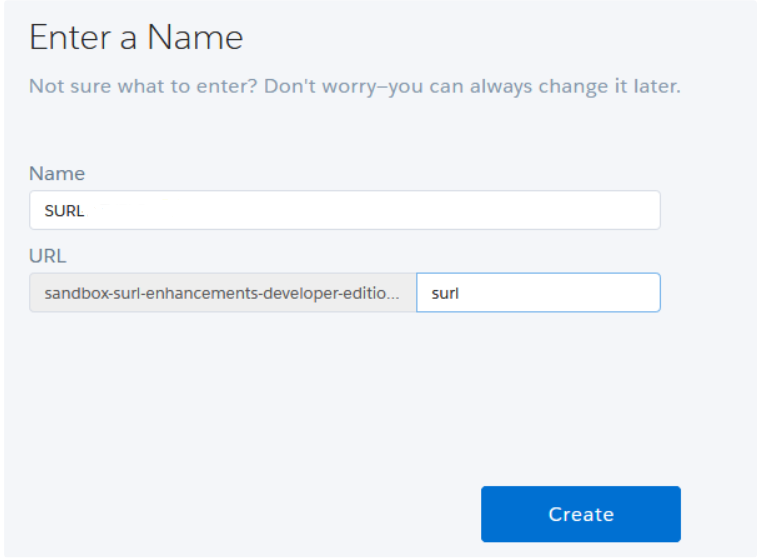
Click Create.
Wait for the community to be created.
We will now create a community user and profile and will return to the community later to complete the setup.
STEP 2: Create a dedicated Surl User
This user will be used solely for accessing files that use S-URL.
You can either use an internal user or a Community User. This user will need read permissions for the objects you want to share files for. If you use a community user, View All permission is not allowed, so you will need to set up sharing rules instead, which is done in STEP 9.
If you use a community user, we recommend a user with a Customer Community Plus license or some other license that allows the use of sharing rules. (For example, a Customer Community license can only use sharing sets, not sharing rules.)
Choose the license you want the user to have (others may work as well, depending on what objects you want to use Public Share or DocuFetch on)
Customer Community Plus (external license)
Salesforce (internal license)
Salesforce Platform (internal license)
See Standard User Licenses and Experience Cloud User Licenses for information on which objects different licenses have access to.
NOTE: If you want to use Public Share to upload files to Contacts, or you want to use DocuFetch on Contacts, you must use an internal license. If the Surl User is an external user, it cannot get access to upload to internal Contact records even though external licenses allow access to the Contact Object.
Due to Salesforce’s enforcement of multi-factor authentication (MFA) using an internal user for the surl user may not work. A user with a Customer Community Plus license will not need MFA.
Some customers use Platform licenses without encountering MFA issues.
It may be possible to use an internal user with the “Waive Multi-Factor Authentication for Exempt Users” permission. The internal user can only have this permission enabled under certain circumstances. It may work best to clone the Minimum Access - Salesforce profile and then add this and other permissions needed in a permission set.
Depending on what license you’re using, follow instructions for either Option 1 (Community User License) or Option 2 (Internal License) to set up your user.
Option 1: Community User option:
A community user is set up from a Contact on an Account. You may wish to create a simple dedicated Account just for this contact/user.
To create your user and profile using a customer community plus license and profile:
Create the profile
Go to Setup-->profiles
Clone the Customer Community Plus profile. You may want to use this profile only for S-URL since it will have access to a Custom App created for S-URL, as well as an Apex class and Visualforce page
Give the following profile permissions
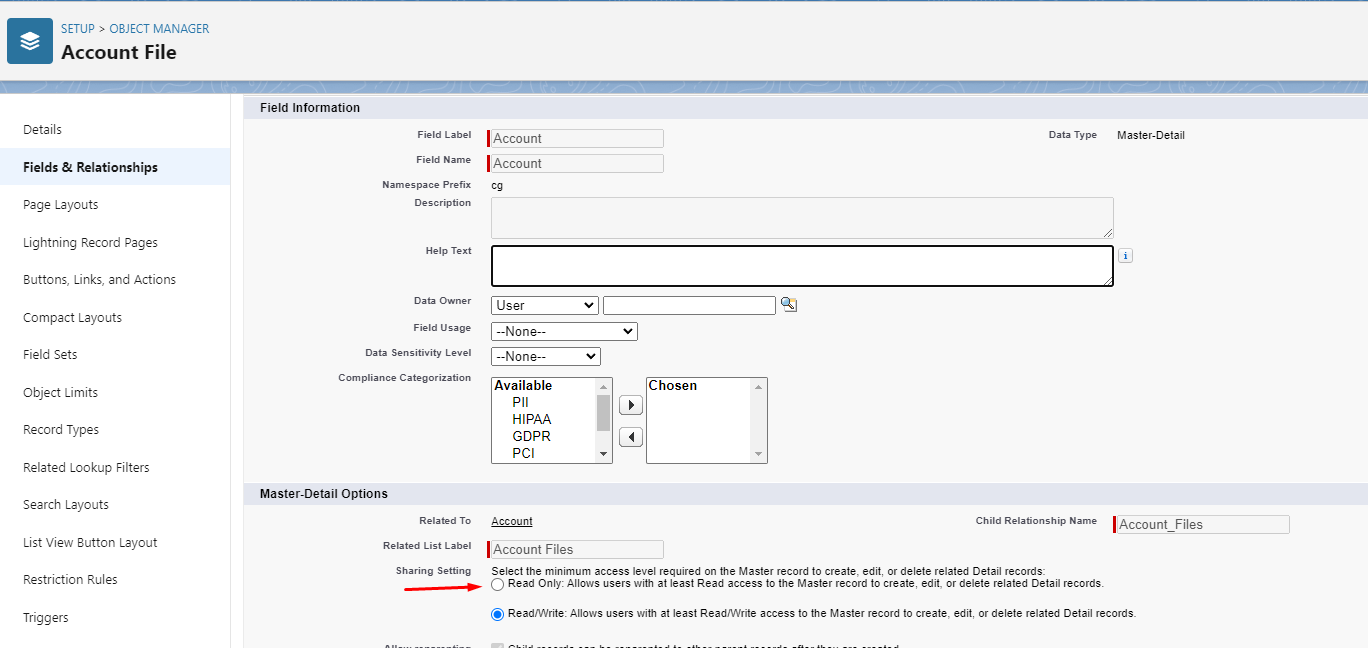
Parent objects (ex: Account) where you store files you want to share: Read. If you want users to upload files, you need Read/Create/Edit permission unless you change this setting in the file object lookup field:
For added security, disallow access to all possible fields on the parent object (some have access by default)
File object (ex: Account Files) of files you want to share: Create/Read/Edit/Delete as needed
Custom file objects with lookup relationship (such as a custom Account File object that has a lookup with Account): Read/Create/Edit/Delete as desired
SURL object: Create/Read/Edit/Delete
Make sure there is Field Level access to the fields on the objects you’re allowing.
Create an Account. Note: the Account owner must have a role.
Create a Contact on this account that you’ll use for community access
On the contact, click Enable Customer User (if this button is not there, go to page layout of Contact, go to Mobile and Lightning Actions and add it to the page.)
Give the user a license (Customer Community Plus or another “Plus” license is needed) and the profile you just created.
Click Save
Option 2: Internal user option:
Create the profile
Go to Setup-->profiles
Clone any profile, such as standard user profile
Give the following permissions. The Waive Multi-Factor Authentication for Exempt Users may only work with a profile with minimal access. We recommend giving permissions in permission sets, rather than on the profile.
Parent objects (ex: Account) where there is a master-detail relationship with files you want to share (ex: Accounts for Account Files): View All (user will not see the Accounts because you will only be sharing files, but they need access to the account in order to access the Account Files because of the master-detail relationship.)
For added security, disallow access to all possible fields on the parent object (some have access by default)
File object (ex: Account Files) of files you want to share: Read/Create/Edit/Delete as desired
Custom file objects with lookup relationship (such as a custom Account File object that has a lookup with Account): Read/Create/Edit/Delete as desired
SDriveColumnConfiguration custom metadata type access.
SURL object: Create/Read/Edit/Delete or Modify All
If using Preview & Thumbnail: Preview object: Read/Create/Edit/Delete
If using File Activities: File Activity object: Read/Create
Click Save.
Go to Custom Field-Level Security tab.
Ensure that the profile has at least read access for all the fields of SURL object and the selected file object(s).
Create a user
Assign the profile you just created to this user
STEP 3: Create a Self-Signed Certificate
Create a Self-Signed Certificate to use with the passwordless login method.
Go to Setup > Security > Certificate and Key Management.
Click on Create Self-Signed Certificate.
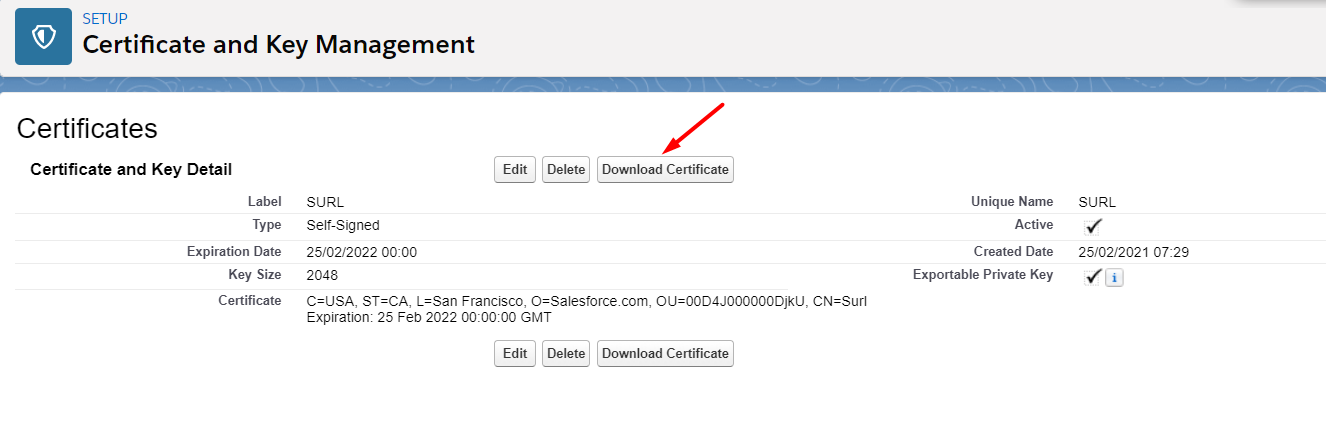
Name its label and the unique name as “SURL” (Case sensitive).
Make sure the Exportable Private Key is checked.

Click Save.
Click on the certificate you just created.
Click Download Certificate.
STEP 4: Create a Connected App
Create a Connected App to use with the passwordless login method.
Go to Setup > Apps > App Manager.
Click on New Connected App.
Enter Connected App Name and Contact Email.
Check the box for Enable OAuth Settings
Enter Callback URL as http://localhost:8080/auth2/callback
Check Use digital signatures and upload the self-signed certificate you downloaded.
Choose the OAuth Scopes
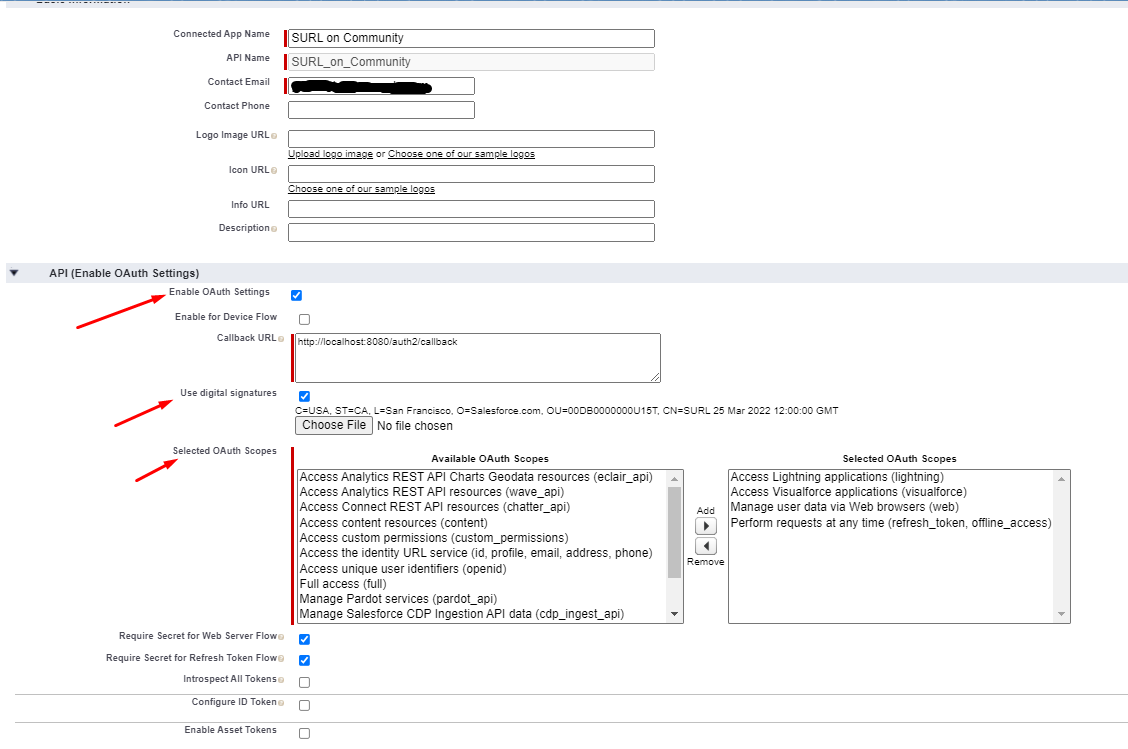
Click Save.
Click Continue
Click Manage Consumer Details button next to Consumer Key and Secret
Copy both Consumer Key and Consumer Secret as you will use them in the passwordless login system.
Back on the Connected App, click Manage at the top
Click Edit Policies
Under Permitted Users, change it to “Admin approved users are pre-authorized”
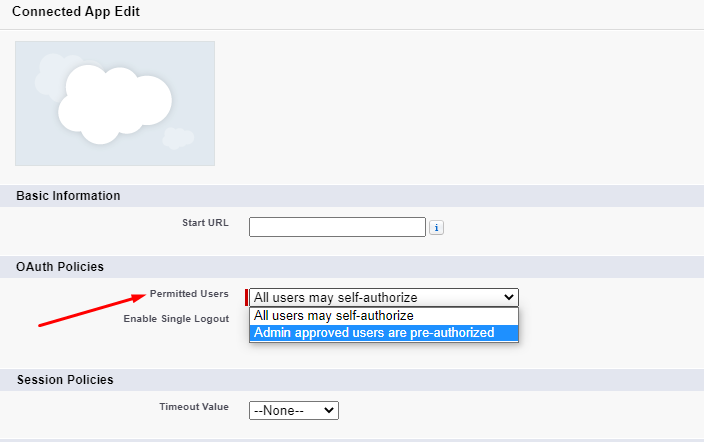
Click Save
STEP 5: Create Passwordless Login Page and Controller
Create a Visualforce page and its controller class to allow the user to access shared items by logging in automatically by a passwordless login system.
Since this cannot be done directly in a production org, you will need to switch to a sandbox and then migrate to production via a change set.
Set up Custom Settings needed for the controller class
Go to Setup-->Custom Settings
Find SDriveConfig and click Manage
Click New
Enter Name: SUrl_Community_Username / Value: the username of the dedicated surl user you set up in STEP 2
Click Save & New
Enter Name: SUrl_Community_ClientId / Value: the consumer key from the connected app
Click Save & New
Enter Name: SUrl_Community_BaseUrl / Value: the base URL of the community (go to setup>digital experiences>all sites to see the url you created in STEP 1. NOTE: Be sure the url in this setting does not have “/s” at the end (which is how it will appear from Builder. ) )
Click Save & New
Enter Name: SUrl_Community_Certificate / Value: the unique name of the self-signed certificate you created in STEP 3
Click Save
Go to Setup-->Visualforce pages
Click Developer Console
Click File->New->Apex Class
Create the
PasswordlessLoginControllerclass as shown below:TEXTglobal with sharing class PasswordlessLoginController { cg__SDriveConfig__c sdrivesetting_SUrl_Community_Username = cg__SDriveConfig__c.getValues('SUrl_Community_Username'); public String username = sdrivesetting_SUrl_Community_Username.cg__Value__c; cg__SDriveConfig__c sdrivesetting_SUrl_Community_ClientId = cg__SDriveConfig__c.getValues('SUrl_Community_ClientId'); public String clientId = sdrivesetting_SUrl_Community_ClientId.cg__Value__c; cg__SDriveConfig__c sdrivesetting_SUrl_Community_BaseUrl = cg__SDriveConfig__c.getValues('SUrl_Community_BaseUrl'); public String communityBaseUrl = sdrivesetting_SUrl_Community_BaseUrl.cg__Value__c; cg__SDriveConfig__c sdrivesetting_SUrl_Community_Certificate = cg__SDriveConfig__c.getValues('SUrl_Community_Certificate'); public String certificate = sdrivesetting_SUrl_Community_Certificate.cg__Value__c; public PageReference JWTlogin() { String url = ApexPages.currentPage().getHeaders().get('referer')==null?'':ApexPages.currentPage().getHeaders().get('referer'); String surlId = url==''?'':url.substring(url.lastIndexOf('sid=') + 4); system.debug('surlId: ' + surlId); String token = getAccessToken(); system.debug('token: ' + token); PageReference PR = New PageReference(communityBaseUrl + '/secur/frontdoor.jsp?sid=' + token + '&retURL=' + communityBaseUrl + '/s/?sid=' + surlId); if(Test.isRunningTest()){ PR = NULL; } return PR; } public String getAccessToken() { String tokenEndpoint = communityBaseUrl + '/services/oauth2/token'; Auth.JWT jwt = new Auth.JWT(); jwt.setIss(clientId); jwt.setSub(username); jwt.setAud(communityBaseUrl); Auth.JWS jws = new Auth.JWS(jwt, certificate); Auth.JWTBearerTokenExchange bearer = new Auth.JWTBearerTokenExchange(tokenEndpoint, jws); String accessToken=''; if(!Test.isRunningTest()){ accessToken = bearer.getAccessToken(); } return accessToken; } }Click File->Save
Click File->New->Visualforce Page
Create the
PasswordlessLoginVFP as below:CODE<apex:page controller="PasswordlessLoginController" showHeader="false" cache="false" standardStylesheets="false" action="{!JWTlogin}"> </apex:page>Click File->Save
Create the following test class to use when needed for migration to production
TEXT@isTest public class PasswordlessLoginController_Test { @testSetup static void makeData() { cg__SDriveConfig__c sdrivesetting_SUrl_Community_Username = new cg__SDriveConfig__c(); sdrivesetting_SUrl_Community_Username.Name = 'SUrl_Community_Username'; sdrivesetting_SUrl_Community_Username.cg__Value__c = 'communitysurl@surl.com'; insert sdrivesetting_SUrl_Community_Username; cg__SDriveConfig__c sdrivesetting_SUrl_Community_ClientId = new cg__SDriveConfig__c(); sdrivesetting_SUrl_Community_ClientId.Name = 'SUrl_Community_ClientId'; sdrivesetting_SUrl_Community_ClientId.cg__Value__c = 'ABCDEFGHIJ'; insert sdrivesetting_SUrl_Community_ClientId; cg__SDriveConfig__c sdrivesetting_SUrl_Community_BaseUrl = new cg__SDriveConfig__c(); sdrivesetting_SUrl_Community_BaseUrl.Name = 'SUrl_Community_BaseUrl'; sdrivesetting_SUrl_Community_BaseUrl.cg__Value__c = 'https://test.cs99.force.com/surl'; insert sdrivesetting_SUrl_Community_BaseUrl; cg__SDriveConfig__c sdrivesetting_SUrl_Community_Certificate = new cg__SDriveConfig__c(); sdrivesetting_SUrl_Community_Certificate.Name = 'SUrl_Community_Certificate'; sdrivesetting_SUrl_Community_Certificate.cg__Value__c = 'MySurl'; insert sdrivesetting_SUrl_Community_Certificate; } @isTest static void passwordlessLoginTest() { if(Test.isRunningTest()){ PasswordlessLoginController controller = new PasswordlessLoginController(); String accessToken = controller.getAccessToken(); System.assertEquals('', accessToken); PageReference pageReference = controller.JWTlogin(); System.assertEquals(null, pageReference); PasswordlessLoginController controller2 = new PasswordlessLoginController(); controller2.username = 'invalid@example.com'; String accessToken2 = controller2.getAccessToken(); System.assertEquals('', accessToken2); PageReference pageReference2 = controller2.JWTlogin(); System.assertEquals(null, pageReference2); PasswordlessLoginController controller3 = new PasswordlessLoginController(); controller3.clientId = 'invalidclientid'; String accessToken3 = controller3.getAccessToken(); System.assertEquals('', accessToken3); PageReference pageReference3 = controller3.JWTlogin(); System.assertEquals(null, pageReference3); PasswordlessLoginController controller4 = new PasswordlessLoginController(); controller4.communityBaseUrl = 'invalidcommunityBaseUrl'; String accessToken4 = controller4.getAccessToken(); System.assertEquals('', accessToken4); PageReference pageReference4 = controller4.JWTlogin(); System.assertEquals(null, pageReference4); PasswordlessLoginController controller5 = new PasswordlessLoginController(); controller5.certificate = 'surl'; String accessToken5 = controller5.getAccessToken(); System.assertEquals('', accessToken5); PageReference pageReference5 = controller5.JWTlogin(); System.assertEquals(null, pageReference5); } } }Click File->Save
STEP 6: Finish setting up your Community
Access your community by going to Setup->Digital Experiences->All Sites and click Builder
Go to Settings-->General and click on the Community Guest User profile
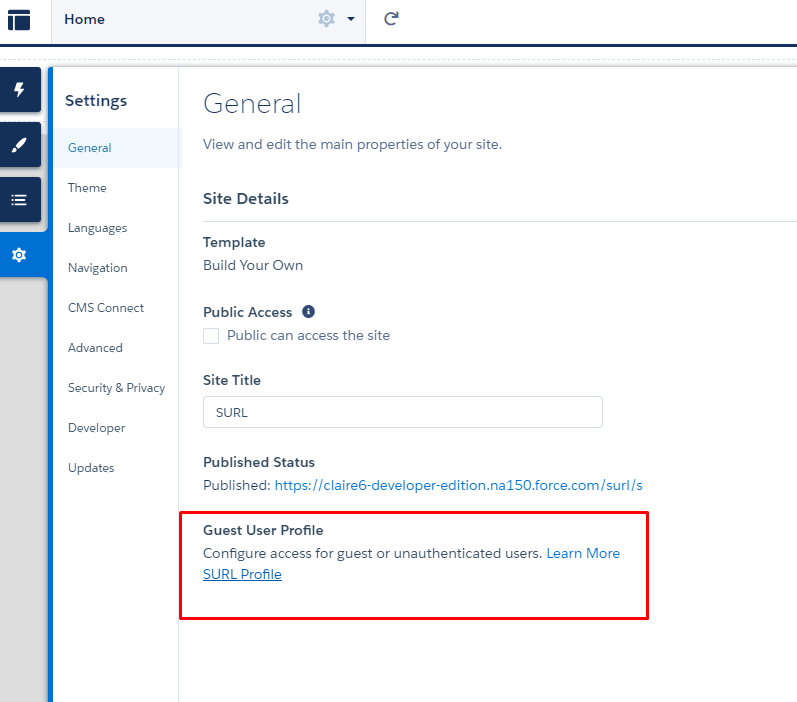
Give this profile access to the PasswordlessLogin Visualforce page. (This is needed even though we will not be using the community Guest User.)
Go back to your community and go to Workspaces
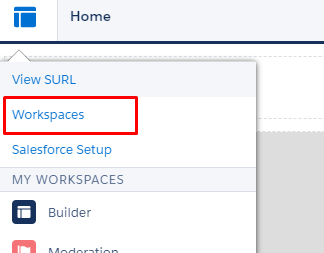
Click on Administration.
Go to the Members tab.
Add the profile of the User you set up in STEP 2 to the Selected Profiles section and click Save. NOTE: If using a community user profile, make sure to change the dropdown for “Search” to Customer instead of Internal.
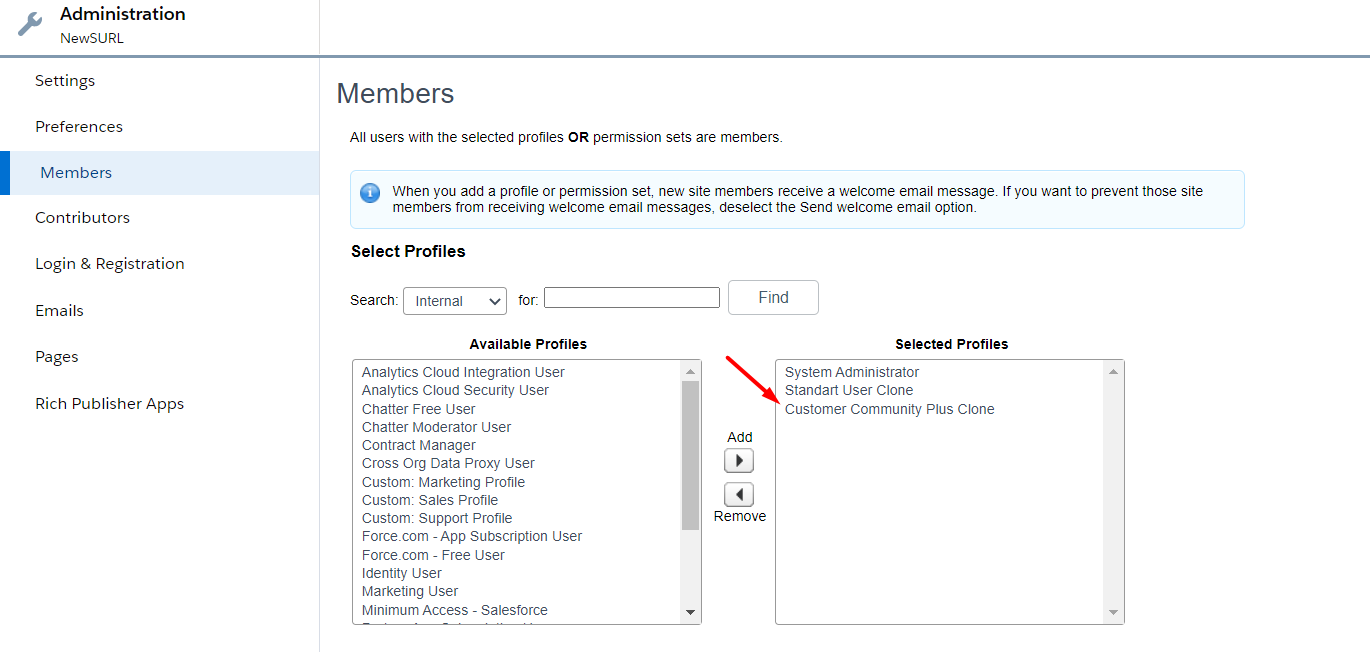
Click Save
Go to Login & Registration tab.
Under Login Page Setup, Select Login Page Type as Visualforce Page and select the
PasswordlessLoginVFP.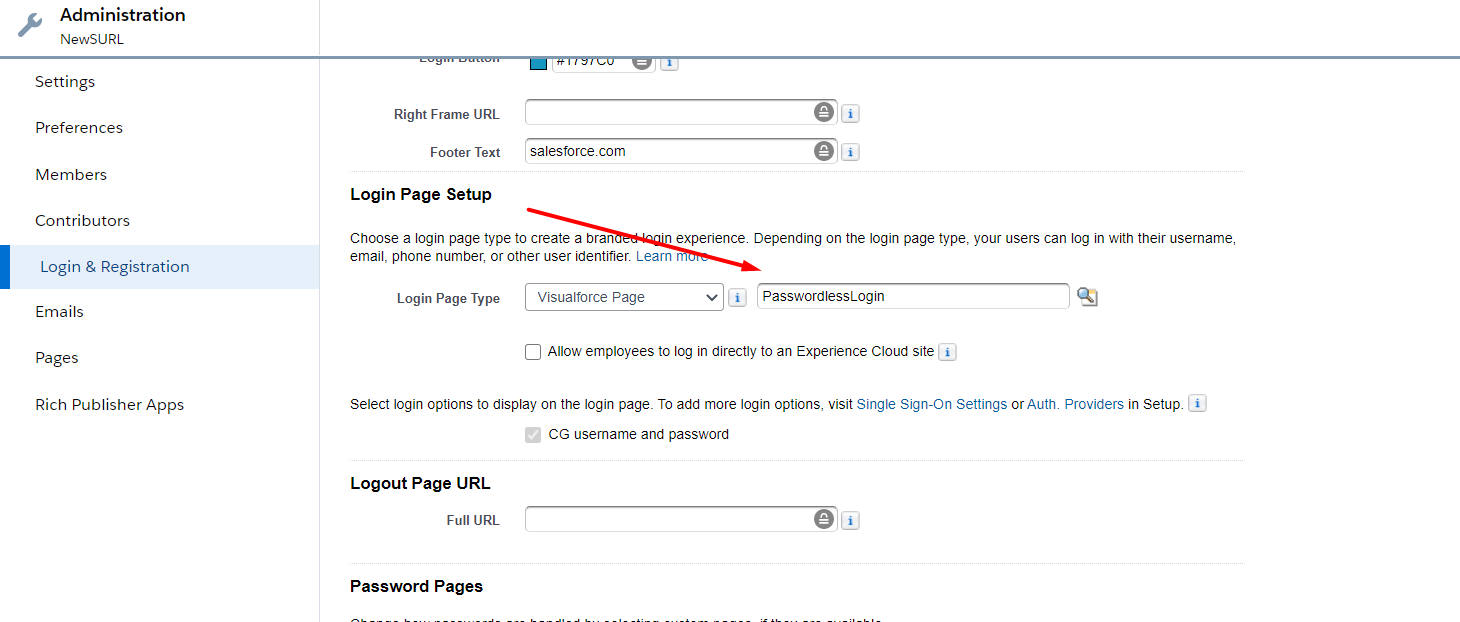
Click Save.
Click on the Administration on the top and click on Builder.
Click the Trash icon on the “Let’s get started!” section to remove it.

When prompted click Delete.
Click on the Components (lightning icon) section.
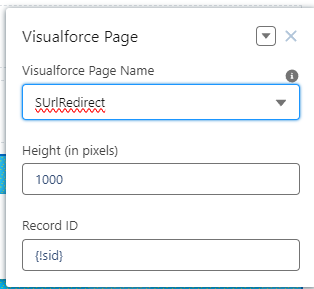
Drag a Visualforce Page component on the Content section.
Select SUrlRedirect as the Visualforce Page.
Set its height to 1000.
If you are using S-Drive version 2.25 or later, change {!recordId} to {!sid}. Otherwise keep it as {!recordId}
2.25 and later
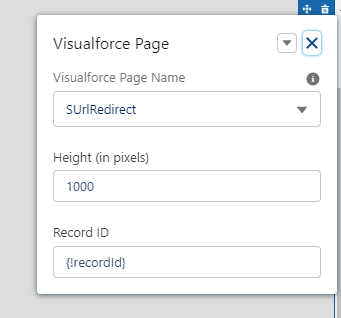
S-Drive 2.24 and earlier
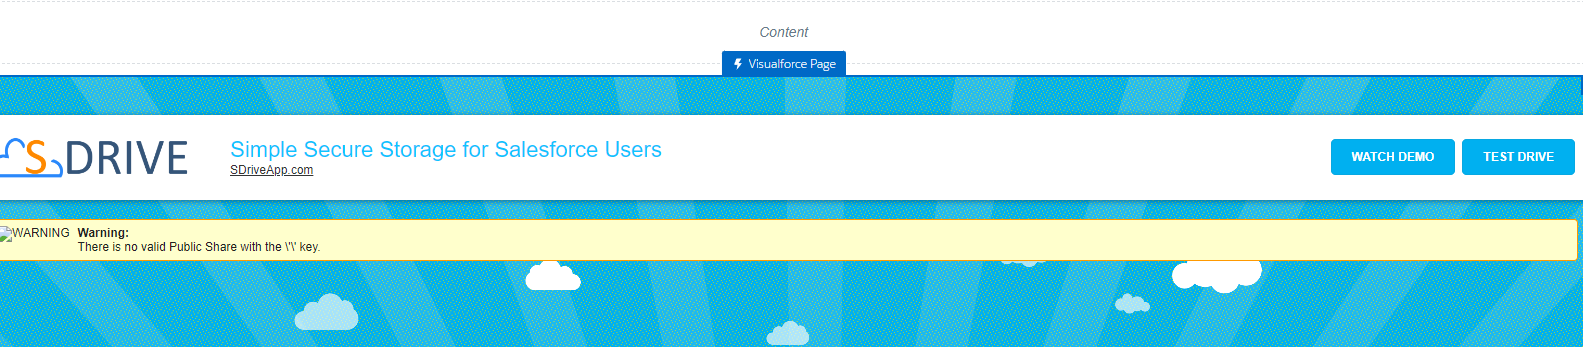
It should then look like this or on an earlier release, may have a blank gray square with a sad face.
Click on the Paintbrush to the left and the arrow in the new pop and click on Edit CSS
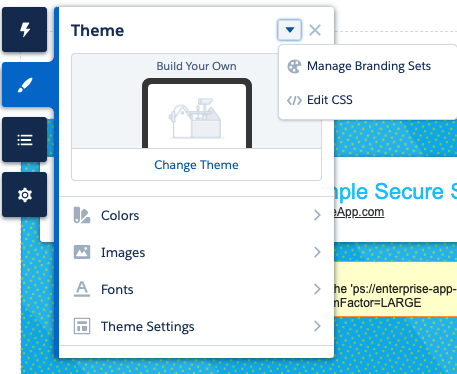
Click on User Overrides in the popup box
Add the following CSS code.
CODE.siteforceStarterBody .cCenterPanel { margin: unset; max-width: inherit !important; padding: unset; } .siteforceStarterBody .cCenterPanel .contentRegion { padding: unset !important; } .oneAlohaPageDeprecated>iframe { height: 100vh; }Click Save
Click on Settings (gear icon) > Security & Privacy
Make the Security Level as Relaxed CSP: Permit Access to Inline Scripts and Allowed Hosts.

Click Publish
Click Publish on the prompt.
Go to Administration.
Click Activate.
STEP 7: Trusted URLs and Remote Site Settings to Salesforce
Trusted URLs
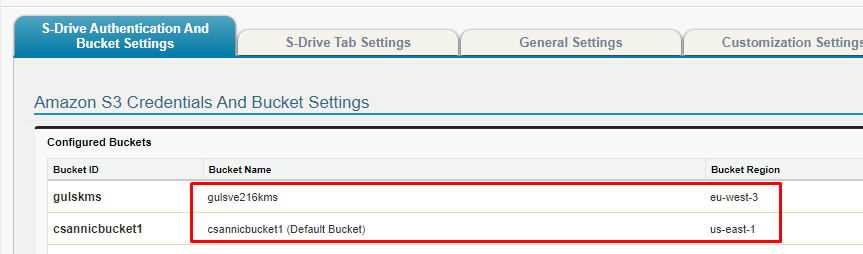
Add the following CSP Trusted Sites. (See info box for instructions and which boxes to check.) <bucketname> is the name of your bucket. Add one CSP Trusted Site for each bucket.
<region> is your bucket region. Add one CSP Trusted Site for each region if you have more than one.
https://<bucketname>.s3.<region>.amazonaws.com
https://<bucketname>.s3.amazonaws.com
If using AWS transfer acceleration, https://<bucketname>.s3-accelerate.amazonaws.com
If you’re not sure what your bucket name and region are, you can check S-Drive Configuration
To add Trusted Sites:
Go to Setup > Trusted URLs
For each url listed below:
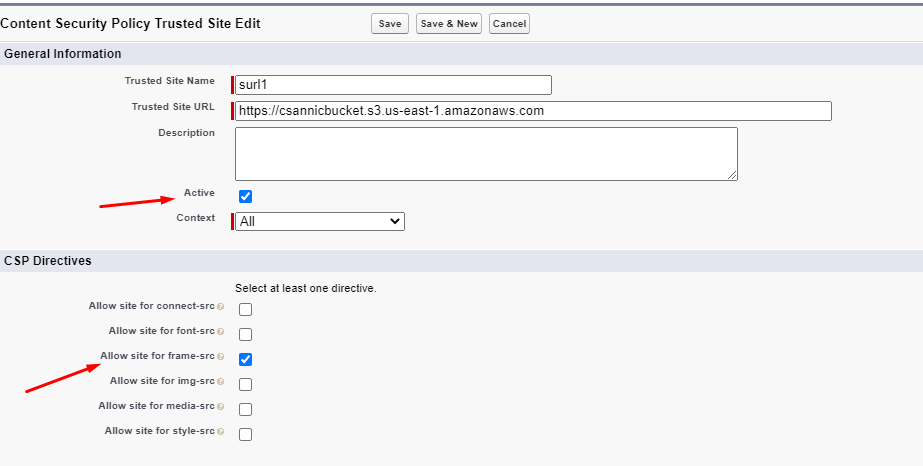
Click on New Trusted Site
Add a Trusted Site Name of your choosing and the url (listed below)
Make sure the Active checkbox is checked
Make sure Allow site for frame-src box is checked
Remote Site Settings
Go to Setup > Remote Site Settings and add your Community URL.
You can find your community url by going to setup>digital experiences>all sites to see the url you created in STEP 1. (e.g. https://cyangate-a-dev-ed.my.site.com/surl) If you have anything after the “.com”, it will automatically be removed. This is ok.Click Save
STEP 8: Give Surl User Profile access to the Connected App and PasswordlessLogin Class and Page
Go to Setup-->Profiles and edit the profile of the user you created up in STEP 2
Give the profile the following access
Under Assigned Connected Apps: give access to the connected app you created in STEP 4.
Under Apex Classes: give access to PasswordlessLoginController and cg.FileListController
Under Visualforce Pages: give access to PasswordlessLogin and SUrlRedirect
Under Custom Setting Definitions: give access to all settings that start with “cg.”
STEP 9: Give the Community User access to the necessary objects through sharing rules
The community user needs access to objects in addition to the profile permissions given in STEP 2. If you used an internal user with View All permission, you can skip this step.
Record access (sharing) is needed as follows:
On the Surl object: Share all surls with the surl user you created (see options below for how to do this)
For a file object that has a master-detail relationship to the parent:
For open/download functionality: Share all parent records, giving READ access, with the user you created
For upload functionality: Share all parent records, giving READ/WRITE access, with the user you created. This is needed to populate the lookup field when uploading a file.
For a file object that has a lookup relationship to the parent:
For open/download functionality: Share all file records, giving READ access, with the user you created
For upload functionality: Share all file records, giving READ/WRITE access, with the user you created. Share all parent records, giving READ access, with the user you created. This is needed to populate the lookup field when uploading a file.
You can give the needed access either using Org Wide Default (option 1, or with sharing rules (option 2).
Note: If using Preview & Thumbnail or File Activities, include sharing rules for Preview and File Activities.
Option 1: Make OWD public for external users (if using a Community license) for that object (or for the parent if the file object is a master-detail relationship, for example for Account if using S-URL for Account Files)
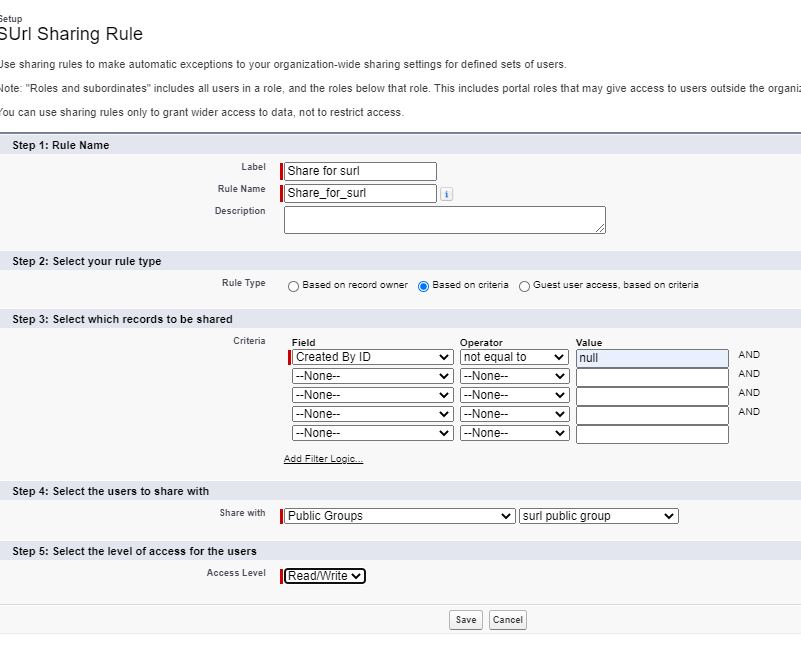
Option 2: Create a sharing rule to share all records of the object. You can use something as shown below, where the surl public group contains only the user you set up in STEP 2. Or you can share with Portal Roles and select the role of your user. Use criteria that is always true.
STEP 10: Enable S-URL
Go to S-Drive Configuration > Micro Services
Enable S-URL and type in the URL you set for the community (e.g. https://sandbox-surl-enhancements-developer-edition.cs81.force.com/surl) (Go to setup>digital experiences>all sites to see the url you created in STEP 1. NOTE: Be sure the url in this setting does not have “/s” at the end (which is how it will appear from Builder. ) )
(Optional) To customize the public share page, upload CSS static resource as “sdrivecustom” and Javascript static resource as “sdrivecustomscript” and change the initial part of static resource links with the community URL link before configuring the UI customization on the S-Drive Configuration page.
Example:Static resource URL: https://guls-demo-cg-dev-ed--c.visualforce.com/resource/1595934376000/sdrivecustom?
will be changed to
SURL Configuration URL: https://cyangate-comm-developer-edition.um5.force.com/surl/resource/1595934376000/sdrivecustom
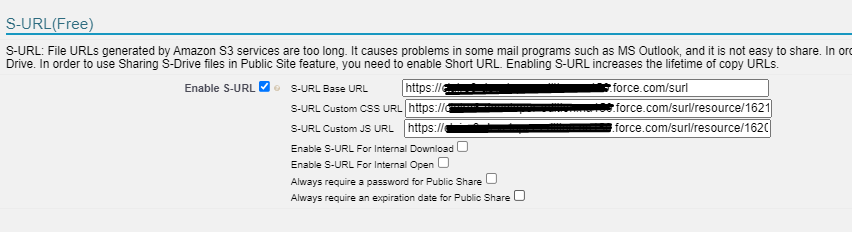
You can choose to use S-URL for internal open and/or internal download (not recommended)
You can choose to require a password and/or an expiration date for Public Share links.
Click Save
Notes:
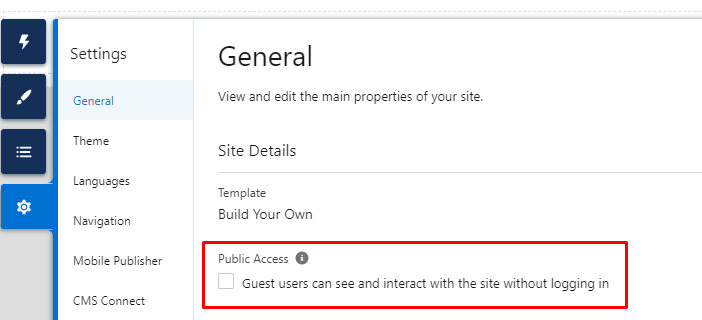
Community can NOT have guest user access. Make sure this box is unchecked. Error will be “Too many redirects”