
2.16 User guide for Salesforce Lightning
This section includes information about how to use S-Drive in Salesforce Lightning Experience.
S-Drive Lightning Component
The S-Drive Lightning Component is divided into 3 sections:
These sections are described in more detail below.
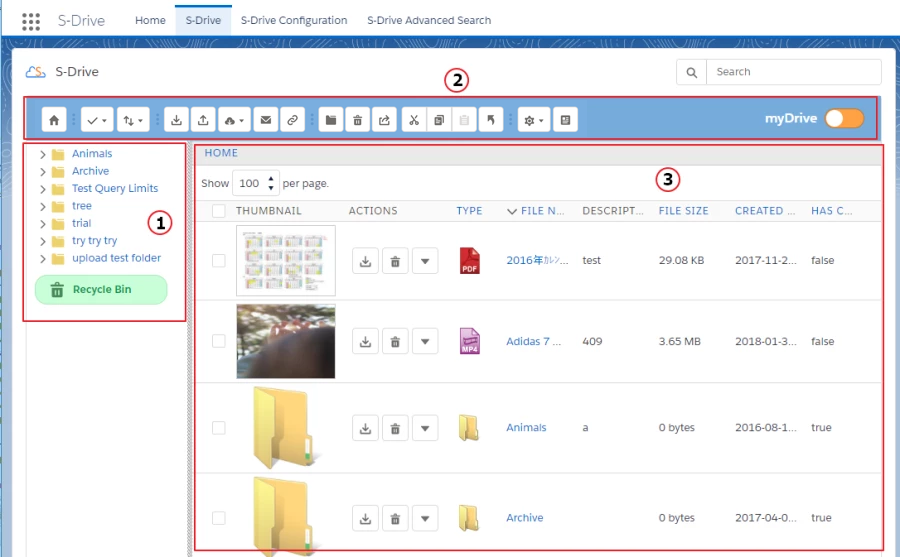
Folders
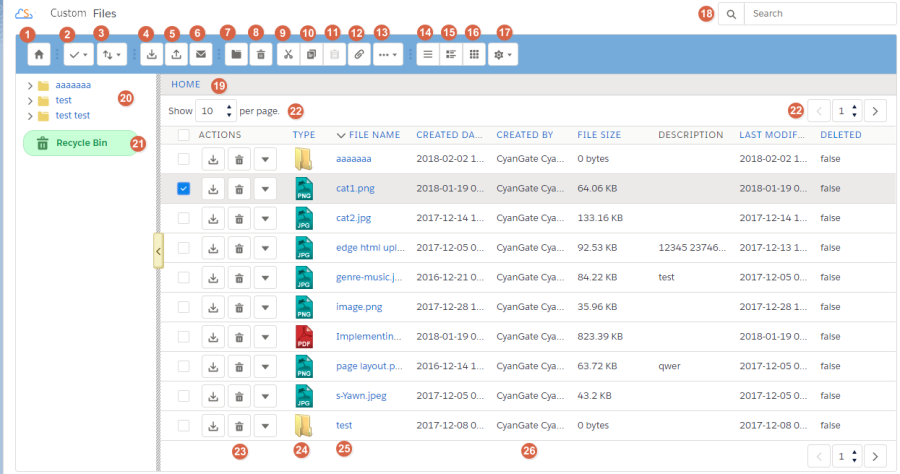
Left panel is the "Folders" panel. It displays your account's folder structure. Your home folder is named as "Home" and your folders are listed in a hierarchical way. You can click on a folder name to display its contents in the right pane. If a top-folder has sub-folders under it, it will show its contents on the panel when clicked.Toolbar
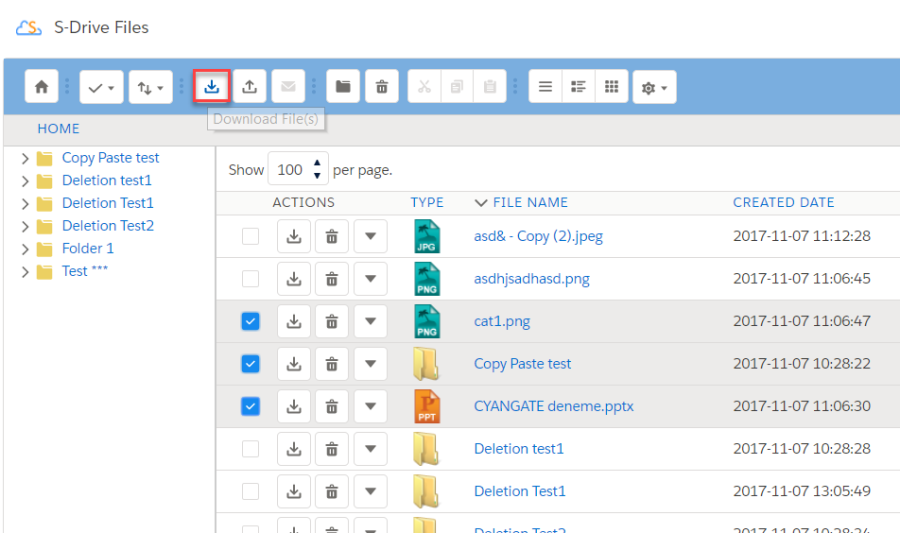
Top panel is the "Toolbar" panel. It displays breadcrumb navigation for folders, search box, action buttons and view type buttons.
a. "Breadcrumb Folder Navigation" keeps the current folder information. For example, if you are under "Home/Animals/Cats" folder, the location information will be displayed in this area (Figure 136-a). You can click any level to drill down to that subfolder.
b. "Home" button is functioning same as "Home" link on breadcrumb navigation. It directs to root folder of S-Drive Folders.
c. "Select All -Dropdown" button is used to Select All or Deselect All items in the list.
d. "Sort -Dropdown" button is used to sort File List below. If a field selected (i.e. Create Date) files sorted by selected field as ascending order. If same field selected again it is sorted by descending order.
e. "Download File(s)" button is used to download selected file(s). If just one file selected it directly download file. If more than one file or folder selected, it creates a zip file and download it.
f. "Upload File(s)" button is used to upload file(s). See "Uploading Files" section for more information (Figure 136-f). This item is not displayed for the "Search Results View".
g. "Import External File(s)" button is used to import files to S-Drive from external sources such as Google Drive, Box, etc. See "Importing External Files" section for more information.
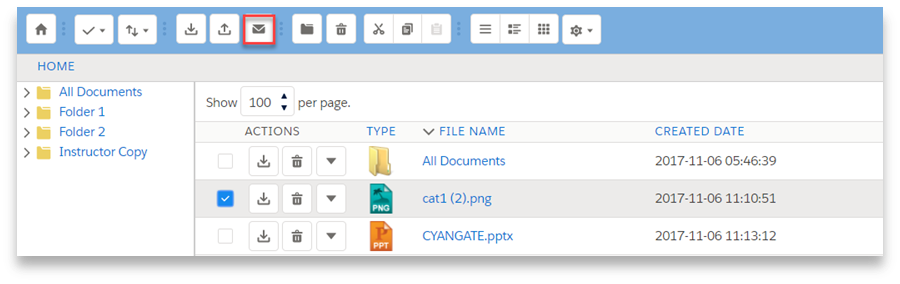
h. "Email Files" button is used to email files. See "Emailing Files" section for more information (Figure 136-g).
i. "Share Files With Public Link" button is for creating public links for downloading or giving access. See "Sharing Files with Public Link" section for more information.
j. "Create New Folder" button is used to create folders. See "Creating Folders" section for more information (Figure 136-h). This item is not displayed for the "Search Results View".
k. "Delete Selected File(s)" button is used to delete file(s) or folder(s). See "Deleting Files" and "Deleting Folders" sections for more information (Figure 136-i).
l. "Cut" button is used to move file(s) between folders. See "Moving Files" section for more information (Figure 136-j).
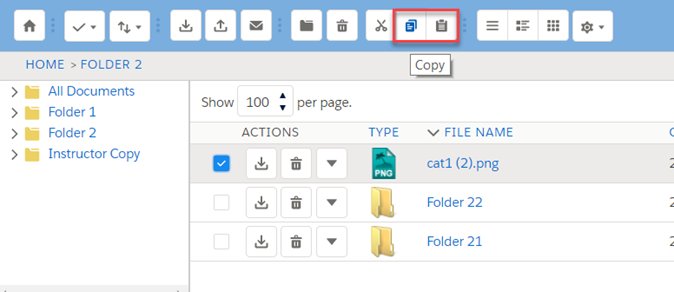
m. "Copy" button is used to copy file(s) between folders. See "Copying Files" sections for more information (Figure 136-k).
n. "Paste" button is used to paste the copied or cut file(s) to a folder. This button is not visible until files are selected for cut/copy. See "Moving Files" and "Copying Files" sections for more information (Figure 136-l). This item is not displayed for the "Search Results View".
o. "Custom Actions" button is used to perform custom actions. See "Custom Actions" section in "S-Drive Admin Guide" for more information.
p. Changes current view to List view. For more information, you can look at View Types section.q. Changes current view to Thumbnail view. For more information, you can look at View Types section.
r. Cchanges current view to Grid view. For more information, you can look at View Types section.
s. "Settings" dropdown menu button. You can set current View Type of S-Drive Folders page as default and set current Sort Field as default. Also, you can select whether to Hide Breadcrumbs and/or Hide Folders Tree View.
t. "Fields" button is used to change the shown fields in the files section. See "Changing Displayed Fields" section for more information.
u. "Search Box" is used to search items (files, folders) in S-Drive Folders. Refer to the "Searching Items" section for more information (Figure 136-q).
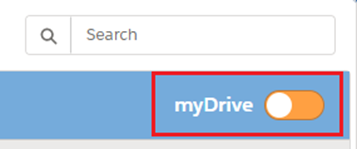
v. "myDrive" toggle button is used to navigate to myDrive folders. See "myDrive" section for more information.File list
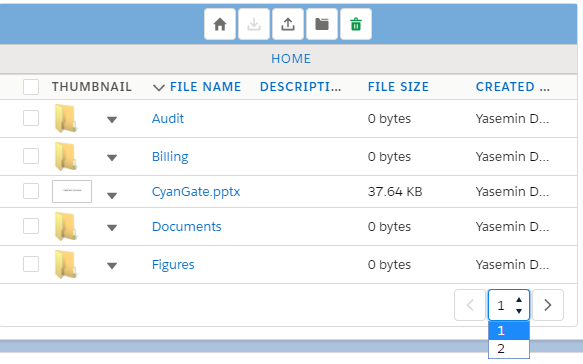
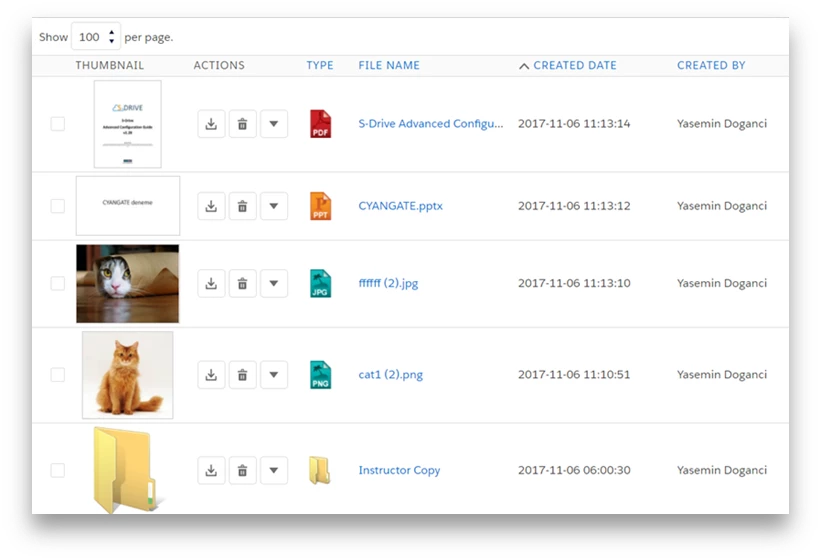
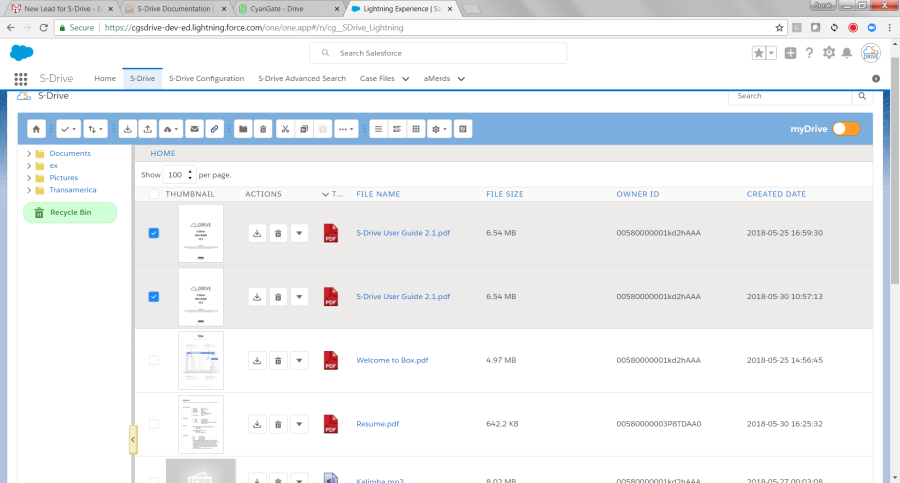
The main panel shows the list of files, the action menu, file type, and columns of information as set by the System Admin. This list can be shown in List View (seen here), Thumbnail View, or Grid View. See View Types for more information. From here, you can choose files and folders and perform actions on them (download, open, edit, etc.)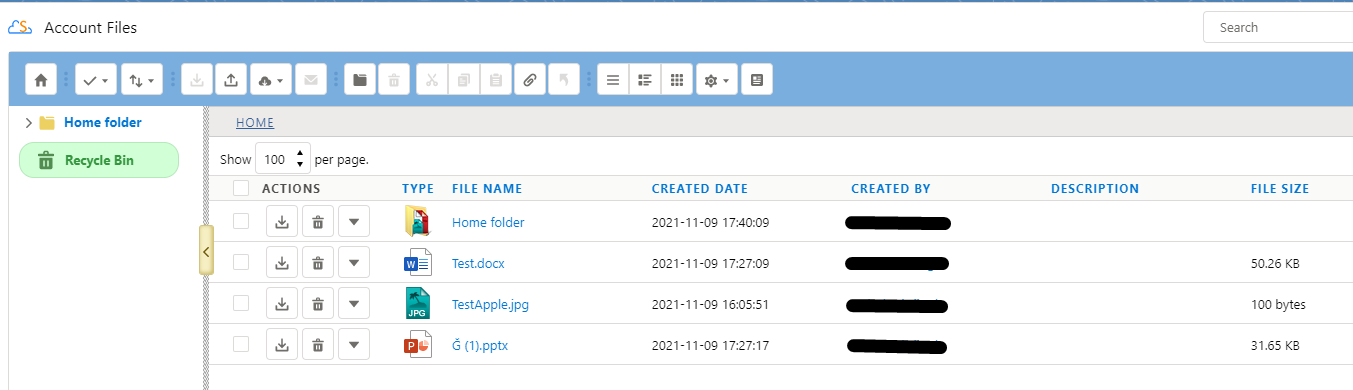
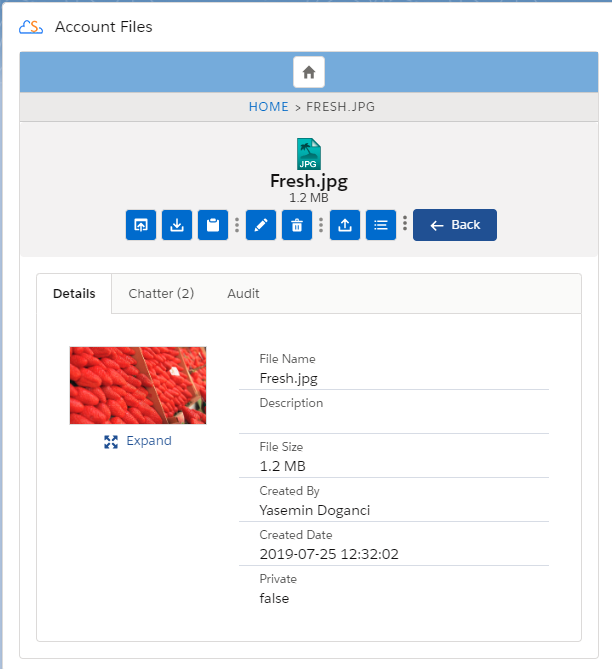
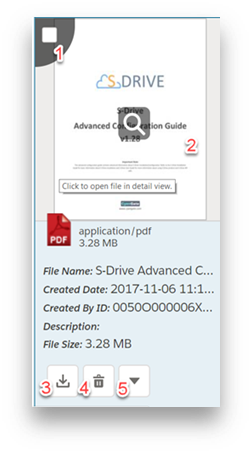
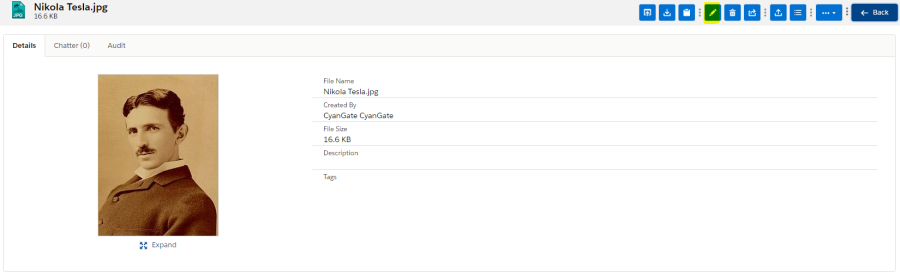
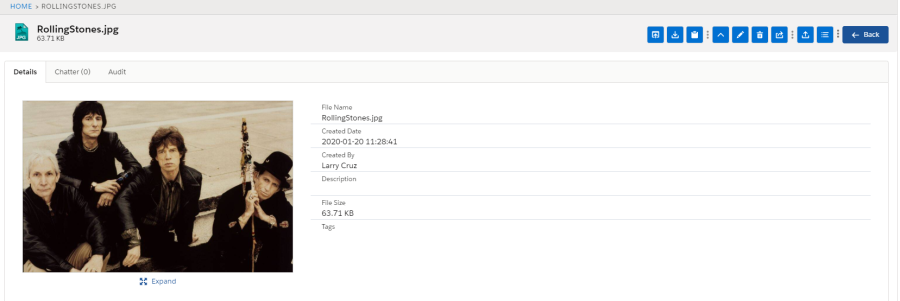
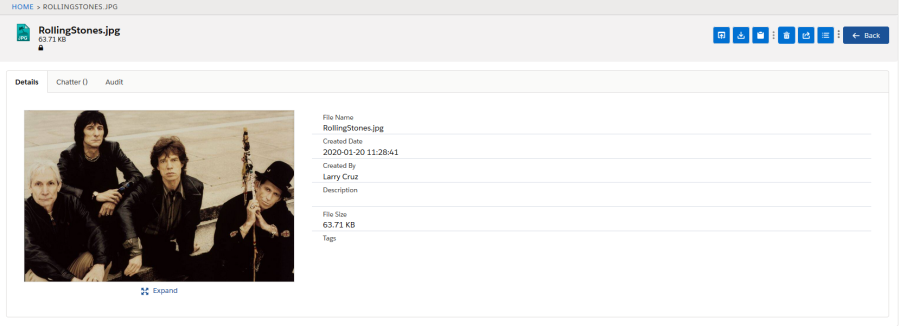
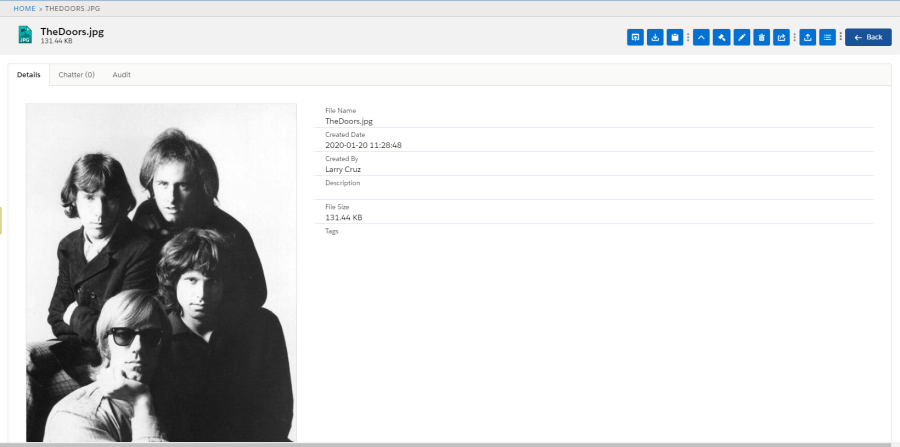
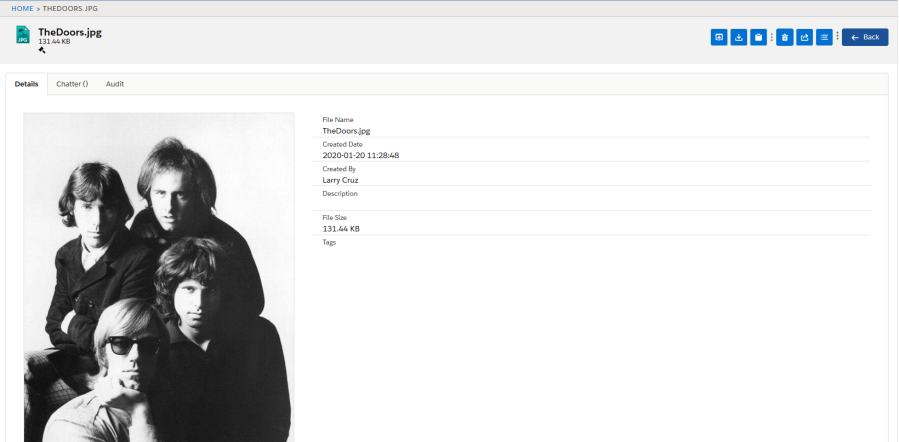
If you click on a file name, the thumbnail image (in Thumbnail view or Grid view), or the Action Menu “Details” item, you will see the the File Detail View.
On the Detail page there are different tabs to navigate, to view different kinds of information about the file. These three tabs are "Detail", "Chatter" and "Audit".
The Detail view consist of three main parts: Preview image of file if it exists, File properties & custom fields and Action buttons.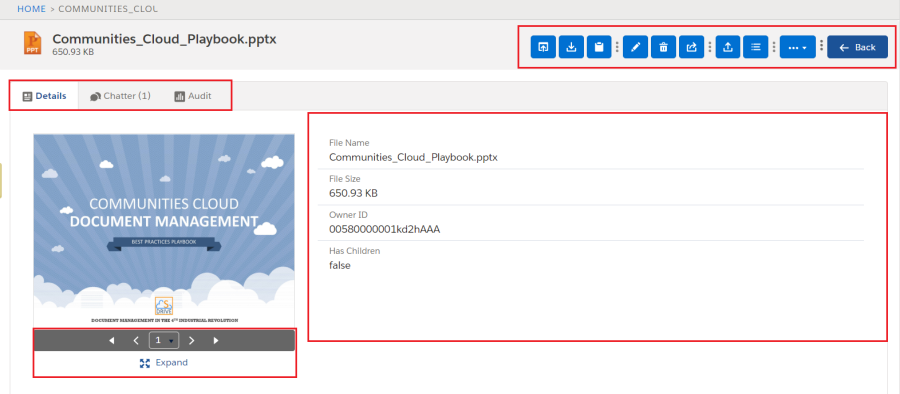
If your file has multiple pages, the previews of these pages are also displayable in this section. Using the
buttons under the preview of the file, it is possible to navigate through all the pages.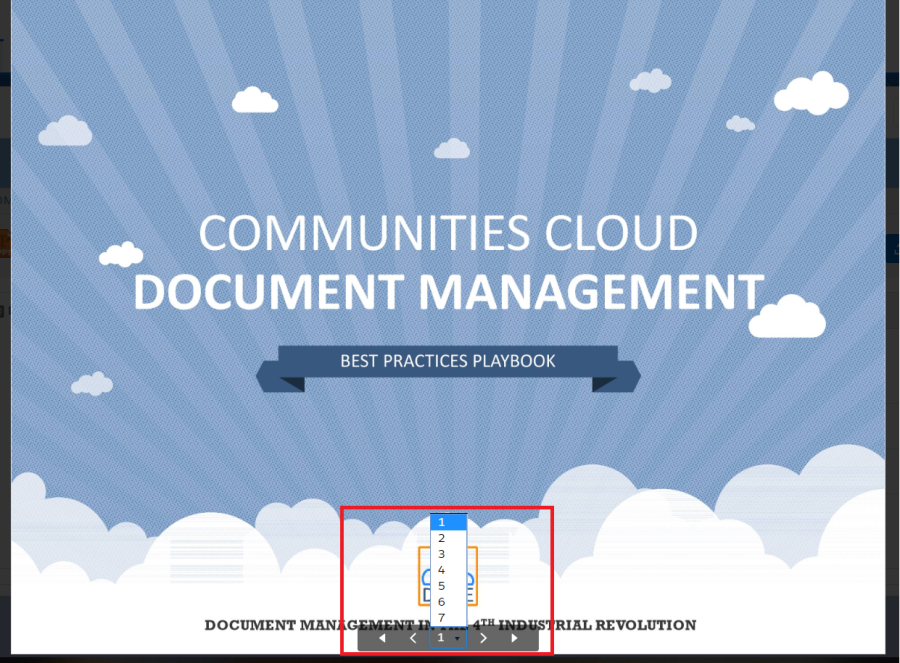
You can also expand the preview and go to a specific page of the file.
The Chatter view consist of two parts: the publisher and the feed. To get detailed information on Chatter please check Chatter section. The number of feed items can be seen next to Chatter tab (1).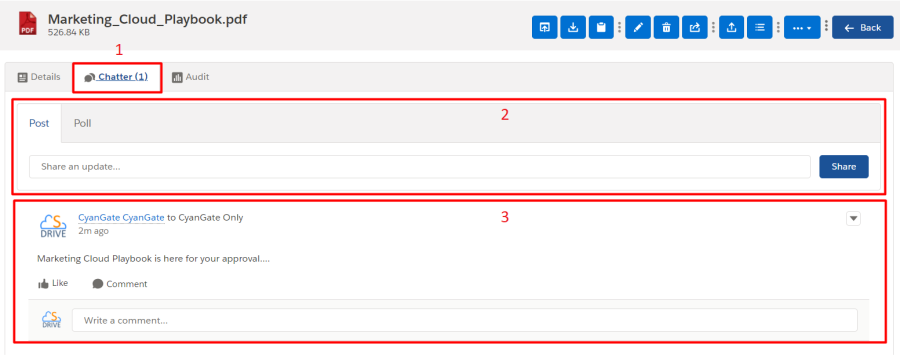
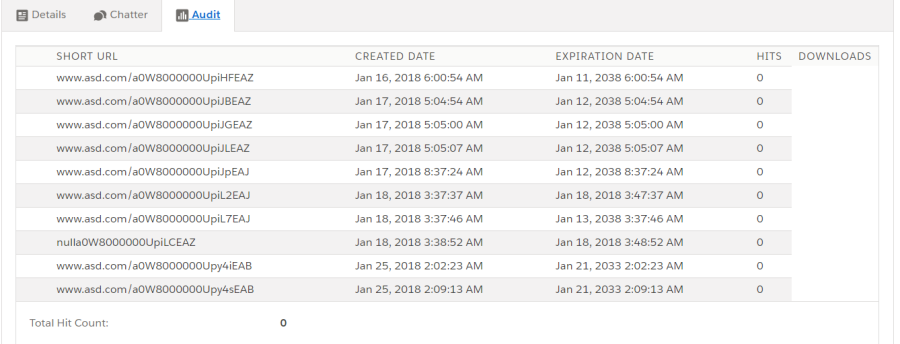
The Audit view consist of information about the URL of the file, the created and expiration date, and hit and download counts.
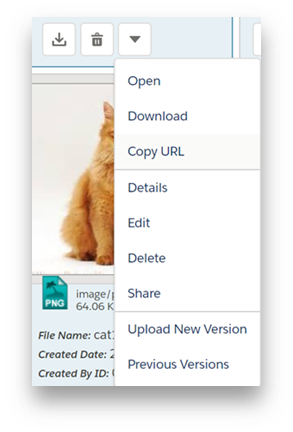
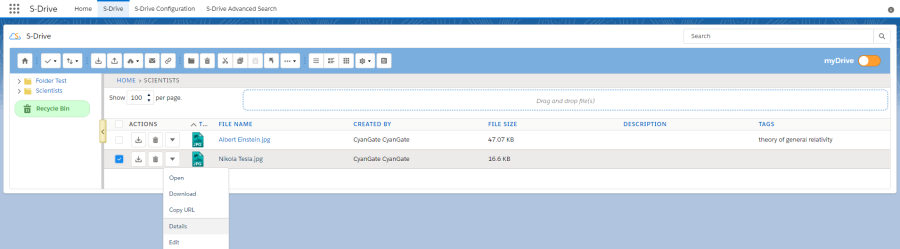
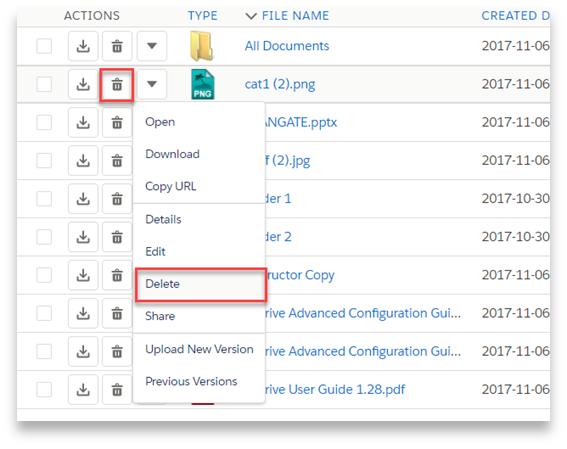
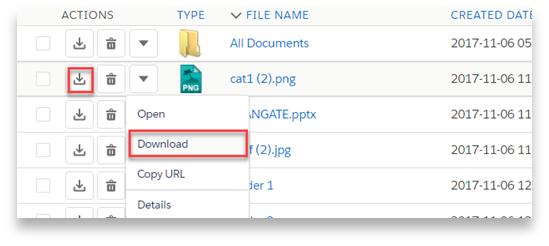
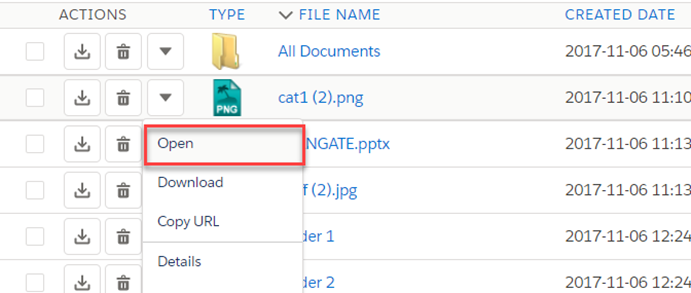
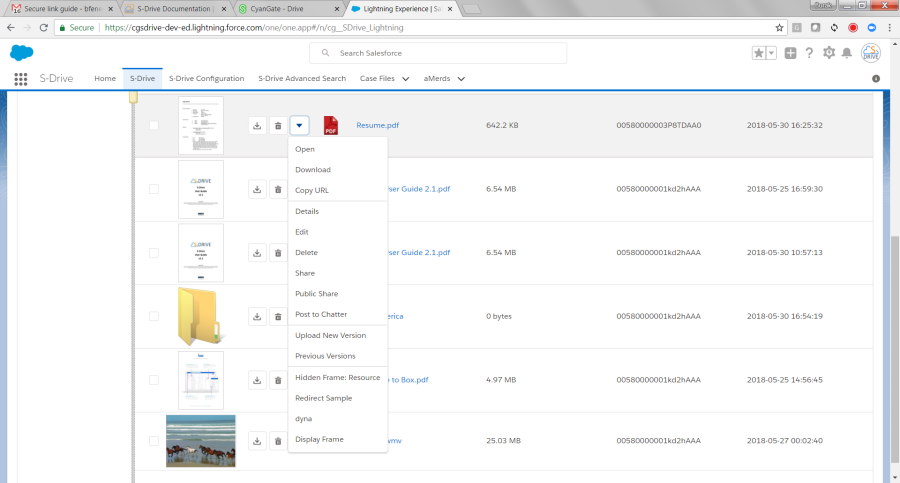
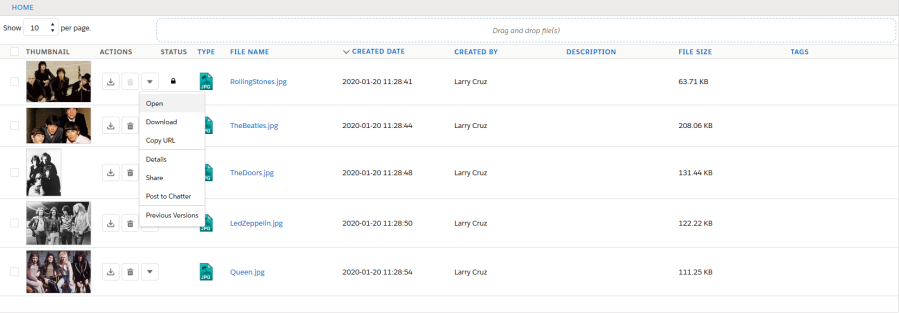
Back on the List View, the "Actions" column is used to display action buttons. The buttons shown here are based on configuration and profile permissions. There are two quick buttons for the most commonly used actions: Download & Delete. Clicking the down arrow button, shows a dropdown menu with more actions. Let's review the details about these item actions.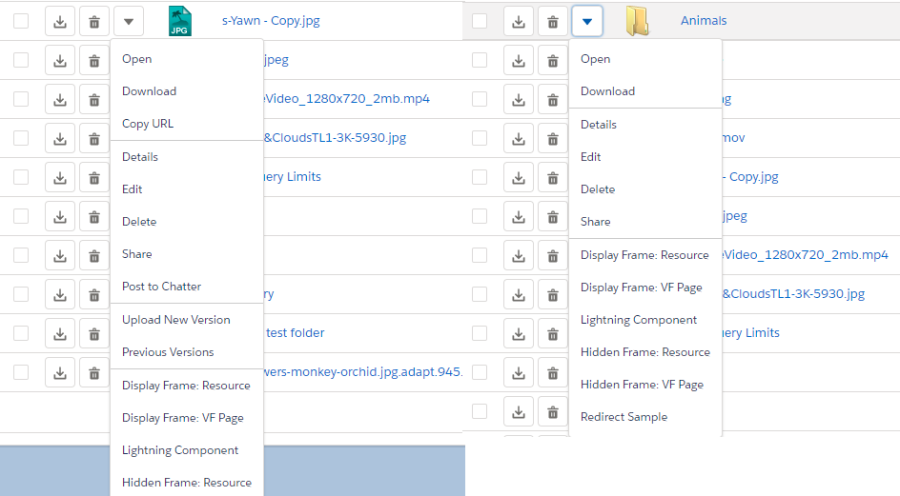
Open: It opens files that browsers support to view. If browser cannot open, it will be downloaded.
Download: You can download the selected file by selecting this action menu item. If you start download action for a folder, it creates a zip file then download it. See "Downloading Files" section for more information.
Copy URL: This option is displayed only for files. You can copy the file download URL to the clipboard. See "Copying URL to Clipboard" section for more information.
Details: For a file or folder when you click Details action, a modal window opens with file thumbnail and all information about file or folder. For more information, see Details Window.
Edit: This option is displayed for both files and folders. You can edit file/folder description by clicking this action menu item. See "Editing File/Folder Description" section for more information.
Delete: This option is displayed for both files and folders. You can delete selected file/folder by clicking this action menu item. See "Deleting Files" and "Deleting Folders" sections for more information.
Share: This option is displayed for both files and folders if manual sharing is allowed for this file object. You can share file/folder by clicking this action menu item. See "Sharing Files & Folders" section for more information.
Post to Chatter: This option is displayed only for files. You can post your thoughts related to this file by clicking on this action menu item. See "Posting to Chatter" section for more information.
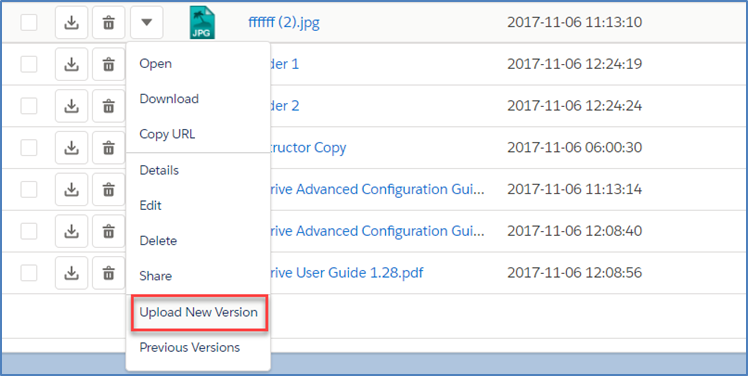
Upload New Version: If versioning is enabled version actions are shown on menu. By this action, you can upload versions of a file.
Previous Versions: By this action, Versioning List page is opened, and all versions are listed. For more information please see "Uploading New Version of a File" and "Previous Versions of File" sections.
Custom Actions: You will see the custom actions that is built by your admin or developer in this section. Clicking on one of these actions will perform the custom action. See "Custom Actions" section in "S-Drive Admin Guide" for more information or contact your admin if you have questions on the custom actions that is built for your organization.
Compact S-Drive Screen
The compact view enabled S-Drive component will look like the following figure.
When using Compact View there are limited features in the toolbar. In this view, the available functionalities are the following:
Navigate to Home
Upload files
Create folders
Navigate to the Recycle Bin for displaying the trashed files and folders
Advanced operations such as search, public share, e-mail, and cut/copy-paste are not available in compact view. Please disable "Use Compact View" configuration to enable these features.
Each file in the file list will have these in the following order:
A checkbox to select the file
The thumbnail image of the file
Actions menu button
File Name
Configured Fields
Although the toolbar options are limited for a compact view, users can still use the file actions button to do the following operations:
Open
Download
Copy URL
Details
Edit
Delete
Post to Chatter
Upload New Version
Previous Versions

The available actions in the Detail view are:
Open
Download
Copy URL
Edit
Delete
Upload New Version
Previous Versions
When navigating to Details view, the users can see all the configured fields and actions on the detail page. "Details", "Chatter", "Audit" tabs are available in this view.
Note that Folder Tree is not available in the compact view mode.
If there is a pagination configuration for the compact view, the pagination options will show up on the bottom right corner of the component for navigation.
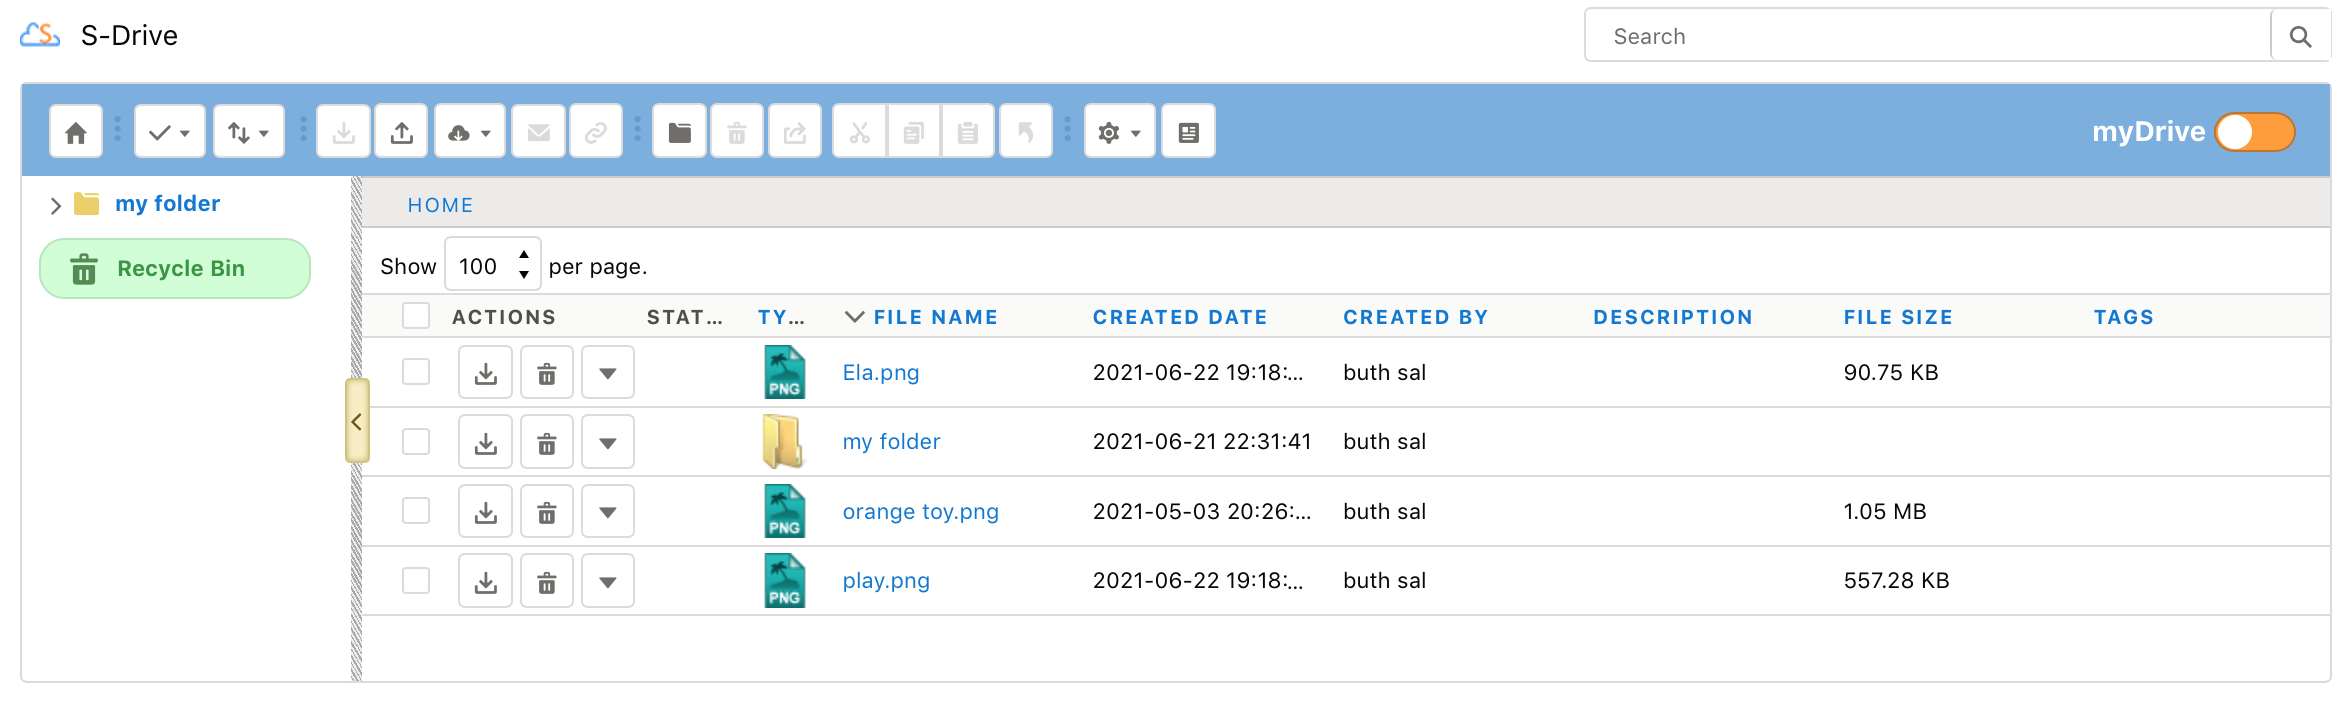
myDrive Folders
After the installation of S-Drive and clicking on "S-Drive" tab on the Tabs menu, or S-Drive app in App Menu in Lightning Experience, you will navigate to your S-Drive page.
The regular S-Drive page will be opened, and on the right-hand side of the toolbar menu, under the search bar, you will see a toggle button called "myDrive". When you click on this button you will switch into a new page called "myDrive".
myDrive provides a new place to upload your files and create new folders that are only visible to you and no one else in your organization. myDrive is not available for Communities or Attachments.
In myDrive, you can upload files, create folders, download or delete files and folders, and perform cut/copy/paste options, search for files in myDrive just as you do in S-Drive. The main difference of myDrive is that this place is private only to you. Therefore, you will not find any sharing related actions, such as "Share", "E-mail" and "Chatter" in myDrive.
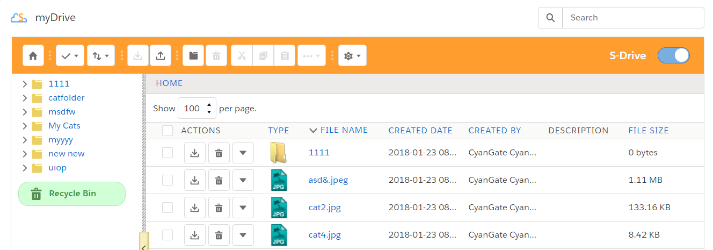
To go back to S-Drive files, you can use the toggle button.
Note: If your admin changed the settings of 'MyS3Object' in Salesforce's Sharing Settings, your files and folders in myDrive might be visible to others. To make your myDrive private to you, contact your admin to change the sharing settings to "private".
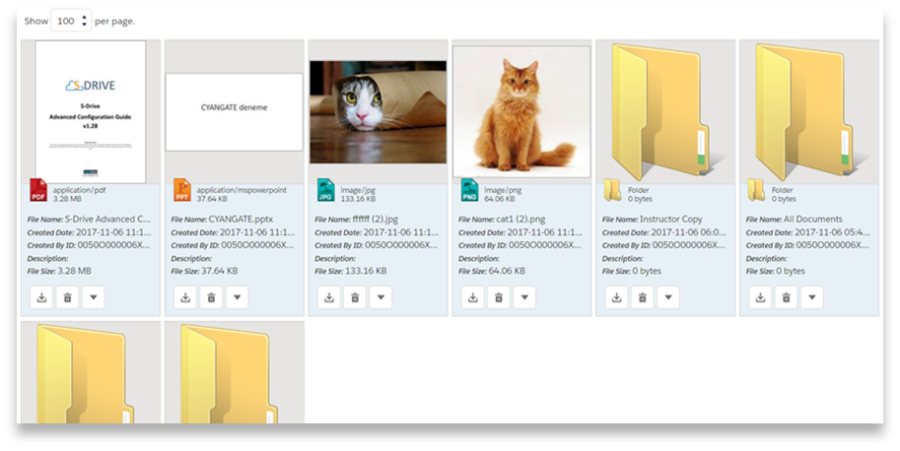
View Types
The file list panel in S-Drive can be displayed in 3 different formats: List View, Thumbnail View, and Grid View. Each is explained in more detail below.
List View
List view is default S-Drive view for all users. There is no thumbnail image for this view type. The files are listed in a regular order in this view type.
Thumbnail View
On thumbnail view, in addition to what is shown in List View there is thumbnail image of the document. Thumbnail view is active only for users who enabled Preview & Thumbnail feature.
Grid View
On Grid view, each item is listed on grid-card style with same height. Grid view is active only for users who enabled Preview & Thumbnail feature. In the Grid view, action buttons, menu & selection checkbox are different.
Selection Checkbox: When mouse hovers over thumbnail image, a checkbox is shown on the top-left side. You can select or deselect item by using this checkbox.
Detail Window: When hovering thumbnail image there is a glass icon on the center. If you click on image Detail Window is opened. To see more information please check Detail Window section.
Download Button: You can download file or folder by using this button.
Delete Button: It deletes file or folder. To see more information, you can see Delete section.
Action Menu Button: You can access all actions about file or folder to click this down arrow button. To get detail information on actions menu please check List View Actions section.
Creating Folders
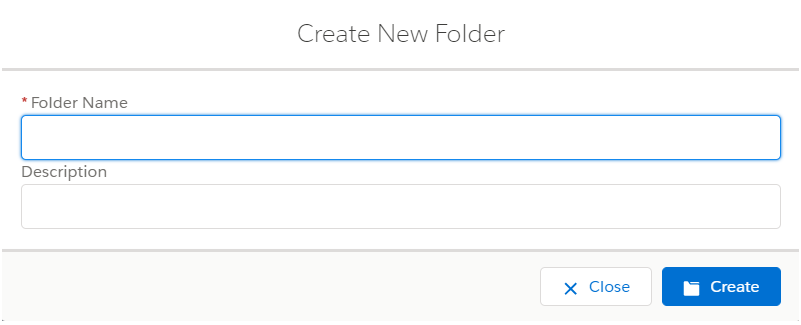
You can create folders by clicking "Create New Folder" button in the toolbar. You can create any number of sub-folders in a folder. Go to the folder that you want to create a sub-folder. Click "Create New Folder" button. After clicking the "Create New Folder" button, a new pop-up screen will be opened.

"Folder Name": Type in the new folder name into this field. You have 255 characters' limitation for the folder name. You can rename a folder after creation. Filling in this field is mandatory.
"Description": Type in the folder description into this field. You can use folder description to describe the folder. This field is an optional field that means you don't have to supply a description. You have 32000 characters' limitation for this field. However, you should keep it short for readability.
"Inherit Sharing from Parent Folder": If you're creating a folder in a subfolder and you have sharing enabled, you can inherit sharing from parent folder. Inheriting sharing from parent folder means all manual shares that are defined on parent folder will be applied to newly created folder. You won't be able to see this option if you're creating a folder at the "Home" level or if you do not have permissions for sharing.
"Close Button": If you decide not to create a folder, you can click on Close button. Operation will be canceled, and you'll return to the S-Drive Folders screen.
"Create Button": After filling in the required fields, you can click on Create button to create the new folder. S-Drive will create the new folder and refresh the folder structure for you.
Notes
If you try to create a folder without a name, with forbidden characters, or with a name that exists in the current folder you'll get one of the warning messages below:
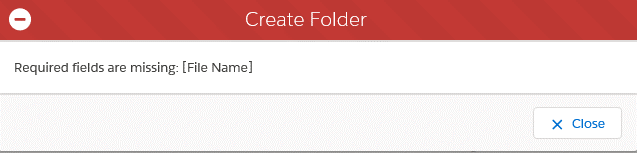
'Required fields are missing [File Name]'
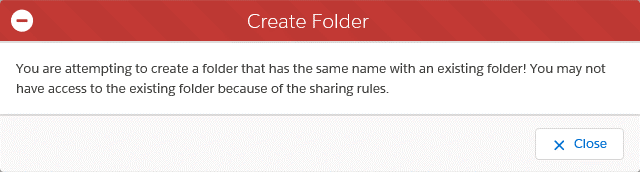
You are attempting to create a folder that has the same name with an existing folder! You may not have access to the existing folder because of sharing rules.'
"Create Folder" button becomes invisible if you do not have permissions to create a folder.
"Create Folder" button becomes invisible for the "Search Results View" once a search operation is performed. So, you cannot create a folder in the search results screen. You need to click "Home" button and go to the folder where you want to create the subfolder.
Uploading Files
Uploading with Buttons
You can upload files by clicking "Upload File(s)" button in the toolbar (Figure 136-e). You can upload any number of files into a folder at a time. Go to the folder that you want to upload files. Click "Upload File(s)" button. After clicking the "Upload File(s)" button, a new pop-up screen will be opened as shown in (Figure II 23).
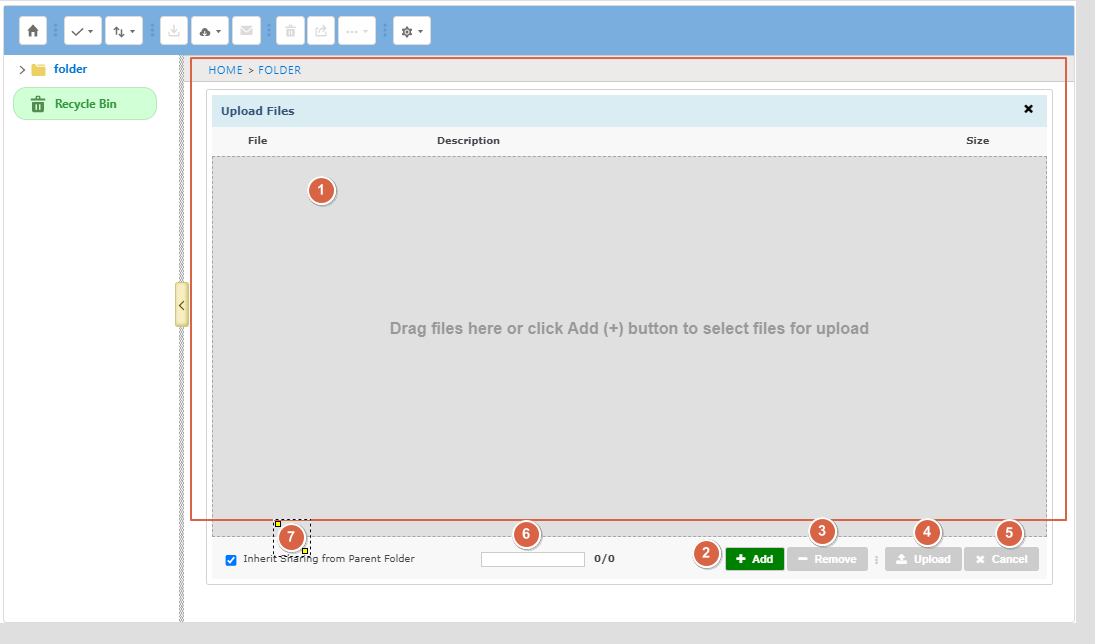
“Uploaded Files”: This is the File list/Drag and Drop area. The names of the files to be uploaded will be displayed here once they are selected using Add or Drag and Drop along with a Status indicator to the left of the file name.
"File” Column: This column displays the names of the files to be uploaded.
“Description” Column: This field may or may not show based on Configuration. Custom fields can be displayed here for users to fill in when uploading files.
"Size” Column: This column displays the sizes of the files to be uploaded. Html Upload Widget also supports custom object fields to edit these fields' values before uploading.
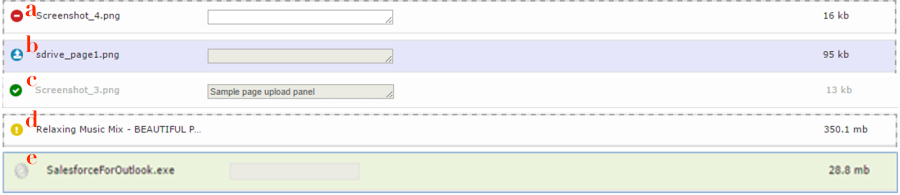
Status: A status indicator appears to the left of the file names that are selected for upload. It displays the status of the files which are being uploaded. There are five possible scenarios: Queued, Uploading, Complete, Failed, and Multipart Processing.
+ Add: Use this to browse files on your computer for upload. To select multiple files at a time from a folder, click on each file while you are holding "Ctrl" key. After selecting files to upload, click "Open" button. Selected files will be added to the Upload Files screen. Note that selected files are not uploaded yet, you are just creating an upload list. You can use "Add file(s)" and "Remove file(s)" buttons multiple times to organize the upload list.
- Remove: After adding some files to the "upload files list", you may decide to remove some files from the list. You can do this by selecting the file(s) from list and then clicking "Remove file(s)" button. To select multiple files, hold the "Ctrl" key, while selecting files to be deleted.
Upload: After selecting the files to be uploaded and editing their description, you can click this button, to start uploading files. Files that completed uploading will show a green check mark for success or a yellow exclamation point for failure. After Uploading files, you will be given the option of clicking “Complete” to return to the file list or “Add More” to upload more files. If any files failed to upload, you can hover over the yellow exclamation point to see the error message. If you click to the "Upload file(s)" button after a failure or cancellation, "COMPLETED" files in the upload list will be skipped for this iteration and only unprocessed, failed or canceled items will be uploaded.
Cancel: Use this button to cancel during upload. If you are uploading multiple files, the files that have already been uploaded will not be affected if you hit Cancel.
Upload Progress Bar: This progress bar displays the upload information after clicking the "Upload file(s) Button". For Html Upload Widget, percentage of the progress (i.e. 49%) and the uploaded files count of total files count (i.e. 1/2) is displayed in the upload progress bar. If upload is completed successfully, it displays "Upload(s) completed successfully" message inside the progress bar. You can cancel the upload at any time by clicking the "Cancel Upload" button. (Note: Cancel Upload button is just visible while upload is in progress.

Inherit Sharing from Parent Folder: If you are uploading a file into a folder, this box may show depending on your configuration and sharing rules. If checked, any manual share rules on the parent folder will be inherited by the file(s) that are uploaded.
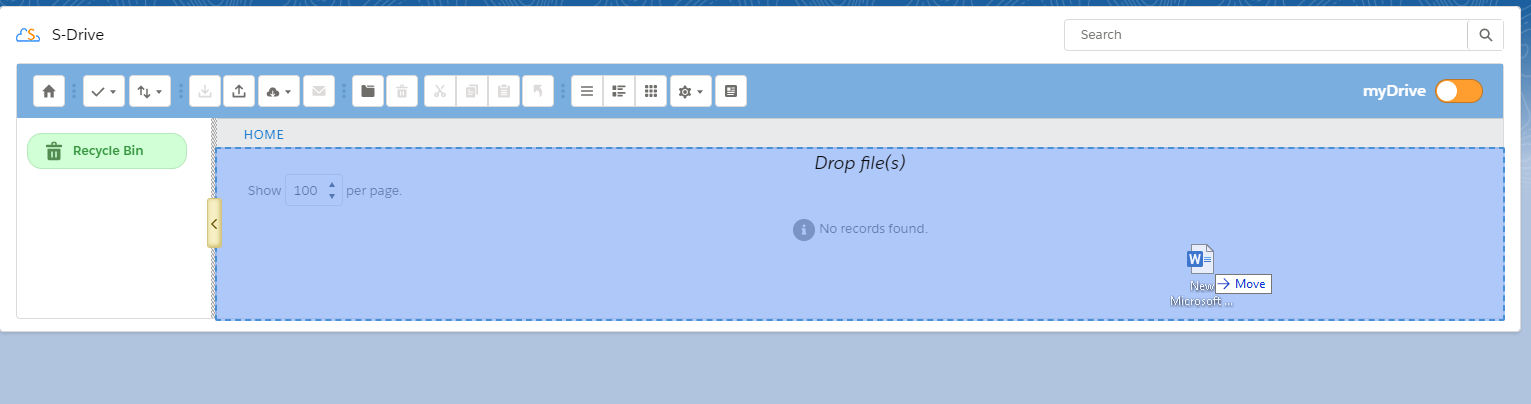
Uploading Files with Drag and Drop
You can also upload files with by dragging and dropping from the desktop or your file explorer to S-Drive on your browser. Select and drag your files from your local interface and drag it to anywhere on the S-Drive component. It will turn blue and you can drop it.
Once you drop the file or files, the Upload panel will open as shown below. If the File Object has a required field, you will have to fill them in. Then click the upload button. Once uploaded, click on continue to finish.
In order to use Drag and Drop in Chrome, you must disable the Chrome site isolation setting. In the Chrome url bar, go to chrome://flags/#site-isolation-trial-opt-out and set the flag to disabled.
Tagging
Tagging is a feature coming with 2.5 release and it is available for Salesforce Classic and Lightning Experience. You can both add tags to your S-Drive files and delete the existing tags. Tags are also searchable here. By clicking on the tags, you can find files that have the same tags with the clicked one.
If you don't see Tags, refer to Admin Guide 2.5 – 3.2.1. S-Drive Configuration Tab Section H to learn how to configure it.
Adding Tags
In order to add tags to a file, go to Details of the file for the Lightning Experience.
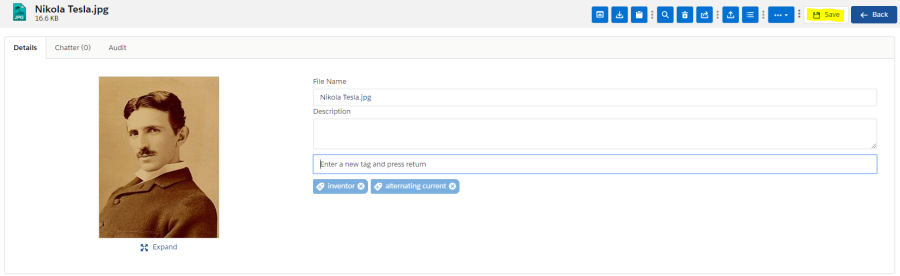
After going to Details, click the Edit button in the Detail section to add tags.
Then you will see this edit section. You can either add single tag or multiple tags by separating them with a comma. After adding the tags, press Enter to see them.

After entering two tags and clicking the enter button, tags will be added.
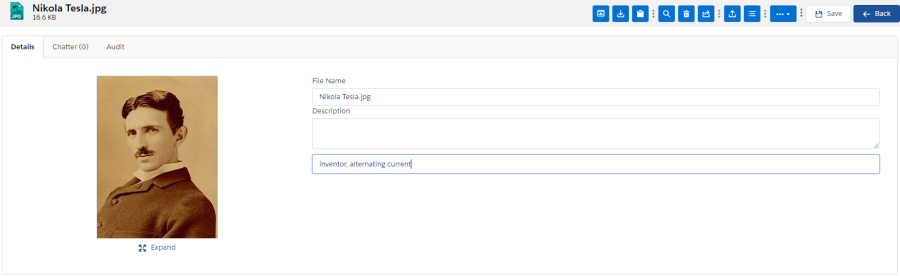
After tags are added, click the Save button to save the tags.
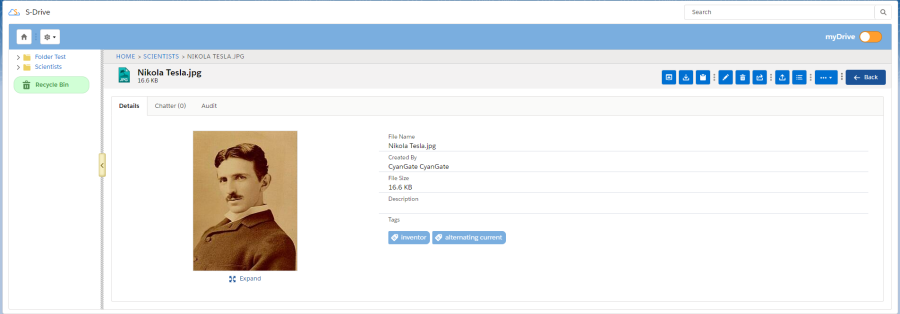
After saving the tags, the final look will be like below.

After saving the tags, the final look will be like below.
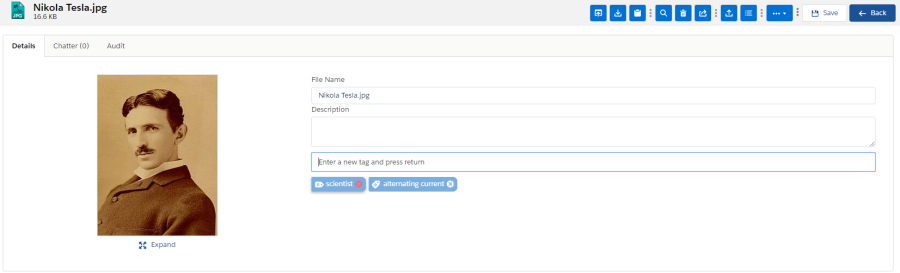
Removing Tags
If you want to delete the tags from the files, go to Details/Edit section again. Click X button, then click Save button.
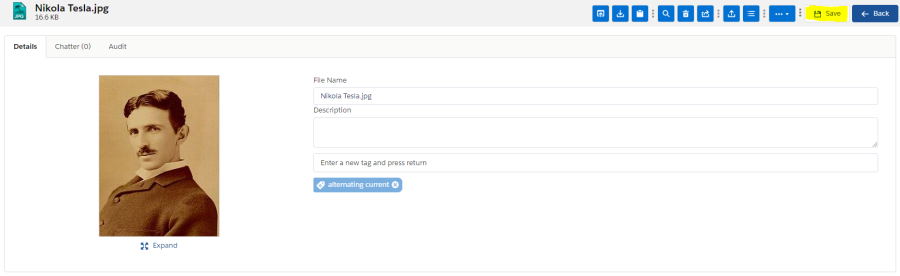
Then the final look will look like below.

Searching Files with Tags
Like in the Salesforce Classic, you can search and find files across S-Drive that have the same tags with the clicked one. Click the tag in the Detail section of the file.
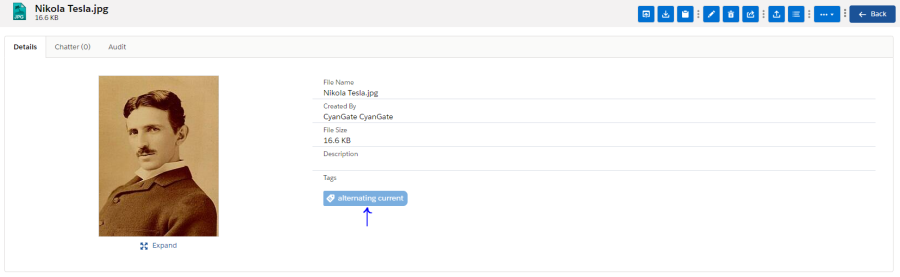
You can see the result as below. Right now, there is only one file that has the alternating current tag.

Importing External Files
SDrive supports importing the files which are stored in Google Drive, Box, One Drive, or SharePoint. By using the Files Connect feature of Salesforce, our system is now integrated to the given systems for file navigation and important.
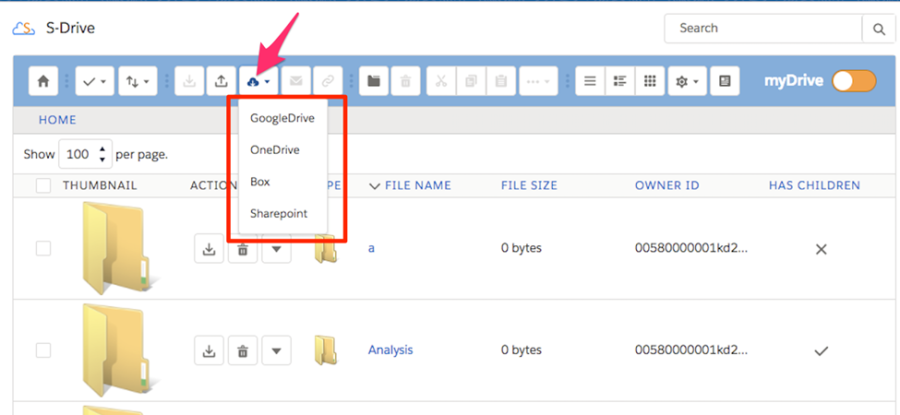
You can find "Import External Files" button on the toolbar. And when the button is clicked, it shows all possible external storage platforms which S-Drive has integration to. So, when any of them is selected, it shows a new modal for user to input external data object name, which is set by admin who set Files Connect configuration for external drive. Check S-Drive Admin Guide for information about configuring External Data Objects.
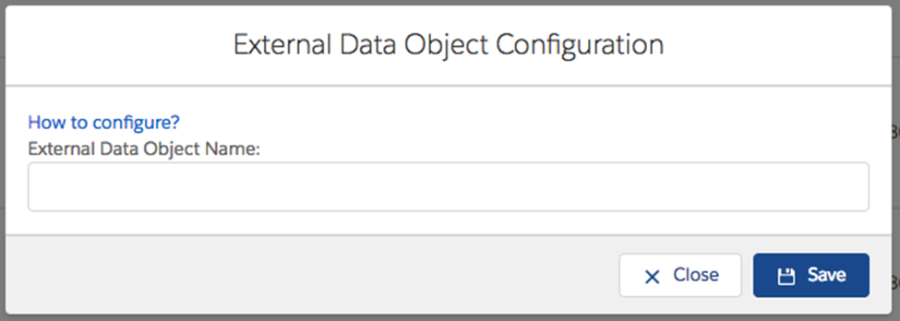
After putting down the external data object name and click save, your external storage platform is ready for navigation and importing files.

You can select the files or navigate within the folders and select the files which you want to import to S-Drive platform. And when files are selected and "Import External Files" clicked, the selected ones are queued for transfer to S-Drive as given in the figure(d).
(a)"Import External Files" Used for importing the selected files from external storage to S-Drive. It copies the files to the S-Drive folder root on which user previously clicked the import button on the toolbar.
(b)"Go Back" Used for returning to S-Drive File list component.
Deleting Files
There are two possible ways to delete files: "Single File Deletion" or "Multiple File Deletion". Note that "Deleting Folders" will be handled in a different topic.
If versioning is enabled and selected file has versions, all versions of selected file will also be deleted.
The S-Drive recycle bin is never automatically emptied.
Files in the S-Drive recycle bin still exist in the AWS S3 bucket. Once deleted from the S-Drive recycle bin, they are deleted from the bucket.
Files deleted from the S-Drive recycle bin go into the Salesforce org recycle bin. You can not restore a file from the Org recycle bin.
Do not delete S-Drive files from a list view (such Account Files.) Doing so will cause unintended results.
Single File Deletion
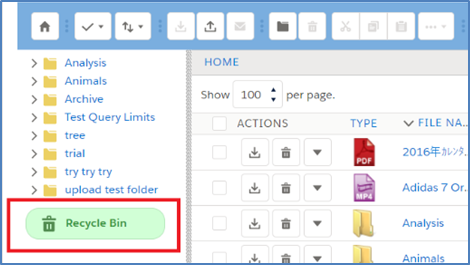
To delete a file, click the "Item Actions" button in the "Actions" column of the selected file and select "Delete" item menu action from the dropdown menu. Using this method, you can delete files one by one. The files you chose to delete will immediately go to the Recycle Bin. In Recycle Bin you can choose to delete the files permanently or restore them. You can access recycled files/folders by clicking on the "Recycle Bin" button which is at the bottom of the Folder's Tree.

When you navigate to Recycle Bin, you will see the list of files and folders you have deleted. You can recover or delete the files/folders in Recycle Bin. You can choose multiple items to delete or recover at once. For these purposes you can use the Toolbar menu buttons or the Actions menu.

When you recover files/folders they will be sent back to where they were located before deletion.
If you decide to delete the files, you can click on the "Delete File" item action or the "Delete" button on the Toolbar. After clicking the "Delete File" item action menu you'll be asked if you are sure.
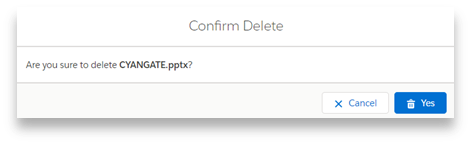
If you select "Yes", file will be deleted immediately, and you'll return to the S-Drive Folders screen. If you select "Cancel", file won't be deleted, and you'll return to the S-Drive Folders screen.
Multiple File Deletion
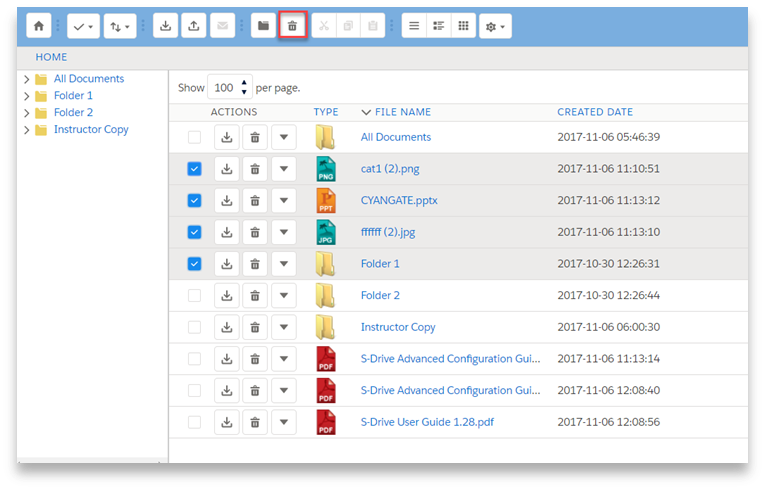
To delete multiple files at a time, select files and then click the "Delete File(s)" button in the toolbar of the S-Drive application. The files you have chosen to delete will immediately go to the Recycle Bin. In Recycle Bin you can choose to delete the files permanently or restore them. You can access recycled files/folders by clicking on the "Recycle Bin" button which is at the bottom of the Folder's Tree.
When you navigate to Recycle Bin, you will see the list of files and folders you have deleted. You can recover or delete the files/folders in Recycle Bin. You can choose multiple items to delete or recover at once. For these purposes you can use the Toolbar menu buttons or the Actions menu.
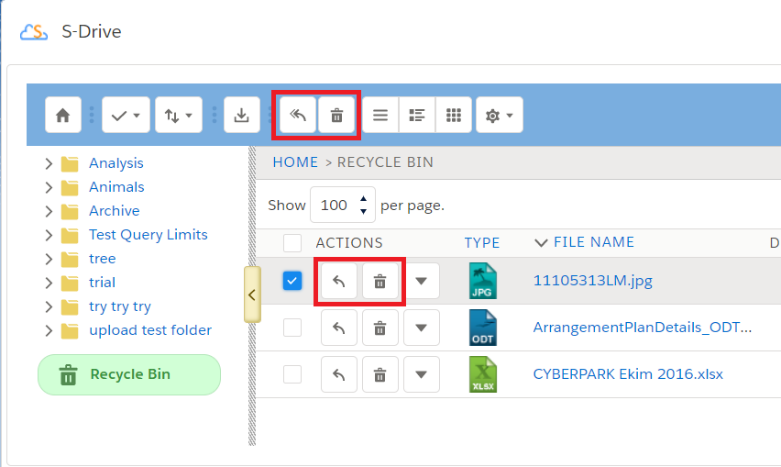
When you recover files/folders they will be sent back to where they were located before deletion.
Using this method, you can delete multiple files at a time. After clicking the "Delete File(s)" button you'll be asked if you are sure. Select "Yes" to delete selected files, "Cancel" to cancel delete operation.
Deleting Folders
When you delete a Folder, all files inside the folder are deleted as well.
You can delete folders using the same approach mentioned in the "Deleting Files" section. However, there are some limitations for the folders. When you try to delete a folder, the delete request should not exceed the maximum CPU time on the Salesforce servers. If you cannot delete the folder because of this issue, you need to select a smaller set of folders, to be able to continue with delete process.
Notes
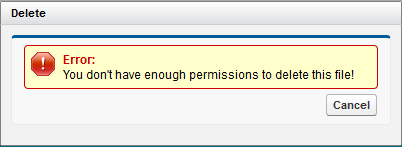
If you try to delete another user's file or folder, you may get an error message: "You don't have enough permission to delete this file!" that means there are sharing restrictions over files set by your System Administrator or the file owner. You need to obey the restrictions set by your System Administrator (or file owner). You need to contact with your System Administrator or file owner to correct any sharing related problem.
Notes on File Recovery
Please consider these situations when you delete / recover files and folders.
If you want to delete a file or folder permanently, first you must delete them from the S-Drive folders, and then delete them from the S-Drive Recycle Bin.
If you delete a sub-folder and then delete the folder it was placed, both folders will be displayed in the Recycle Bin. When you try to recover the sub-folder, it will be sent to the main file, and still be in recycle bin. In order to recover any sub-folders or files, you should recover the main folder they are in.
If you send some files to Recycle Bin in Lightning Experience, the files won't be deleted in Classic.
Emailing Files
Emailing files is very easy using S-Drive. You can email any number of files at a time. S-Drive does not attach files to emails; it adds links to the files at the bottom of the email message. You can set the expiration time for these links also. You and your email recipients don't have to wait for sending/downloading large attachments. They'll just click the link in the email, and they'll download attachments directly from source in a secure and fast way. You can use email templates in your organization. Let's see how this can be done. First select the files to email from the folder you want by clicking checkboxes next to each file, then click "Email" button in the toolbar. Email screen will be opened.
Email Files screen contains many features. Let's review the details of the fields in this screen:
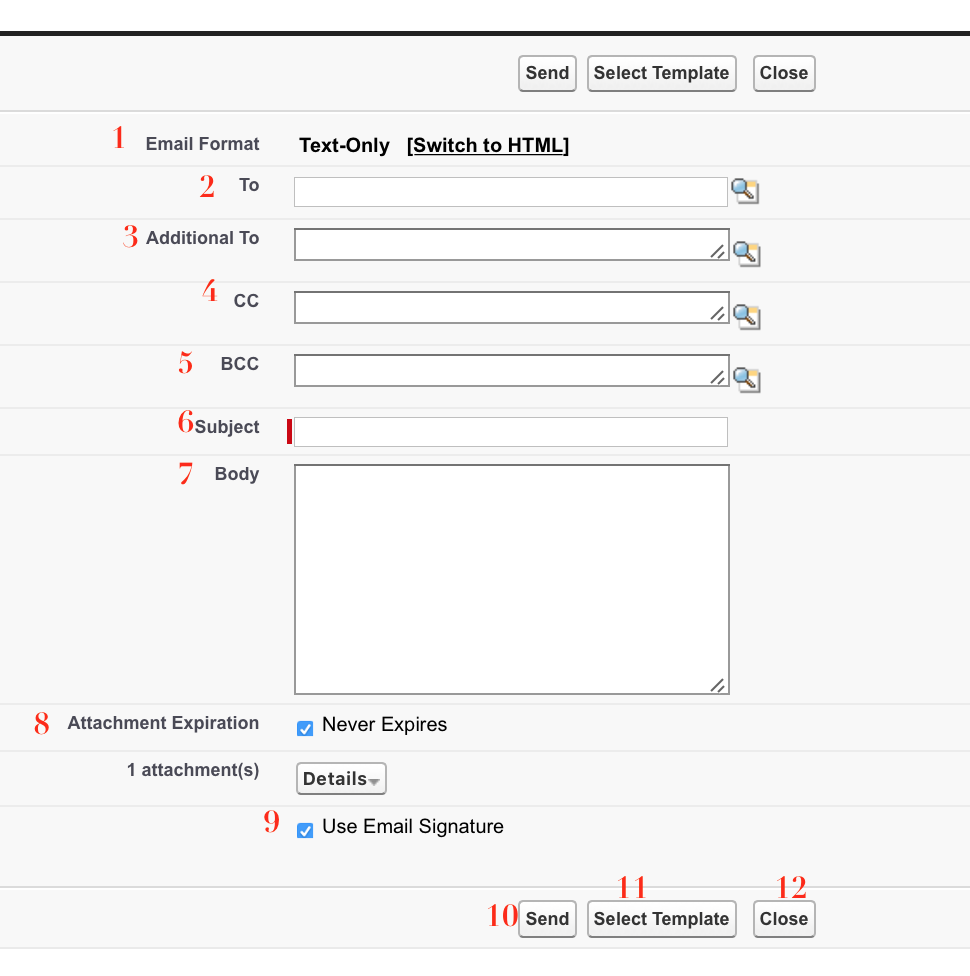
"Email Format": Used to select the email format. If you want to remove any HTML formatting and send a text email, click "Switch to Text-Only". Click "Switch to HTML" to use HTML formatting or to track the email. This option will not be displayed if you selected an HTML template from the "Select Template" menu.
"To...": The main recipient of the email. This field must be filled with a Salesforce contact. You cannot type in the email address; you need to search for contacts by clicking the "Lookup" button and then getting a user from the list. You can also type in some characters of the contact name and then click the lookup button. After clicking the "Lookup" button "Search Contacts" screen will be opened. If you decide to change or remove the "To..." recipient of the email you can clear this field. "Lookup" button is not available for Customer Portal users.
This field is used just for sending email to Salesforce contacts. Other recipients can be added to "Additional To...", "CC..." and "BCC..." fields. Also note that the email message is added to the Activity History of the Salesforce.com contact. You can access activity history of a contact from his contact page under Salesforce.com Contacts tab. See S-Drive Admin Guide for enabling Activity History for standard and custom objects. Important Note: For Contact, Account, Case and Opportunity S-Drive Attachments, "To" field is auto-filled with related contact information, if available. You can configure this option for custom objects using "S-Drive Admin Guide – Creating Custom Object Files" section.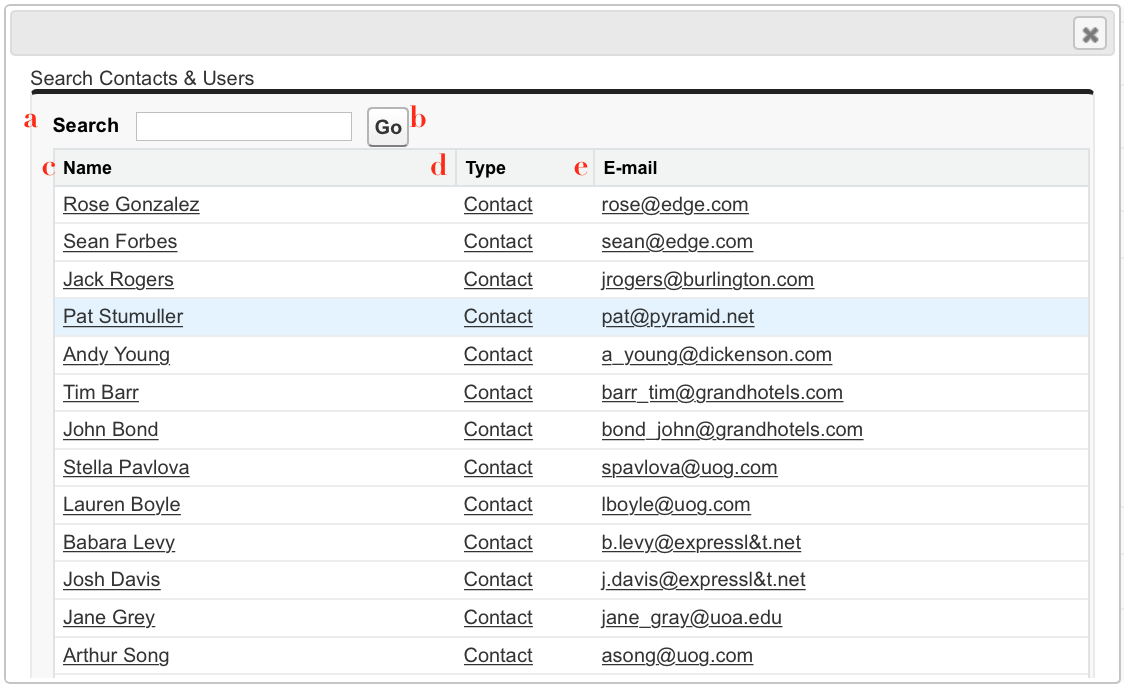
a. "Search Criteria": Type in the search criteria in this field. S-Drive searches over name, last name and email fields for the typed keyword after clicking the "Go" button or pressing the Enter key. You can leave it blank and press "Go" button to search across all your contacts .
b. "Go Button": After typing in the search criteria, click this button to start the search and retrieve the search results.
c. "Name Column": Results will be listed in this section after the search. Results' name will be displayed in this column.
e. "Email Column": Results' emails will be displayed in this column.
"Additional To...": You can add additional mail recipients here. For multiple email recipients you need to comma-separate them. Also, you can click the "Lookup" button to select recipients from Salesforce contacts. "Lookup" button is not available for Customer Portal users.
"CC...": Carbon copy the email. If you want to carbon-copy the email to some recipients, you can add them comma-separated here. Also, you can click the "Lookup" button to select recipients from Salesforce contacts. "Lookup" button is not available for Customer Portal users.
"BCC...": Blind carbon copy the email. If you want to blind-carbon-copy the email to some recipients, you can add them comma-separated here. Also, you can click the "Lookup" button to select recipients from Salesforce contacts. "Lookup" button is not available for Customer Portal users.
"Subject": Type the subject of the mail to this field. This field is required. If you select a template this section is auto filled with the subject of the email template..
"Body": Type the email message to this field. If you select a template this section is auto filled with the body of the email template.
"Attachment Expiration": This field is used to set the expiration time for the attached files (Figure II48). Default is "Never Expires" (but organization-wide default value can be customizable over "S-Drive Configuration", consult to your system administrator to change the default value). Means that link in the email will be active until the account is closed or the file is deleted. If you uncheck "Never Expires", other options will appear. If you check the "Never Expires", other options will disappear again.

a. "Number Field": Type in the number for the selected time type (i.e. 30 minutes, 4 hours, 5 months). For this field, only positive integer values are allowed. If you type another character, you'll get "E-mail attachment expiration must use just numbers (e.g. 50)!" error message.
b. "Time Type": You can select minute(s), hour(s), day(s), month(s) or year(s) for this field.
c. "Attachment Details": This section gives information about attached files (Figure II 48-c). If you click "Details" button next to the "X attachment(s)" text, you'll see the file names and file sizes of the attached files. You can remove attached files using red - button next to the attached file name. You can hide attachment details by clicking "Details" button again.
For example, if you select 30 minutes for the attachment expiration, recipients of the email will not be able to download the attached files after 30 minutes of sending the email.
"Use Email Signature": If you want to use your email signature that you created over Salesforce account, check this option. If you do not want to append signature to the email, uncheck this option . "Use Email Signature" option is not available for Customer Portal users.
To display or change your email signature, login to your Salesforce account. Go to "Setup -> Personal Setup -> Email -> My Email Settings" and you'll see a section named "Email Signature"."Send Button": To send your message, click Send button. If everything is fine, you'll get "Email has been sent successfully" message. If it fails, you'll get "Email Failed" message along with the reason of the failure.
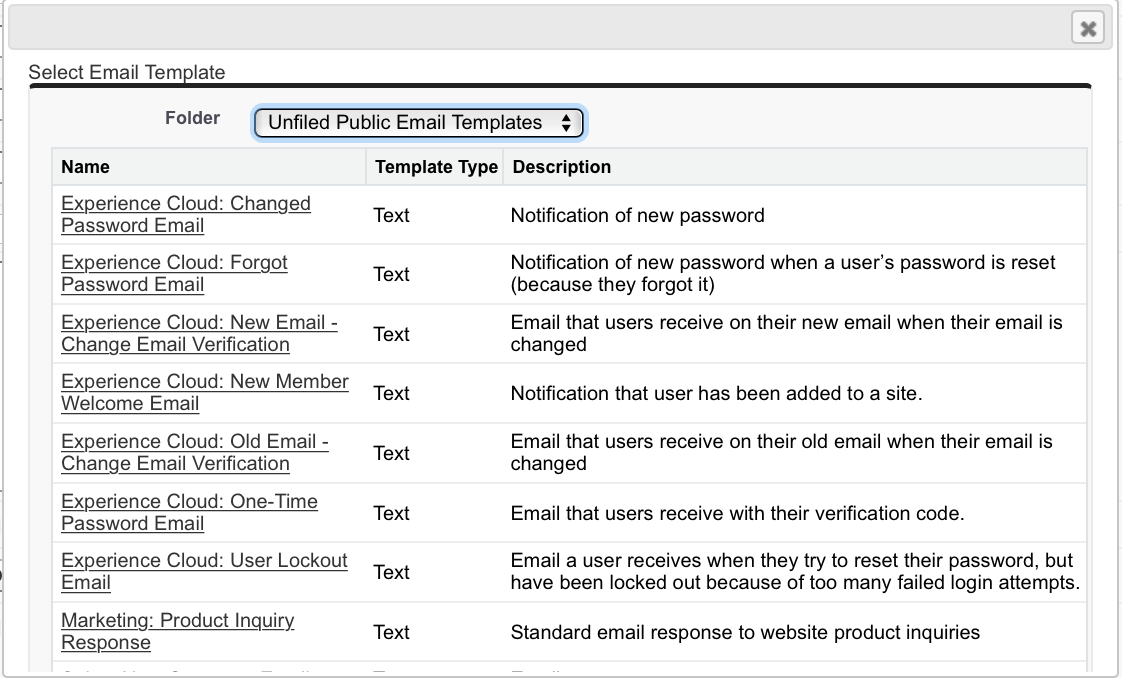
"Select Template": You can click "Select Template" button to choose a predefined email template. Choose a folder and select a template from the folder. If necessary, you can modify the content of the template in your email; however, you cannot modify Custom templates. Once you select the template email screens "Subject" and "Body" sections will be filled with the contents of the predefined template. Template selection screen is not available for Customer Portal users.
"Close": You can close email screen by clicking this button. It will close the email screen and return you back to the S-Drive screen (Figure II 50).
You cannot email folders. If you try to email a folder as an attachment, you'll get "You can't email a folder. Please check your selection list and try again!" message.
S-Drive Email
The Email Lightning component allows users to write emails with attachments of any S-Drive files on any object.
Please refer to Admin Guide to learn how to enable S-Drive Email.
Write an email
Fill the email field with proper email addresses, to send to multiple contacts separate the email addresses by commas, write an email body and format it by using the toolbar at the top of the email body text area. The body and the subject can be left blank.
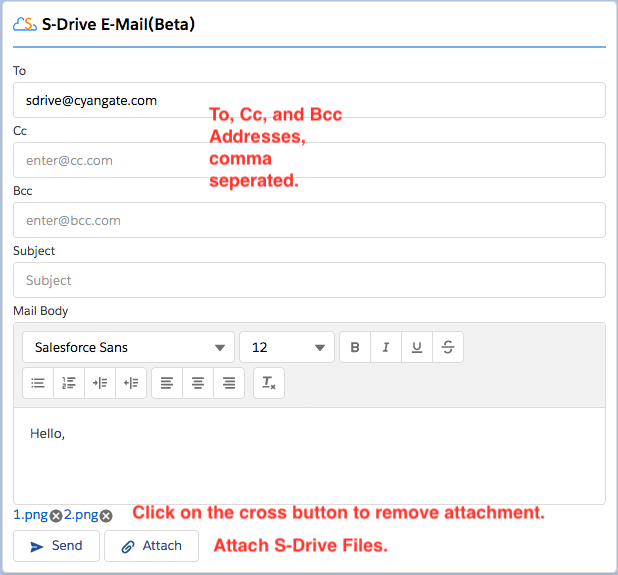
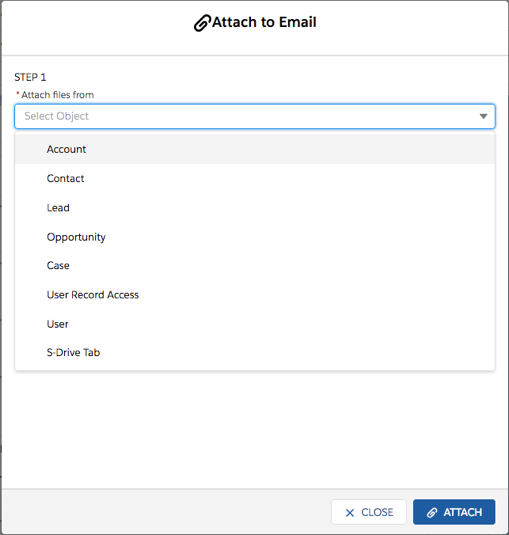
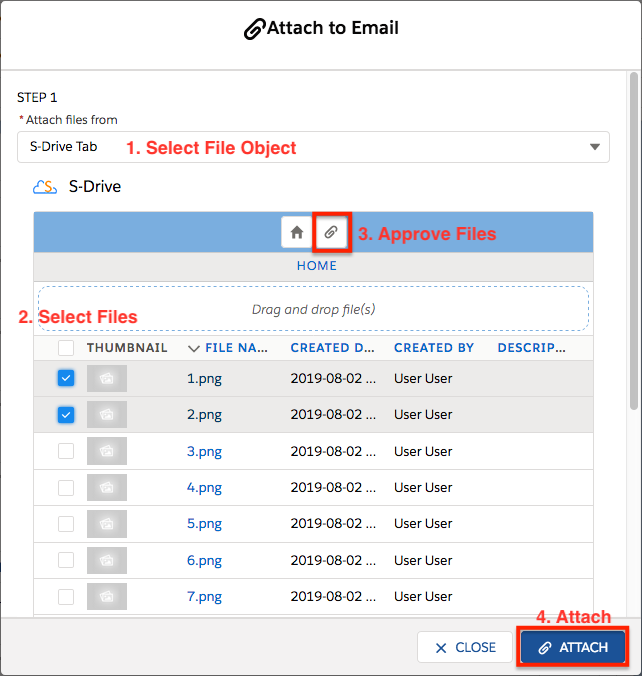
Attach Files
Click on "Attach button" to open the file selector pop up. First choose the object type you want to attach files from. If you chose "S-Drive Tab" you may choose your files to attach, otherwise select the file object type and finally choose the record the files you want to attach are located using the search box. S-Drive in compact view should now show up. Use the selection box to choose your files to attach and then chick on the attach icon in the toolbar at the top. When you are done click on the "Attach" button at the bottom. If you wish to not attach any files click "Close".
Send the mail
Click "Send" at the bottom of the email editor, the user will be prompted with an email success message. If object and field level security disables users to insert or update any of the fields of the Email Message object, users will be prompted with the following error message. To Keep track of emails sent enable users to edit fields in the EmailMessage object.
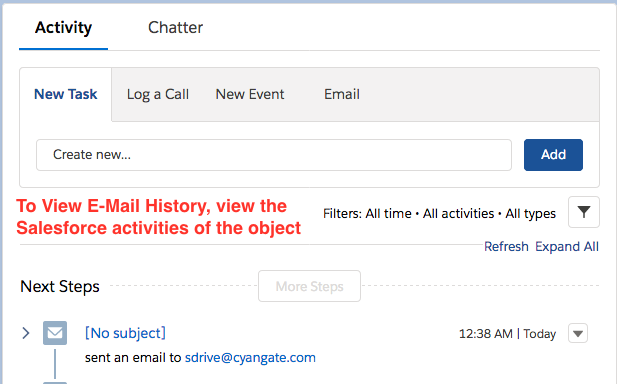
View Emails from Activities
If you want to see emails sent from your Activities panel in a record first activate Salesforce Enhanced Email. Go to Setup > Enhanced Email > Enable. When Enhanced Email is enabled you will be able to see emails sent in the activity history.
Changing your email footer
To have a custom email footer go to S-Drive Configuration > General Settings > Mail Settings > Custom Email Footer.
Post Files to Chatter
You can make comments on different files you have on your S-Drive files. For this purpose, you can use the "Post to Chatter" functionality. Click on Item Actions Menu of a file and click on "Post to Chatter" (Figure II 55).
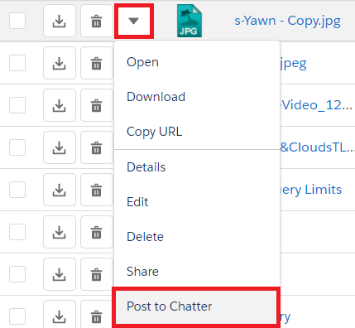
Figure II 55
Choosing this option will open a pop-up dialogue where you can share your thoughts on these files with Salesforce's Chatter.
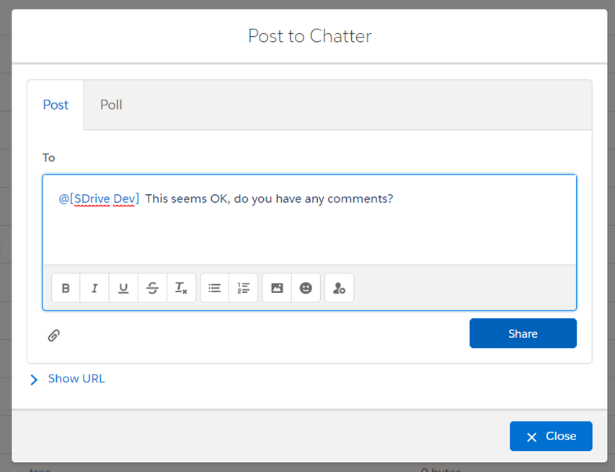
In this pop-up page, you can either post your thoughts, or create a poll and mention users who have access to this file. See the URL of the file in this pop-up box, by clicking on the "Show URL" button on the bottom left side.
You can reach the Chatter posts about the file from the "Detail" page of the file, by clicking on the "Chatter" tab (Figure II 58-1). In this page you can also share posts (Figure II 58-2).
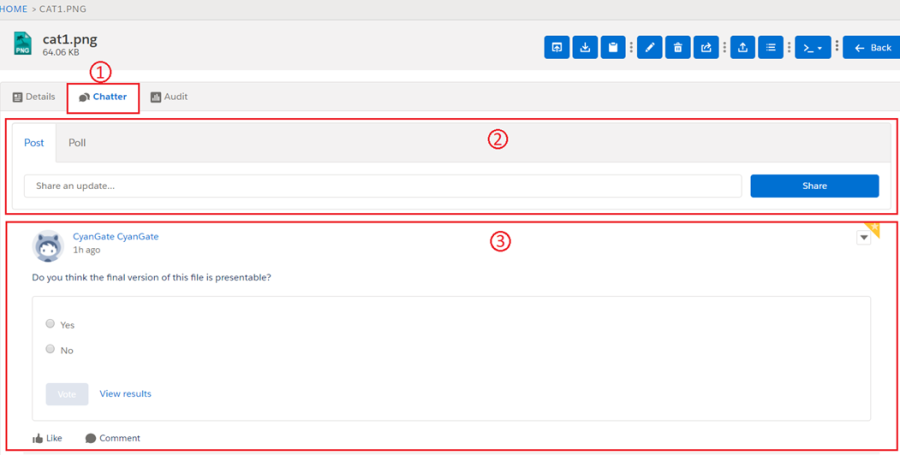
In Detail page you can click on the "Chatter" tab to see the chatter related information – the posts and comments – about the file.
In this place you can also post your thoughts about the file.
Here you can reach the chatter feed. Posts which are made about the specific file will be displayed in this section.
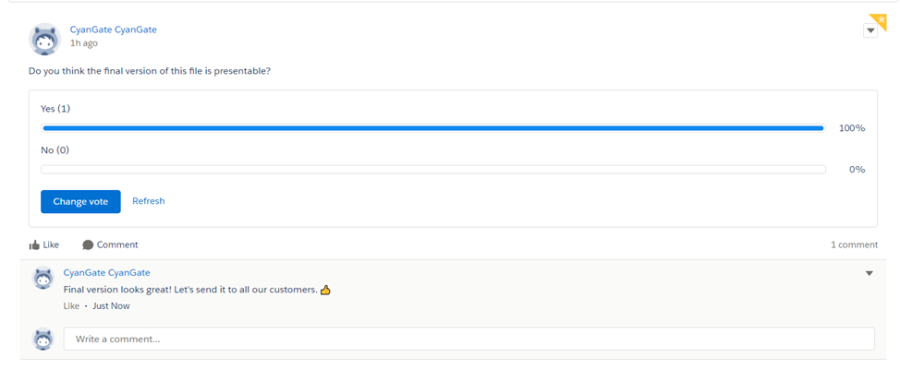
You can also like the posts, make comments about them and vote on polls. The results of these polls can also be displayed in this section.
Note: In order to enable chatter, you should enable it using the S-Drive Configurations and your Feed Tracking in Salesforce should be enabled on the object type's you want to make posts about. If you do not enable Feed Tracking, you won't be able to use Chatter on S-Drive.

Downloading Files
There are two ways of downloading files in S-Drive: "One File Download" and " Zip & Download (Multiple File & Folder Download)".
One File Download
You can download individual files by clicking "Download" item menu action and download shortcut button from the "Item Actions" button. If "Download" item menu action is selected for file item, download will be controlled by the browser you use (Internet Explorer, Firefox, Chrome, Safari, Opera etc.) If you select "Download" action for a folder it directs to Zip & Download.
Zip & Download (Multiple Files and Folder Download)
If you choose multiple file and click download button on S-Drive Toolbar, or if you try to download folder by action menu, our service prepares folders and files into a zip file and start to download zip file automatically.
After Zip file prepared, download starts. The Zip file is handled by your browser. For some browsers download may start immediately, while for other browsers it may ask to download file or not. Zip file can be found under browser's defined download folder. Zip files are named using the following format: [YEAR][MONTH][DAY][HOUR][MINUTE][SECOND]_[OBJECT NAME].zip .

Opening Files
If you want to open the files automatically, you should click "Open" link.
You can make some configurations for browsers (Internet Explorer, Firefox, Chrome, Safari, Opera etc.) to enable some types of files for opening. You can reference below links:
Internet Explorer: http://247support.custhelp.com/app/answers/detail/a_id/8892/~/internet-explorer%3A-no-download-prompt-appears http://erptraining.niu.edu/erptraining/PS_browser_settings/ie9.shtml
Chrome: http://blog.rubbersoft.com/2010/01/how-to-automatically-open-downloaded-files-in-chrome/
http://www.adeptscience.co.uk/kb/article/1379E
Firefox: http://meruscase.com/customizing-your-experience/how-do-i-auto-open-documents-in-firefox/
http://kb.mozillazine.org/File_types_and_download_actions
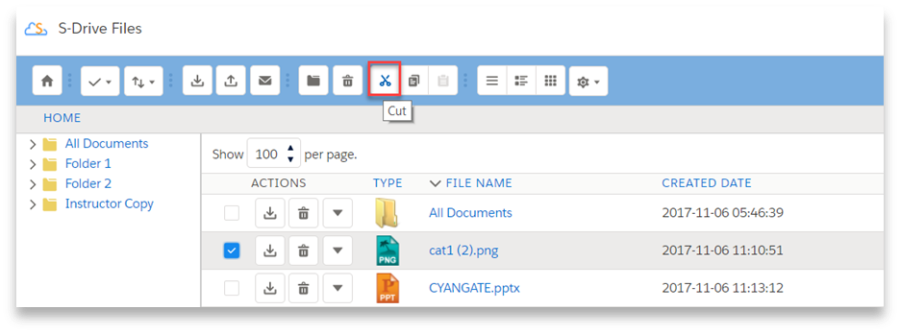
Moving Files
You can move files between directories in S-Drive. To do this, first you need to select files to move. Then click the "Cut" button at the top menu. Go to the folder where you want to paste the files, select "Paste" button at the top menu.
If sharing is enabled, it will ask if you want to bring the current sharings with the cut item(s). You can select "Yes" or "No" based on your decision.
It will start the paste operation and a progress bar will be displayed in the middle of the screen. You can cancel the paste operation anytime by clicking "Cancel" button. After completion of the paste operation this pop-up screen will disappear.
If there is already a file with that name inside the target directory, S-Drive will warn you with "Do you want to overwrite?" message.
If you select "Yes", it will overwrite the file and if there are other files in move list, it will process them. If you select "No", it will skip that file and process other files in the move list. If you select "Cancel" it will cancel the move process and won't process the files left.
Notes
"Cut" and "Paste" buttons become invisible if you do not have permissions to cut/paste items in the current folder.
File will be "Cut" and "Paste" with all its versions, if you have versions under this file.
Copying Files
You can copy files between directories in S-Drive. To do this, first, you need to select files to copy. Then select "Copy" button at the top menu. Go to the folder where you want to paste the files and select "Paste" button at the top menu.
If sharing is enabled, it will ask if you want to bring the current sharings with the cut item(s). You can select "Yes" or "No" based on your decision.
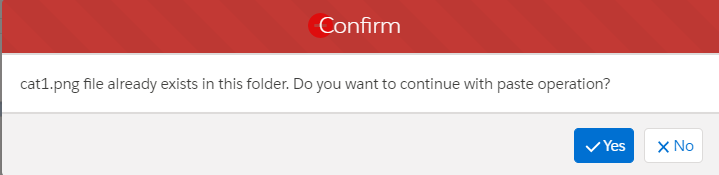
If there is already a file with that name inside the target directory, S-Drive will warn you with the "Do you want to continue with paste operation?" message.
Shortcuts
You can create shortcuts of files in the same file object or across different file objects
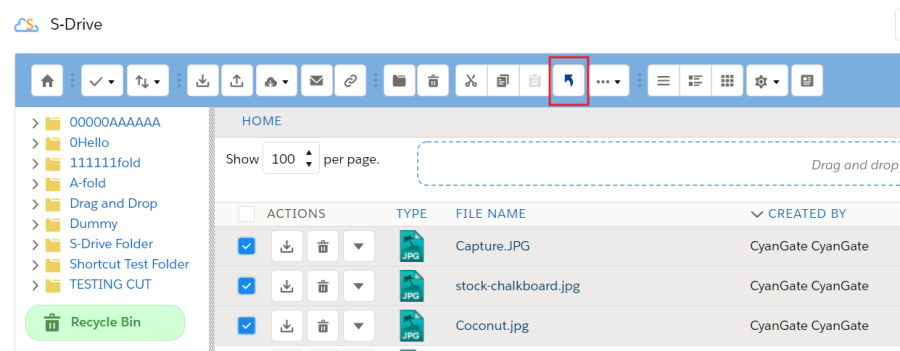
To create shortcuts, select the files you want to create the shortcuts for, and then click on the button on the toolbar (Figure 216). A panel will show up and you'll be asked to select the objects and records you want the shortcuts to be created in.
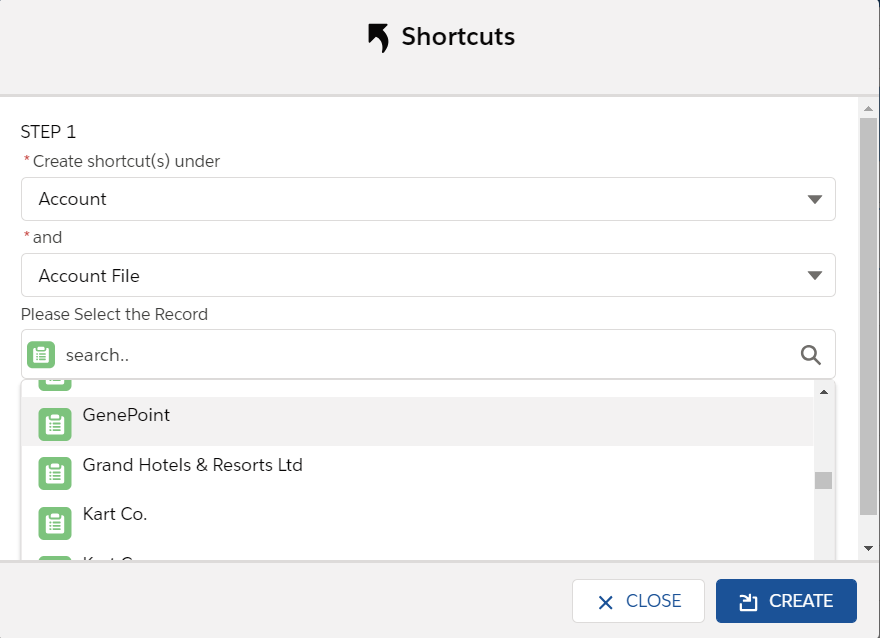
Step 1.
Choose the object, file object, and the record.
Object: The parent object that you want to create shortcuts under. Example: Account
File Object: The file object selection will be shown if there are multiple file objects related to the parent object. Example: Account File.
Record: The record that you want to create the shortcuts under.
Step 2.
Once you choose your record, you will be asked to select a folder that the shortcuts will be created under.
Step 3.
In this step, you can either choose to create a new folder to put the shortcuts into or select from the folder tree the folder you want. The selected folder will be highlighted in a yellow color. If you do not choose a folder, the shortcuts will be created under Home.
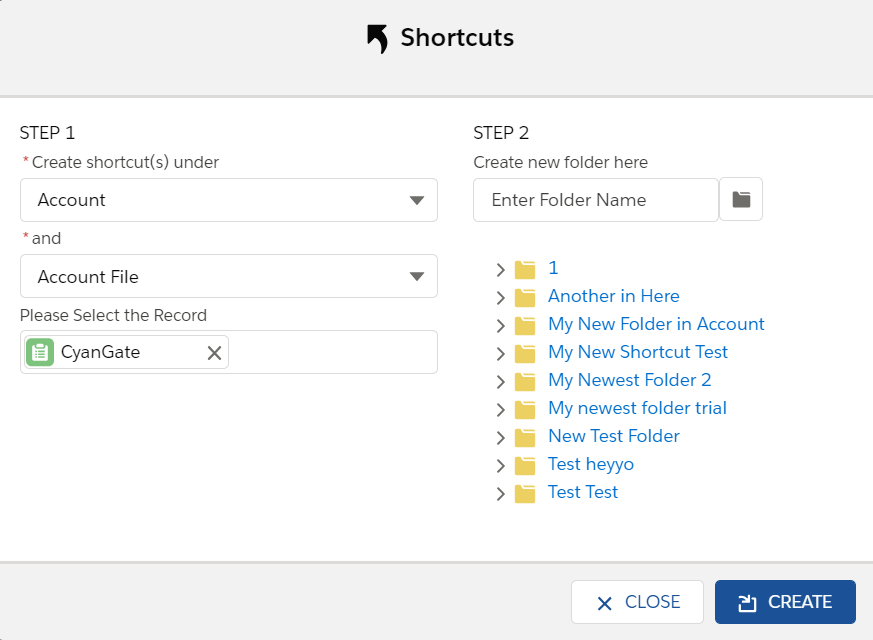
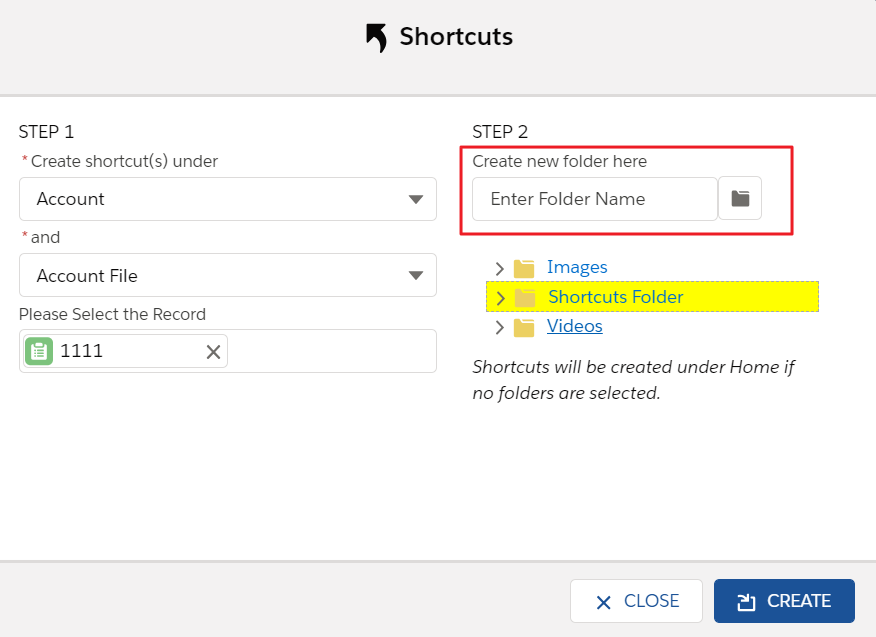
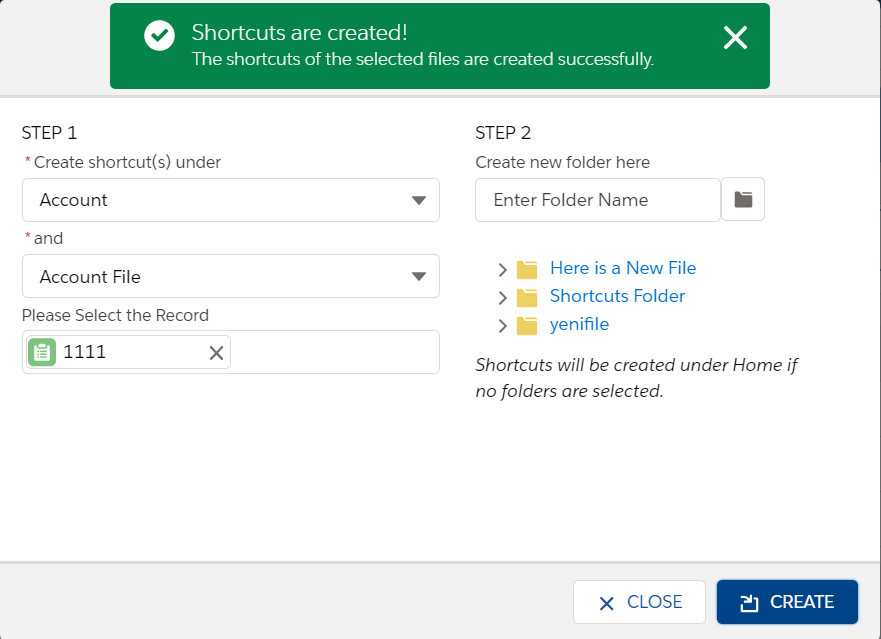
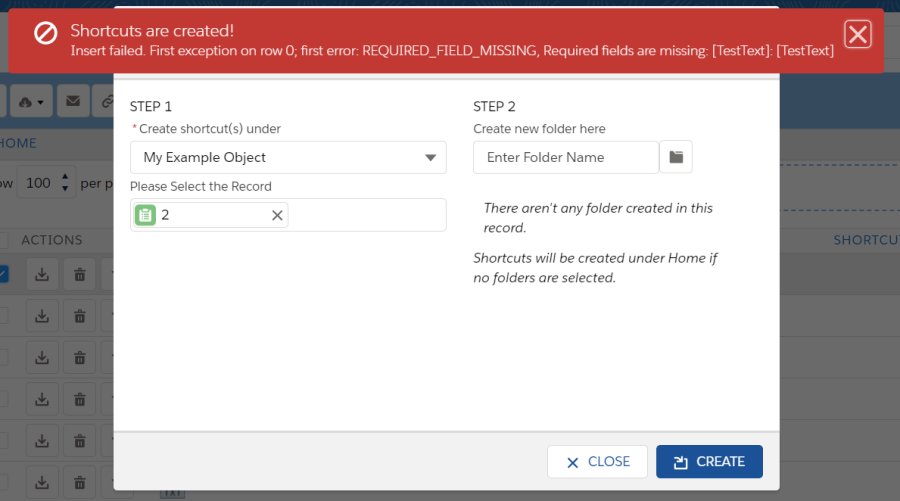
After making the selections, click on "Create" button to create the shortcuts.
A success message will be shown if the shortcuts are created successfully in the destination record.
If something goes wrong in the process, an error message will be shown.
Editing File/Folder Description
To edit the description of a file/folder, select a file/folder. Then go to the "Actions" tab of the selected file/folder. Click to the "Item Actions" button and select the "Edit" item menu action from the dropdown list.
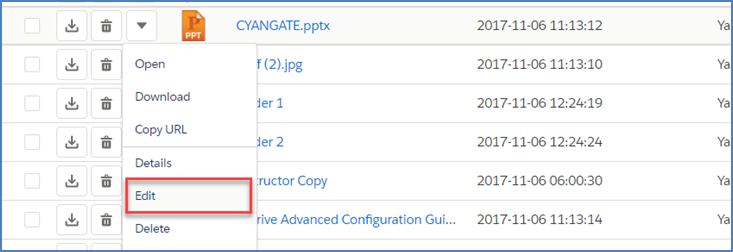
The Detail page of that file/folder will be opened. You can change the name and description here and click "Save" button to save changes. If you click on "Back" button, the changes will not be saved, and you will be directed to S-Drive Folders screen.
If you try to edit the description of a file/folder that you do not have edit permissions, you'll get a "You don't have enough permission to update this file!" error message.
Copying URL to Clipboard
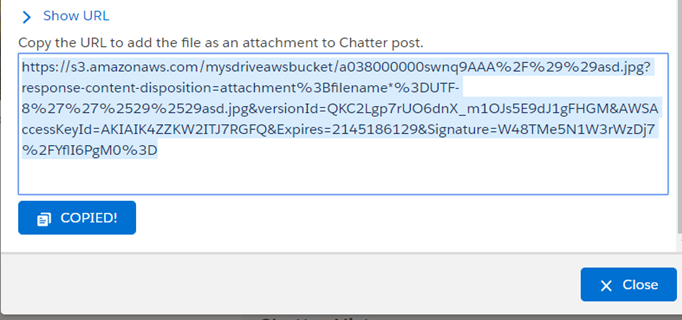
To copy URL of a file to clipboard, click "Item Actions" button next to the file and click "Copy URL" action menu item to copy the URL of the selected file to the clipboard.
After clicking this button, Copy URL pop-up will be displayed (Figure 226). Select the URL by clicking "Copy" button in this pop-up. You can close this pop-up by clicking "Close" button. After clicking "Copy" button, the button changes to "COPIED!" and the Copy URL for the picture becomes available for usage.

You can paste it to any document, or you can use it to access file from browser. For example, if you paste it to the Internet Explorer address bar after copying it, you will get a direct download link for the file.
This feature is not enabled for folders. Because folders don't have URLs in S-Drive. "Copy URL" item menu action is invisible for the folders.
If you want to use shorter URLs, please see S-URL section in "S-Drive Admin Guide".
Sharing Files & Folders
S-Drive Folders supports object level sharing. The Share action is available when manual sharing is allowed by sharing settings and configured in S-Drive.
You can share files and folders by clicking "Item Actions" button under "Actions" column and selecting "Share" action menu item from dropdown for individual files and folders.
Once you select "Share" action menu item, current shares on the file will be listed in a pop-u. You can review the shares on the object, add new shares, and edit/delete manual shares, using this screen.
"Action" column is used to edit or delete the manual shares. "Type" column displays the type (user, group, role etc.) of the sharing. "Name" column displays the name of the user/group/role etc. that item is shared. If name is underlined, you can click to open the details in a new window. "Access Level" column displays if the share is "read only", "read/write". "Reason" column displays the reason of the sharing. Only manual shares are editable, other types of shares (owner, custom object sharing rule etc.) are for view purposes.
You can add new shares by clicking "New Share" button and close this screen by clicking "Close" button.
Once you click "New Share" button "Add New Share" page will be opened. You can select the "Type" from the dropdown. Once you select the type, available fields will be listed in "Available" section . You can select multiple items and click the arrows to move the items between "Available" and "Share With" sections. You can select "Read Only" or "Read/Write" from the "Access Level" section. Selected shares can be saved using "Save" button, you can go back by clicking "Cancel" button and you can close the Share pop-up by clicking "Close" button.
If you want to edit a sharing you can click "Edit" in the share lists screen (Figure 230-1). You can change selected object's access level and save.
You can delete a manual sharing by clicking "Delete" in the share lists screen. If you select "Yes", share will be deleted.
Notes
Sharing items (files or folder) with "Read Only" access level gives allowed shared user/group/ profile etc. read-only access. That means user can see file details, download file, copy file; but cannot edit, delete, move, rename file. If user has "Read Only" access on a folder he won't be able to see "New Folder", "Upload File(s)", "Cut" buttons.
Sharing items (files or folder) with "Read/Write" access level gives allowed shared user/group/ profile etc. read-write access. That means user can see file details, download file, copy, edit, delete, move, and rename file. But cannot delete the file. Only file/folder owner can delete the file.
If no sharing is given to the user on a folder, user won't be able to see the folder and its contents.
Sharing folders affects sub files and folders. So, if you share a folder, that sharing will be applied to sub files and folders.
If sharing is enabled and if you're in a subfolder (not Home folder), you'll see "Inherit Sharing from Parent Folder" checkbox when creating a folder or uploading files. Default is checked. You can uncheck this checkbox if you do not want to inherit shares from parent to the newly created folder or file at the time of creation.
If there are profile level permission definitions, profile level permissions override the sharing settings. So, if "S3Objects"is set as read only for a profile, there is no meaning to give read/write access on a folder.
Based on the shares that your file/folder have, some or all the "Item Actions" item action menus may be invisible or clicking the item in the dropdown will warn you with a "not enough permission" error message.
If you want to restrict standard users to create files and folders at the top level of S-Drive Folders, you can check "Only Allow Users with Modify All Permissions to Create Items at the Top Level" checkbox from "S-Drive Configuration" tab.
"Share" item action menu in "Item Actions" dropdown is not visible to customer portal users.
Public Sharing of Files and Folders
Users can now share certain files and folders publicly. If a single file or folder (along with folder's content) will be shared, file/ folder action dropdown can be used.
In order to publicly share multiple files/ folders, select files/ folders that you want to share and click on Public Files/ Folders button.
The user will have an option to allow public download of or public access to these files/ folders.
Public Download of Files and Folders
Upon selection of files and folders and clicking on public link button, selected items get listed. A secure URL gets generated automatically as well.
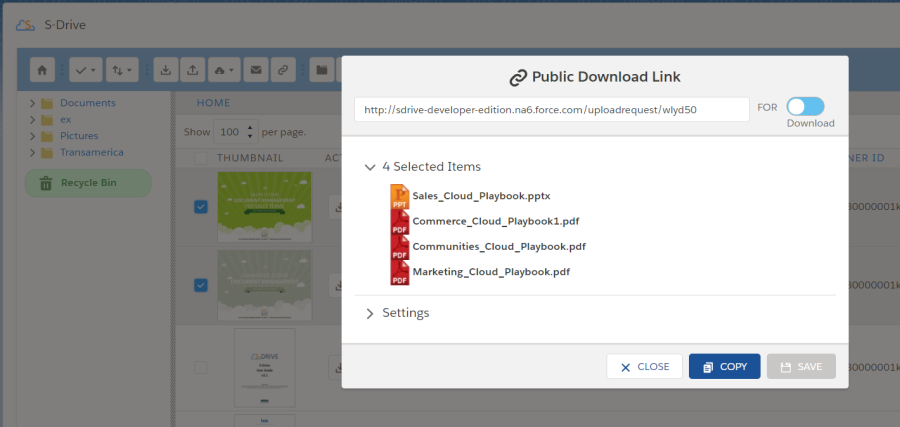
There is also a Settings section where a user can enhance the security of the link via adding a password, expiration date and IP range.
Once the setting is completed, a user should click on SAVE to add new parameters into the link. The link can now we copied over using COPY function and pasted into any browser by any user (even non-Salesforce users). Any user knowing the associated security setting (if a password is set, the password should be known) can download files/ folders.
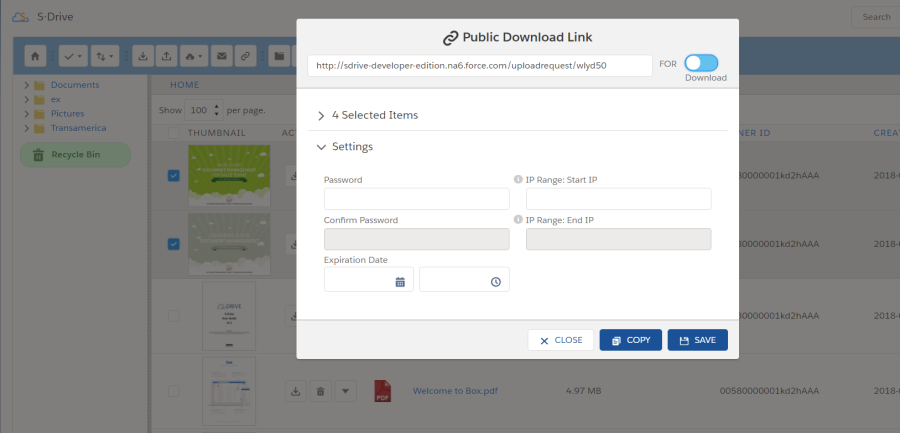
Public Access to Files and Folders
Upon selection of files and folders and clicking on public link button, selected items get listed. A secure URL gets generated automatically as well.
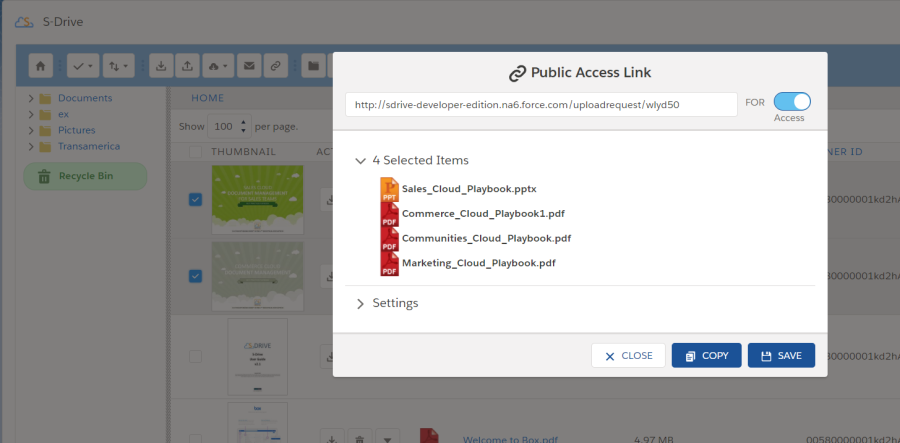
There is also a Settings section where a user can define how selected items can be accessed.
View (/Download): This option brings the public user to download access of selected items
Revise: This option brings the public user access to edit selected items
Upload: This option brings the public user access to upload new files
Delete: This option brings the public user access to delete selected items
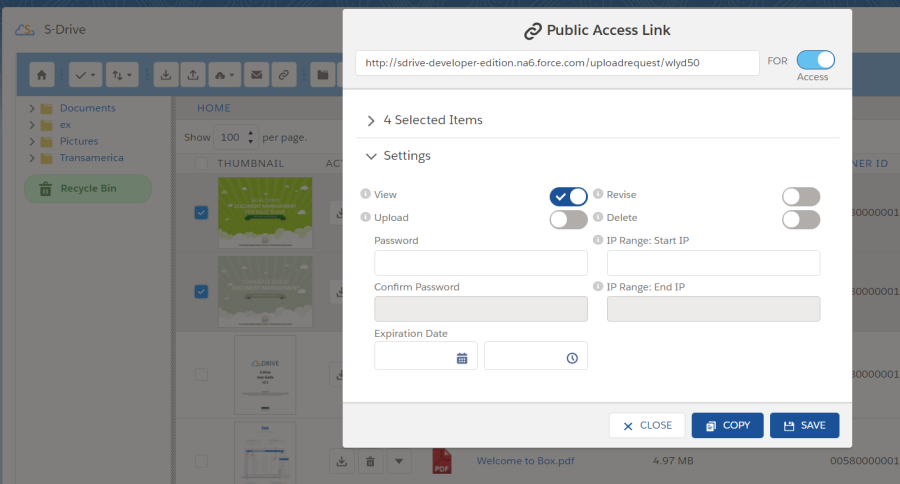
In the Setting section, a user can enhance the security of the link via adding a password, expiration date and IP range as well.
Uploading New Version of a File
[This feature requires enabling versioning on the organization. Refer to the S-Drive Installation Guide to enable Versioning for your organization.] You can upload new version of a file by clicking "Item Actions" button under "Actions" column and selecting "Upload New Version" action menu item from dropdown for individual files. Only HTML Upload Manager supports version upload.
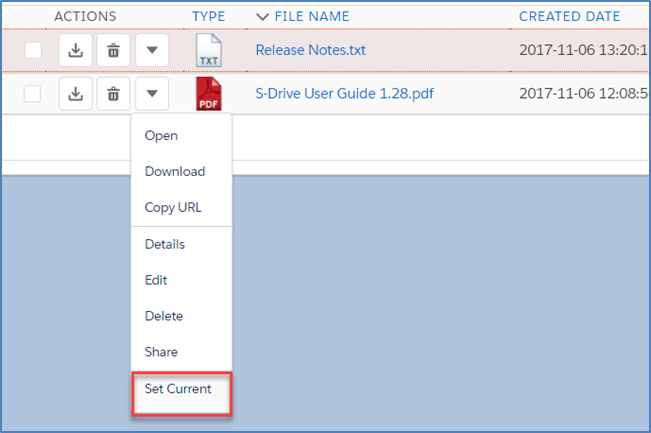
You can set a version as the latest version by clicking "Item Actions" button under "Actions" column and selecting "Set Current" action menu item from dropdown for individual files in Versions screen. When you click Set Current, selected old version will be set as the latest version of the file.
You will be able to apply Download, Open, Copy URL, Edit, Rename, Delete actions for individual version files also. These actions are same as the other item actions explained above.
actions are same as the other item actions explained above.
Check-In & Check-Out
Check-In & Check-Out lets you lock files, preventing others from modifying or deleting the file while you're working on it. If the feature is enabled from the configuration page, a file without any lock has "Check-Out" option under its action menu and its details page shows an up-arrow icon, which again lets users check out the file

After clicking Check-Out, nothing changes for you as the user who checked out the file. You can still modify the file, delete it, or upload a new version to it. You can see a small lock icon under the STATUS column, indicating that the file is checked-out.
However, for other users, the file can no longer be edited or deleted. The delete button becomes disabled, and the action menu has fewer options to choose from as shown below.
If a user has the special RemoveLockPermission custom permission, or if you are the System Administrator, you get the right to check-in files without waiting for the user who checked-out that file.
The same restrictions apply to the preview page of the file as well as shown below.
Note that the lock icon that was available under the STATUS column now appears under the file name on top-left corner. Hovering over that lock shows who checked out the file.
When the user who checked-out the file uploads a new version, the file is checked-in automatically. When a file with previous versions is checked-out, all previous versions become checked-out as well.
The "checked out files" folder (displayed under the recycle bin) shows all files that the user can check-in. If someone is a Sys Admin or has RemoveLockPermission, files checked-out by other users will be shown, otherwise only the files checked-out by that user
Legal Hold
Legal Hold lets you lock files, preventing others from modifying or deleting the file. It is similar to Check-In & Check-Out but with some minor differences. File objects that can be put under legal hold should be explicitly selected from the S-Drive configuration page, and only certain users, i.e., System Administrators and holders of RemoveLockPermission, can put files under legal hold and remove files from legal hold. If the feature is enabled from the configuration page and the file object (e.g. cg_S3Object_c) is selected, a file that isn't under legal hold would have a button called "Put Legal Hold" under its action menu and its details page shows a gavel icon, which again lets users put the file under legal hold.
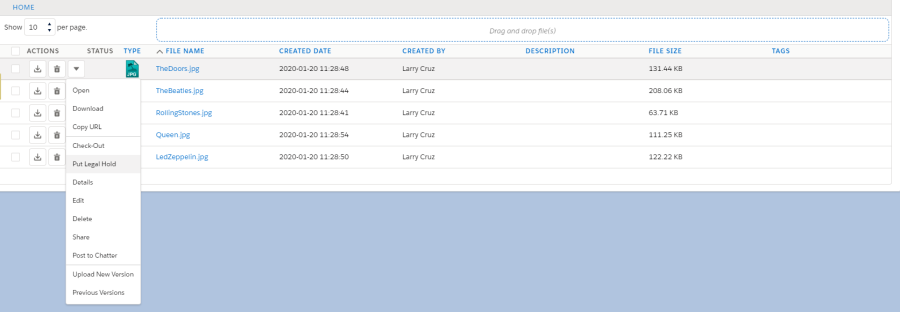
After clicking "Put Legal Hold", nothing changes for you as the user who put the file under legal hold. You can still modify the file, delete it, or upload a new version to it. You can see a small gavel icon under the STATUS column, indicating that the file is under legal hold.
However, for other users, file can no longer be edited or deleted. The delete button becomes disabled, and the action menu has fewer options to choose from.

If a user has the special RemoveLockPermission custom permission, or if you are the System Administrator, you get the right to remove files from legal hold without waiting for the user who put them under legal hold in the first place.
When the user who put the file under legal hold uploads a new version, the new versions are also put under legal hold.
When a file with previous versions is put under legal hold, all previous versions are put under legal hold as well.
The same restrictions apply to the preview page of the file as well.
Note that the gavel icon that was available under the STATUS column now appears under the file name on top-left corner. Hovering over that icon shows who put the file under legal hold.
File Activities
When File Activities are enabled in S-Drive Configuration, the file activities recorded for a file record are displayed in file record's detail page under "Audit" tab.
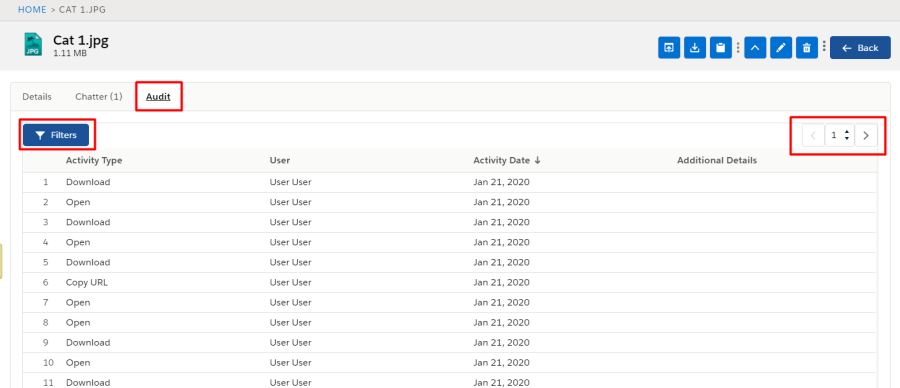
Here all file activities recorded for the file will be displayed in a tabular format sorted by Created Date. You can change the sort order by clicking each header in the table: Activity Type, Created By or Created Date.
Note: It is not possible to sort by Additional Details column.
You can also navigate through pages using the pagination buttons at the right top corner. Each page has 20 file activity records.
In order to view filters and filter the file activity records for a specific file record, click on the "Filters" button on the top left corner of the table.

Here you can select the type of activities using the checkboxes, to change the displayed activities based on type. You can also apply a date range in order to see the activities recorded between specific dates. In order to apply filters, click on "Apply Filters" button. To clear all filters on checkboxes and dates, click on "Clear Filters" button. This way, all file activities will be listed in the table. You can click on "Filters" button to close the filters section.
Note: If you enter an invalid date for Start Date or End Date, a warning message will show up.
Changing Displayed Fields
You can change the displayed fields in the file list using the "Field Selection" button (a).
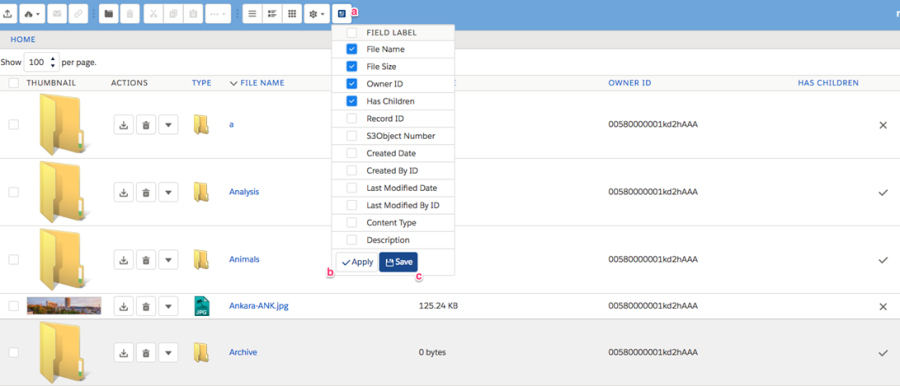
"Apply" button is for after selecting/deselecting the fields to rearrange file list table, to apply these changes to current view of file list (b).
"Save" button is for saving these changes to current view and saved to user's profile. So, in another session or when refreshing, these changes will remain(c). NOTE: in order for changes to be saved, a user must have the Modify All Data permission, which is usually only given to System Administrators. Most users will only be able to “Apply” the changes to the current session.
Searching Items
You can search for files and folders inside S-Drive Folders. To start a search, type the search criteria to the right corner of S-Drive Folders screen, into the search box and click Enter.
If you conduct the search under Home directory, it will bring all the results and display them on the file list. If you navigate into a folder before or during search, the search results will only show the results inside that specific folder, and the results inside the child folders, if there is any.
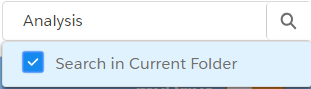
If you want to conduct a search inside only a specific folder, but not in the child folders, please check "Search in Current Folder" checkbox, which is displayed when you hover on the search bar.
You can use wildcards, '{}* (multiple characters), ? (single character)' in search keywords. For example: exam*, boo? etc.
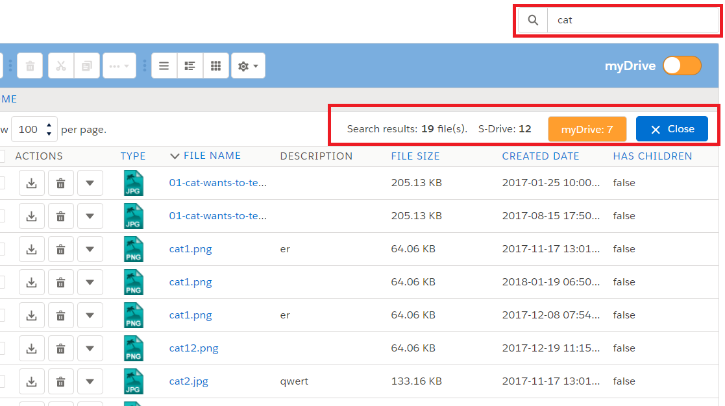
When you perform a search in S-Drive folders, the search will also be made for myDrive folders.
Files and folders that are inside the recycle bin will not be shown in the search results and you cannot conduct a search inside the Recycle Bin.
The results for both will be displayed in the same section with a 'Search results: XX file(s). S-Drive: X myDrive: X ' header. 'New Folder', 'Upload File(s)', 'Paste' buttons are invisible in the search results screen. You can go back to previous screen using (

) button on top right, or you can go to home folder by clicking 'Home' link on the breadcrumb panel or Home button (

) on toolbar.
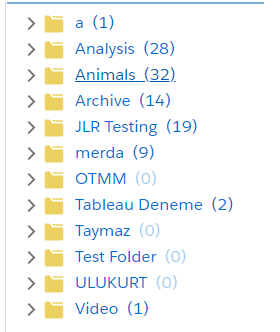
The number of search results found in each folder will be shown in the Folder Tree, next to each folder.
To navigate to the search results for myDrive folders, you can click on myDrive button (

). When clicked it will redirect you to myDrive folders.
"New Folder", "Upload File(s)", "Paste" buttons are invisible in the search results screen.
Notes
Salesforce.com does not index uploaded files immediately, so newly uploaded files will be eligible for search in a few minutes after the upload.
Search is performed on searchable fields like "File Name" and "Description".
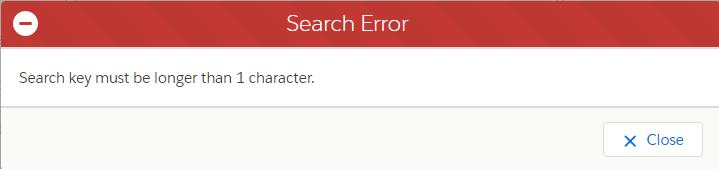
If you try to search with blank criteria or with one character, you'll get an error message saying: "Search key must be longer than 1 character."
iOS (iPad, iPhone, iPod) Support
iOS (iPad, iPhone and iPod devices) support is improved for S-Drive Folders and S-Drive Attachments.
You can browse and search folders/files, create folders, download files, email files, cut-copy-paste files, edit fields (e.g. Description), delete files/folders, copy URLs of files, sort files/folder ascending or descending using your iOS device (preferably iPad).
But currently you cannot upload files, download files using Download Manager for bulk download with your iOS device. Because iOS devices do not support Flash and Java technologies that our upload widgets use. We're planning to add upload feature in next releases.
Screens for iOS devices are like the "S-Drive Folders" and "S-Drive Attachments" screens except the "Upload File(s)" and "Download" buttons at the top of the files section are not available in iOS versions. You can refer to the "S-Drive Attachments" section of this document for more information about the usage.
Below is a screenshot of the Case Files section from an iPad device.
S-Drive Attachments
S-Drive Attachments is the object attachments for S-Drive. You can create folders and upload files to objects without file size limitations using S-Drive Attachments. You can also attach files to the objects from S-Drive Folders. Account, Case, Contact, and Opportunity S-Drive Attachments are bundled in the S-Drive installation. You just need to make some configuration to start using S-Drive Attachments. Please refer to the "S-Drive Installation Guide" for configuration of the S-Drive Attachments. You can also use S-Drive Attachments for your other standard/custom objects using the instructions in "S-Drive Admin Guide". You can also use multiple S-Drive components under a single object, following the instructions in "S-Drive Admin Guide".
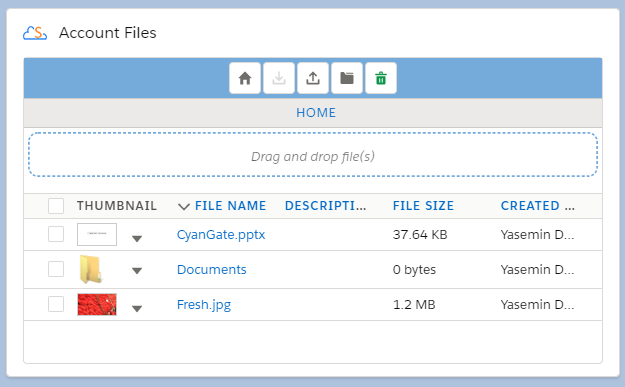
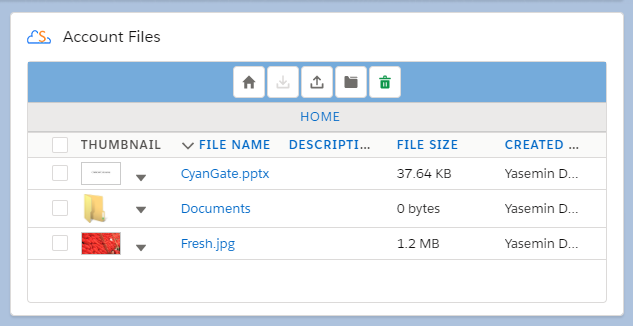
Account Files
After installing S-Drive, if you made the configuration correctly, you will be able to create account files in "Accounts" tab for each account easily. Go to your "Accounts" tab, select an account from the list (or create a new account). If you can see the "Account Files" page block in the current account's page, you can keep on reading ( Figure 251). Otherwise please consult to the S-Drive Admin Guide to activate "Account Files" section.
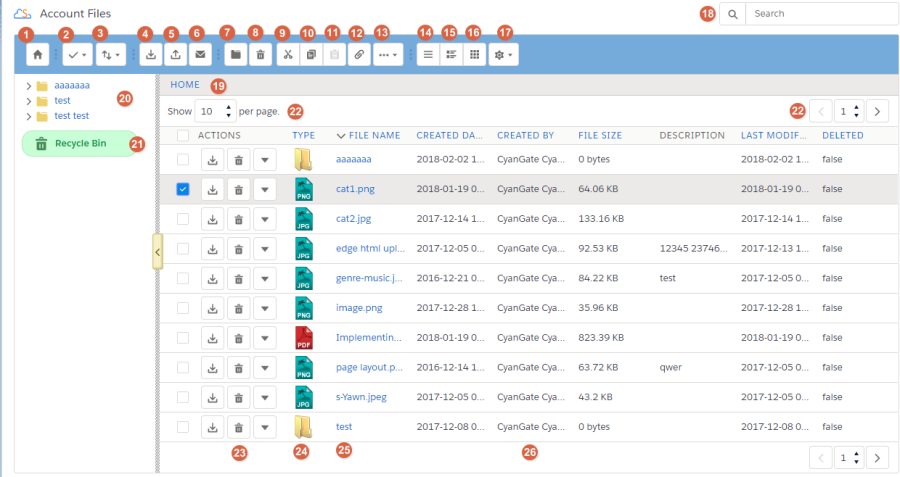
"Home" button is used to direct to root folder of S-Drive Attachments from any sub-folder or search.
"Select All -Dropdown" button is used to Select All or Deselect All items in the list.
"Sort -Dropdown" button is used to sort the File List. If a field selected (i.e. Create Date) files sorted by selected field as ascending order. If same field selected again it is sorted by descending order.
"Download File(s)" button is used to download selected file(s). If just one file selected it directly download file. If more than one file or folder are selected, it creates a zip file and download it.
"Upload File(s)" button is used to upload file(s) to this account. See "Uploading Files" section for more information.This item is not displayed for the "Search Results View".
"Email Files" button is used to email files. See "Emailing Files" section for more information.
"Create New Folder" button is used to create folders. See "Creating Folders" section for more information (Figure 251-7). When you click on this button "Create New Folder" screen pops up (Figure 252). This item is not displayed for the "Search Results View".

"Delete Selected File(s)" button is used to delete file(s) or folder(s). See "Deleting Files" and "Deleting Folders" sections for more information (Figure 251-8).
"Cut" button is used to move file(s) between folders. See "Moving Files" section for more information.
"Copy" button is used to copy file(s) between folders. See "Copying Files" sections for more information.
"Paste" button is used to paste the copied or cut file(s) to a folder. This button is not visible until files are selected for cut/copy. See "Moving Files" and "Copying Files" sections for more information. This item is not displayed for the "Search Results View".
"Attach From S-Drive" button is used to attach files from S-Drive Folders to this account. After clicking this button "S-Drive Folders" screen will be initialized. There will be two buttons above the toolbar section to attach files to this contact. You need to select file(s) to attach, and then click "Attach File(s)" button to start attaching. Attaching is a copy operation, so a new copy of the file will be created once attach is completed.
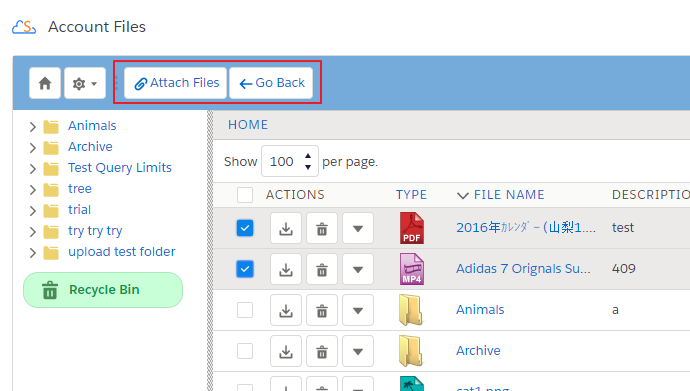
After completion of the attach process, you'll be asked: "You have successfully attached file(s) from S-Drive. Are you done attaching file(s) from S-Drive?" If you select "Yes", message will be closed, and you'll be redirected to the account page. "No" button will return you to Attach From S-Drive screen.

"Custom Actions" button is used to perform different custom actions. See "Custom Actions" section in "S-Drive Admin Guide" for more information.
It changes current view to List view. For more information, you can look at View Types section.
It changes current view to Thumbnail view. For more information, you can look at View Types section.
It changes current view to Grid view. For more information, you can look at View Types section.
By "Settings" dropdown menu button, you can set current View Type of S-Drive Folders page as default and set current Sort Field as default. Also, you can select whether to Hide Breadcrumbs and/or Hide Folders Tree View.
"Save View Type as Default": If this item is selected, it saves current view type to settings. When S-Drive page is opened, File List is shown in selected view type by default.
"Save Sort Field as Default": If this item selected, it saves current sort field to settings. When S-Drive page is opened, File List is ordered by selected field.
"Hide Breadcrumbs": If this item is selected, breadcrumbs will not be shown in the panel.
"Hide Folders Tree View": If this item is selected, left panel shown in will not be shown.
"Search Box" is used to search items (files, folders) in S-Drive Folders. Refer to the "Searching Items" section for more information.
"Breadcrumb Folder Navigation" keeps the current folder information. For example, if you are under "Home/Company Invoices" folder, the location information will be displayed in this area (Figure 251). You can click any level to drill down to that subfolder.
"Folder Tree View" displays your account's folder structure. Your home folder is named as "Home" and your folders are listed in a hierarchical way. You can click on a folder name to display its contents in the right pane. If a top-folder has sub-folders under it, it will show its contents on the panel when clicked.
"Recycle Bin" button is used for navigating to the Recycle Bin of your Account Files. You can find more information about the Recycle Bin in "Deleting Files" section.
"Total Items / Pagination" displays total items in selected folder and pagination if numbers of items are greater than the configured pagination number. If item (file/folder) count in a folder is greater than 10 (can be changed from the left side), items are displayed with pagination and total items are displayed next to the page numbers. Total items include only current folder items, not subfolder items. For example, if there are 108 items in the folder, first 100 items will be displayed in first page and last 8 items will be displayed in the 2nd page.
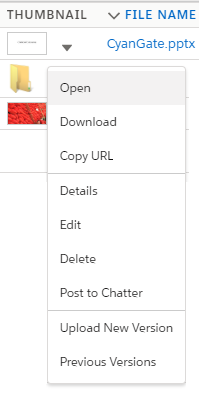
"Actions Column" contains a quick download and a quick delete button. It also contains "Item Actions" button. Once you click "Item Actions" button, dropdown is opened with list of item menu actions.
"Open" is used to open the selected account file. After clicking this link, a new browser tab will be opened, and you will be able to view the file in this new tab.
b. "Download" is used to download selected account file. After clicking this link, the download process will begin automatically, and you will be able to find the file under your computer's "Downloads" folder.
c. Copy URL" is used to copy the URL of the selected account file. After clicking this link, a popup will appear along with the URL of the selected file. This item menu action is only for files and not available for folders.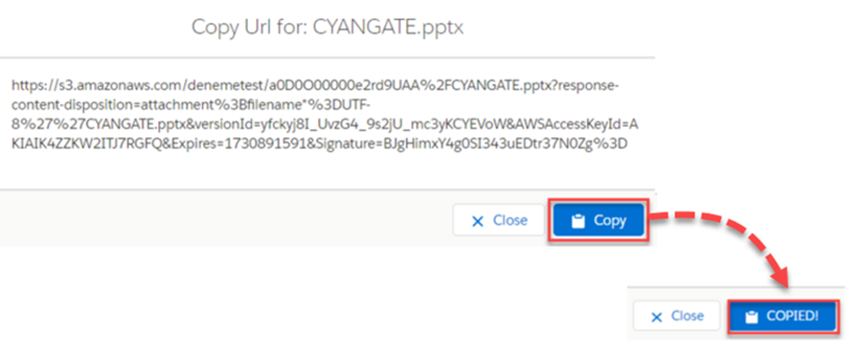
d. "Details" is used to open the details page of the selected account file or folder. In details page, it is possible to see the detailed information about that file or folder. Also, if the preview and thumbnails option is enabled, the thumbnail of a file can also be viewed from this page.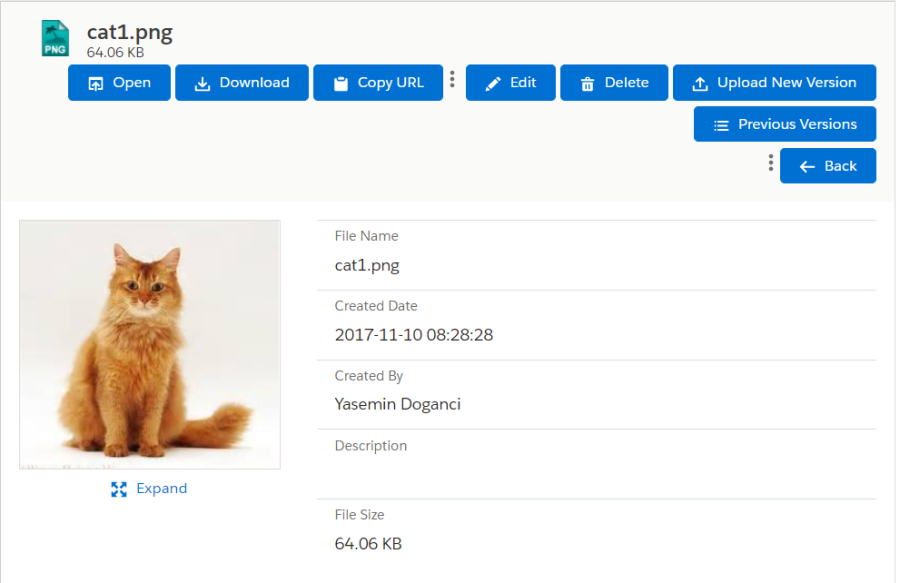
e. "Edit" is used to edit fields of a selected file/folder. After clicking this link; the edit page will be opened (Figure 102) and you'll be able to edit current account file's/folder's editable fields. Edit the fields, then click "Save". After clicking "Save", the fields you have edited will be saved. You can click on "Back" button to go back to previous page.
f. "Delete " is used to delete selected account file/folder. After clicking this link, you'll get a warning message. Select "Yes" to delete the file/folder, "Cancel" to cancel. If you click "Yes", delete process will start.
g. "Post to Chatter" is used to post comments/thoughts about a file to Salesforce Chatter. After clicking, a pop-up screen will appear, and you will be able to create a post or a poll, mention users, and share your thoughts about a file.
h. "Upload New Version": [This feature requires enabling versioning on the organization. Refer to the S-Drive Installation Guide to enable Versioning for your organization.] You can upload new version of file by clicking "Item Actions" button under "Actions" column and selecting "Upload New Version" action menu item from dropdown for individual files . Only HTML Upload Manager supports version upload.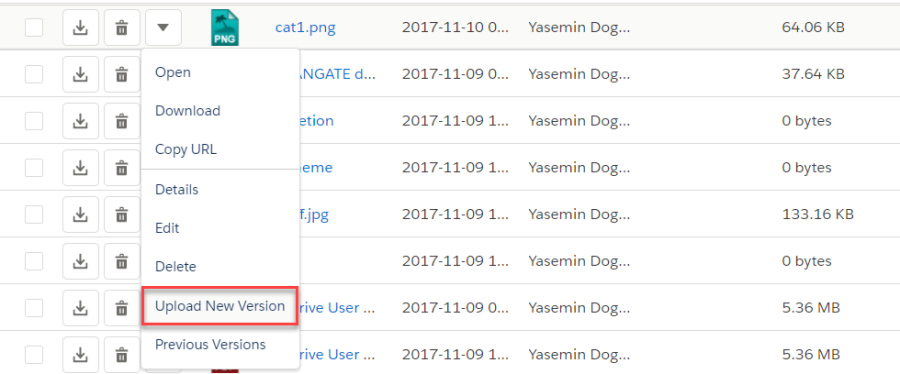
i. "Previous Versions": [This feature requires enabling versioning on the organization. Refer to the S-Drive Installation Guide to enable Versioning for your organization.] You can see previous versions of file by clicking "Item Actions" button under "Actions" column and selecting "Previous Versions" action menu item from dropdown for individual files.
j. "Set Current:" You can set a version as the latest version by clicking "Item Actions" button under "Actions" column and selecting "Set Current" action menu item from dropdown for individual files in Versions screen. When you click Set Current, selected old version will be set as the latest version of the file.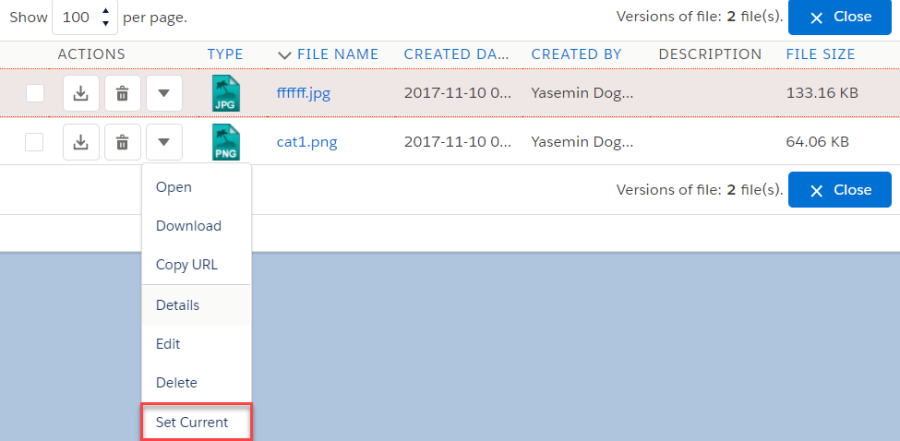
You will be able to apply Download, Open, Copy URL, Edit, Rename, Delete actions for individual version files also. These actions are same as the other item actions explained above.
"Content Type Column" displays a type icon based on the content type of the account file/folder.
"File Name Column" shows the file name information for the account files. You can sort files/folder ascending or descending by clicking the field header.
"Customizable Field Columns" are used to display customizable fields. Your Salesforce.com account's system administrator can change this customizable list using "S-Drive Configuration" page. If nothing is configured, you will see, "Created Date", "Created By", "Description" and "File Size" columns by default. You can sort files/folder ascending or descending by clicking the field header if sorting is allowed for that field type.
Notes
You cannot delete an account which has account files attached. You'll get an error message if you try to delete this kind of account. You need to delete account files first, and then you can delete the account.

Other Standard/Custom Object Files
You can use "files" for standard/custom objects other than Accounts, Contacts, Opportunities, and Cases easily. Go to your object's tab, select an object from the list (or create a new object). If you can see the "<Your Object Name> Files" page block in the current object's page, you can keep on reading. Otherwise please consult to the "S-Drive Admin Guide" to activate "<Your Object Name> Files" section.
"Home" button is used to direct to root folder of S-Drive Attachments from any sub-folder or search.
"Select All -Dropdown" button is used to Select All or Deselect All items in the list.
"Sort -Dropdown" button is used to sort the File List. If a field selected (i.e. Create Date) files sorted by selected field as ascending order. If same field selected again it is sorted by descending order.
"Download File(s)" button is used to download selected file(s). If just one file selected it directly download file. If more than one file or folder are selected, it creates a zip file and download it.
"Upload File(s)" button is used to upload file(s) to this custom object. See "Uploading Files" section for more information. This item is not displayed for the "Search Results View".
"Email Files" button is used to email files. See "Emailing Files" section for more information.
"Create New Folder" button is used to create folders. See "Creating Folders" section for more information. When you click on this button "Create New Folder" screen pops up. This item is not displayed for the "Search Results View".
"Delete Selected File(s)" button is used to delete file(s) or folder(s). See "Deleting Files" and "Deleting Folders" sections for more information.
"Cut" button is used to move file(s) between folders. See "Moving Files" section for more information.
"Copy" button is used to copy file(s) between folders. See "Copying Files" sections for more information.
"Paste" button is used to paste the copied or cut file(s) to a folder. This button is not visible until files are selected for cut/copy. See "Moving Files" and "Copying Files" sections for more information. This item is not displayed for the "Search Results View".
"Attach From S-Drive" button is used to attach files from S-Drive Folders to this custom object. After clicking this button "S-Drive Folders" screen will be initialized. There will be two buttons above the toolbar section to attach files to this contact. You need to select file(s) to attach, and then click "Attach File(s)" button to start attaching. Attaching is a copy operation, so a new copy of the file will be created once attach is completed.

After completion of the attach process, you'll be asked: " You have successfully attached file(s) from S-Drive. Are you done attaching file(s) from S-Drive?" If you select "Yes", message will be closed, and you'll be redirected to the custom object page. "No" button will return you to Attach From S-Drive screen.

"Custom Actions" button is used to perform different custom actions. See "Custom Actions" section in "S-Drive Admin Guide" for more information.
It changes current view to List view. For more information, you can look at View Types section.
It changes current view to Thumbnail view. For more information, you can look at View Types section
It changes current view to Grid view. For more information, you can look at View Types section.
By "Settings" dropdown menu button, you can set current View Type of S-Drive Folders page as default and set current Sort Field as default. Also, you can select whether to Hide Breadcrumbs and/or Hide Folders Tree View.
"Save View Type as Default": If this item is selected, it saves current view type to settings. When S-Drive page is opened, File List is shown in selected view type by default."Save Sort Field as Default": If this item selected, it saves current sort field to settings. When S-Drive page is opened, File List is ordered by selected field.
"Hide Breadcrumbs": If this item is selected, breadcrumbs will not be shown in the panel.
"Hide Folders Tree View": If this item is selected, left panel will not be shown.
"Search Box" is used to search items (files, folders) in S-Drive Folders. Refer to the "Searching Items" section for more information.
"Breadcrumb Folder Navigation" keeps the current folder information. For example, if you are under "Home/Company Invoices" folder, the location information will be displayed in this area. You can click any level to drill down to that subfolder.
"Folder Tree View" displays your custom object's folder structure. Your home folder is named as "Home" and your folders are listed in a hierarchical way. You can click on a folder name to display its contents in the right pane. If a top-folder has sub-folders under it, it will show its contents on the panel when clicked.
"Recycle Bin" button is used for navigating to the Recycle Bin of your Custom Object Files. You can find more information about the Recycle Bin in "Deleting Files" section.
"Total Items / Pagination" displays total items in selected folder and pagination if numbers of items are greater than the configured pagination number. If item (file/folder) count in a folder is greater than 10 (can be changed from the left side), items are displayed with pagination and total items are displayed next to the page numbers. Total items include only current folder items, not subfolder items. For example, if there are 108 items in the folder, first 100 items will be displayed in first page and last 8 items will be displayed in the 2nd page.
"Actions Column" contains a quick download and a quick delete button. It also contains "Item Actions" button. Once you click "Item Actions" button, dropdown is opened with list of item menu actions.
"Open" is used to open the selected custom object file. After clicking this link, a new browser tab will be opened, and you will be able to view the file in this new tab.
"Download" is used to download selected custom object file. After clicking this link, the download process will begin automatically, and you will be able to find the file under your computer's "Downloads" folder.
"Copy URL" is used to copy the URL of the selected custom object file. After clicking this link, a popup will appear along with the URL of the selected file (Figure 100). This item menu action is only for files and not available for folders.

"Details" is used to open the details page of the selected custom object file or folder. In details page, it is possible to see the detailed information about that file or folder. Also, if the preview and thumbnails option is enabled, the thumbnail of a file can also be viewed from this page.

"Edit" is used to edit fields of a selected file/folder. After clicking this link; the edit page will be opened (Figure 102) and you'll be able to edit current custom object file's/folder's editable fields. Edit the fields, then click "Save". After clicking "Save", the fields you have edited will be saved. You can click on "Back" button to go back to previous page.
"Delete " is used to delete selected custom object file/folder. After clicking this link, you'll get a warning message. Select "Yes" to delete the file/folder, "Cancel" to cancel. If you click "Yes", delete process will start.
"Post to Chatter" is used to post comments/thoughts about a file to Salesforce Chatter. After clicking, a pop-up screen will appear, and you will be able to create a post or a poll, mention users, and share your thoughts about a file.
"Upload New Version": [This feature requires enabling versioning on the organization. Refer to the S-Drive Installation Guide to enable Versioning for your organization.] You can upload new version of file by clicking "Item Actions" button under "Actions" column and selecting "Upload New Version" action menu item from dropdown for individual files. Only HTML Upload Manager supports version upload.

"Previous Versions": [This feature requires enabling versioning on the organization. Refer to the S-Drive Installation Guide to enable Versioning for your organization.] You can see previous versions of file by clicking "Item Actions" button under "Actions" column and selecting "Previous Versions" action menu item from dropdown for individual files.

Set Current:" You can set a version as the latest version by clicking "Item Actions" button under "Actions" column and selecting "Set Current" action menu item from dropdown for individual files in Versions screen. When you click Set Current, selected old version will be set as the latest version of the file.

"Content Type Column" displays a type icon based on the content type of the custom object file/folder.
"File Name Column" shows the file name information for the custom object files. You can sort files/folder ascending or descending by clicking the field header.
"Customizable Field Columns" are used to display customizable fields. Your Salesforce.com custom object's system administrator can change this customizable list using "S-Drive Configuration" page. If nothing is configured, you will see, "Created Date", "Created By", "Description" and "File Size" columns by default. You can sort files/folder ascending or descending by clicking the field header if sorting is allowed for that field type.
Notes
If your system administrator set a before delete trigger for your object you cannot delete an object which has object files attached. You'll get an error message if you try to delete this kind of object. You need to delete object files first, and then you can delete the object.
You can use "<Your Object Name> Files" feature from "Customer Portal" also. After making required configuration for customer portal (See S-Drive Admin Guide and S-Drive Customer Portal Guide for more information), your customers can add object files to your objects using "Customer Portal Interface".
Editing Online (Open in Microsoft)
Editing online allows you to open Word, Excel, or PowerPoint documents in Microsoft, and edit them without having to download and re-upload them.
Editing Online must be configured and enabled by your System Administrator.
To use Editing Online:
Click the down-arrow on the Action menu and click “Open in Microsoft Word” or Excel or PowerPoint depending on the type of file.
Read the End User Agreement popup and click “Continue to Office.”
The file will open in Microsoft in a new tab and you can edit it. It will autosave the changes as you work.
Back in S-Drive, the file will show locked for editing with a lock icon and pencil icon in the status column.
While the file is locked for editing, if anything goes wrong or you’d like to end the editing session without saving your changes, you can click the down-arrow on the Action menu and choose “Abort Online Edit.”
When you have finished editing, close the browser tab
Your file will be saved as a new version in S-Drive and the file will be unlocked.
File size: Office online optimizes images, so file sizes may be smaller than the original after editing.
S-Drive Advanced Search
S-Drive Advanced Search helps to perform improved search functionality in object files. AdvancedSearchPage and AdvancedSearchComponent created for that. You can use AdvancedSearchComponent with your own VF pages. You can access to this feature using S-Drive Advanced Search tab.
Searching Files
S-Drive Advanced Search needs following criteria to perform a search;
Object: This represents the S-Drive Object to select. Search will be performed on selected object. E.g. Account, Case.
Object File: This represents the S-Drive Object File to select. Search will be performed on selected object file. E.g. Account File, Case File.
Parent Object Field (Optional): This represents a field of selected parent S-Drive object. If you select a parent object field, you can see that in Results table. E.g. Case Number, Origin.
Search Keyword: This represents the keyword to perform a search. Search will be performed in all fields of selected object file for entered keyword.
You can click on the "Search" button to perform a search. After a successful search, the results will be displayed on screen.
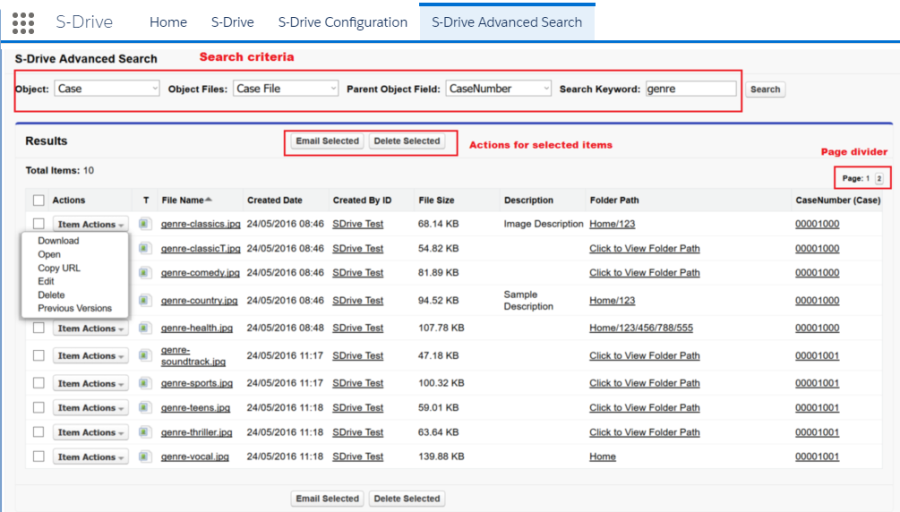
Item Actions
Downloading Files
You can download a file by clicking "Download" item menu action under the "Item Actions" button.Opening Files
You can open a file by clicking "Open" item menu action under the "Item Actions" button.Copy URL
You can Copy URL of a file by clicking "Copy URL" item menu action under the "Item Actions" button. After clicking Copy URL, you can select full URL and copy itEditing Files
You can edit a file by clicking "Edit" item menu action under the "Item Actions" button After clicking Edit, you can edit Description of file and save it.
Notes
If versioning is enabled and if you are displaying previous versions, you can also edit version description for version files.Deleting Files
You can delete a file by clicking "Delete" item menu action under the "Item Actions" button.Previous Versions
You can display previous versions of files by clicking "Previous Versions" item menu action under the "Item Actions" button. After clicking on it, version history of the file will be listed.
You can also Download, Open, Copy URL, Edit and Delete version files.
NotesYou can edit Description and Version Description in "Previous Versions" screen. Also, if you delete Current Version on this screen, most recent file will be set as current.
Email Selected and Delete Selected
You can select one or multiple files by using checkboxes in results table and you can Email these files by clicking "Email Selected" button.
You can select one or multiple files by using checkboxes in results table and you can Delete these files by clicking "Delete Selected" button.
Navigation
You can display the Folder Path of a file by clicking on the "Click to View Folder Path" link and then you can click on the Folder Path to navigate to this folder in a new tab. You can also click on the Parent Object Field (E.g CaseNumber) to navigate to this parent record in a new tab. "Previous Versions" screen doesn't support "Folder Path" column.
Configuring S-Drive Advanced Search ComponentS-Drive Advanced Search feature has been designed as dynamic and reusable. So, you can configure AdvancedSearchComponent. Below, you can see the attributes of AdvancedSearchComponent;
<apex:attribute name="searchCriteria" description="Criteria of the search." access="global" type="String" required="required" assignTo="{!searchCriteriaAT}"/>
<apex:attribute name="customObjectName" description="API Name of the custom object that the files will belong to. This object can also be one of the standard objects such as Solutions or Products. For example: 'MyObject__c' or 'Solution'" access="global" type="String" required="required" assignTo="{!customObjectNameAT}"/>
<apex:attribute name="customField" description="This represents a field of parent S-Drive object. If you pass a parent object field, you can see this field in Results table. E.g. Case Number, Origin." access="global" type="String" required="required" assignTo="{!customFieldAT}"/>
<apex:attribute name="customObjectFileName" description="API Name of the custom object that will represent the file. This custom file object is required to include fields indicated in the installation guide of S-Drive. For example: 'MyFile__c'" access="global" type="String" required="required" assignTo="{!customObjectFileNameAT}"/>
<apex:attribute name="fileNamespacePrefix" description="Namespace prefix for the file object. This attribute is required if the object has a namespace. For example: 'cg__'" access="global" type="String" required="optional" assignTo="{!fileNamespacePrefixAT}" default=""/>
<apex:attribute name="objectNamespacePrefix" description="Namespace prefix for the parent object for the attachments. This attribute is required if the object has a namespace. For example: 'cg__'" access="global" type="String" required="optional" assignTo="{!objectNamespacePrefixAT}" default=""/>
<apex:attribute name="relationshipName" description="Master-detail relation used for selected standard/custom object. For example: 'Parent__r'" access="global" type="String" required="required" assignTo="{!relationshipNameAT}" default=""/>
<apex:attribute name="orderBy" description="Name of the field that should be used to order the list of files. This attribute is optional and leaving this empty will not order the results in any specific order. For example: 'File_Name__c'" access="global" type="String" required="optional" assignTo="{!orderByAT}" default=""/>
<apex:attribute name="pageSize" description="Page size for pagination. Attachment items will be paginated based on this value. This attribute is optional and default value is 100." access="global" type="Integer" required="optional" assignTo="{!pageSizeAT}" default="100"/>
</apex:component>
AdvancedSearchPage is used to pass customObjectName(Object), customObjectFileName(Object File), customField(Parent Object Field) and searchCriteria (Search Keyword) attributes into AdvancedSearchComponent using a user interface. You can embed AdvancedSearchComponent into a different VF Page, you can pass your info into component attributes.
Sample use of AdvancedSearchComponent in a VisualForce page;
<apex:page>
<apex:form>
<cg:AdvancedSearchComponent
searchCriteria="genre"
customField="Origin"
customObjectName="Case"
customObjectFileName="CaseFile__c"
fileNamespacePrefix="cg__"
objectNamespacePrefix="cg__"
relationshipName="Case__r"
orderBy="File_Name__c"
/>
</apex:form>
</apex:page>Sample Output ;