To style and use your branding colors in the S-URL site – (The visualforce page that is the Active Site Home Page – cg.SURLRedirect.page), you can follow these steps.
-
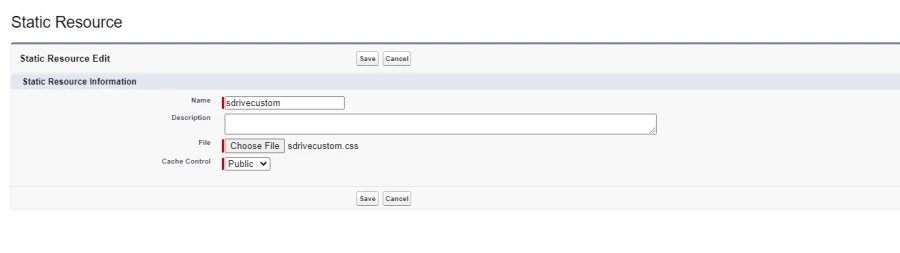
Create a CSS stylesheet in .css format and upload it as a static resource to Salesforce. You can name it as "sdrivecustom.css". You can upload a static resource from Setup > Static Resources > New. The stylesheet should be in the following format.
body {
background: url('https://www.cyangate.com/wp-content/uploads/2015/02/bgSlider.jpg') !important;
}

#SDrive {
position: absolute !important;
width: calc(100% - 38px) !important;
bottom: 0 !important;
}

#SDrive .slogan {
color: #192B55 !important;
}

.sdrive-btn {
border-radius: 5px !important;
background-color: #192B55 !important;
border: 1px solid #314472 !important;
}

.sdrive-btn:hover {
background-color: #314472 !important;
}

.cgToolbar .slds-button{
background-color: #64C8CB !important;
color: white !important;
border: 1px solid #64C8CB !important;
}

.slds-scope .slds-button_icon-border-filled[disabled], .slds-scope .slds-button_icon-border-filled:disabled{
background-color: #96c5c7 !important;
}

#SDriveCmp{
background-color: #a0a0a0 !important;
border: 1px solid #314472 !important;
}

#SDriveCmp .slds-box{
border: 1px solid #314472 !important;
}

#global-search-01{
background: #D3D3D3;
border: 2px solid #314472;
}

.cgSDrive .sd-search-btn.slds-input__icon{
border-radius: 2px !important;
width: 34px !important;
top: 2px !important;
height: 29px !important;
color: #314472 !important;
}

.file-list-table{
background-color: #D3D3D3 !important;
}
.slds-scope .slds-table:not(.slds-no-row-hover) tbody tr:hover > td{
background-color:#e0e0e0 !important;
}

.slds-scope .slds-button_icon-border-filled{
background-color: #64C8CB !important;
}

.community-toolbar{
background-color: #192B55 !important;
}

.cgActions lightning-primitive-icon{
color:#fff;
}

.pass-container{
background-color: #192B55 !important;
color: white !important;
border: 1px solid #64C8CB !important;
}

.pass-container input[type='password']{
background-color: #D3D3D3 !important;
border-radius: 2px !important;
}

.pass-container input[type='submit']{
background: #64C8CB !important;
border: 1px solid #959595 !important;
font-size: 1em !important;
Note: It is required that you set your stylings as "!important", in order to override the styles of regular S-URL page.
Use the following styles for the following scenarios to change:
-
The background color or image of the page: Line 2
-
The width or position of the card or hide the card at the bottom of the page: Lines 5-8
-
The colors of the slogan: : Lines 11-12
-
The button styles and button hover colors: Lines 21- 22
-
The S-Drive Toolbar buttons: Lines 25-29
-
The S-Drive component’s colors: Line 31-32
-
The S-Drive component’s background color: Lines 35-37
-
The search-bar colors and style: Lines 44-55
-
The background color of the S-Drive file-list: Lines 57-58
-
The S-Drive toolbar color: Lines 68-69
-
The colors of action menu items and quick actions: Lines 72-73
-
The password pop-up style: Line 76-90
You can set the Cache Control as public when you upload the static resource.
-
-
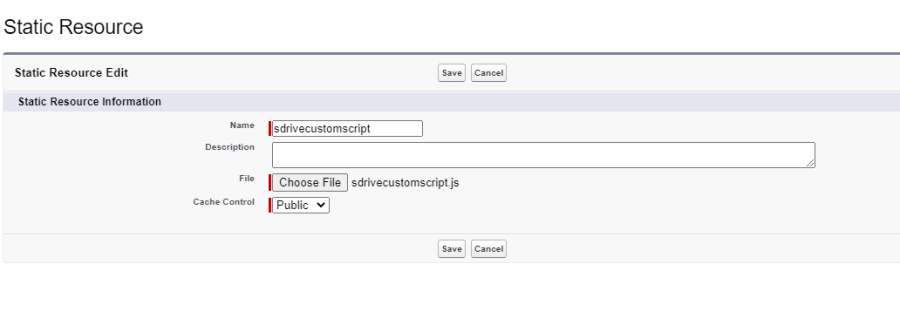
Create a Javascript script in .js format and upload it as a static resource to format the
following sections in the S-URL page. You can name it as “sdrivecustomscript.js”. You
can upload a static resource from Setup > Static Resources > New.
window.addEventListener('load', function () {
setSDriveComponentTitle();
setDriveComponentBrandLogo();
setSurlPageSlogan();
setSurlPageSloganUrl();
setSurlPageButton1();
setSurlPageButton2();
setSurlPageBrandLogo();
setSurlPageBrandLogoUrl();
});

function setSDriveComponentTitle(){
var element = document.querySelector("span[title='S-Drive ']");
if(!element){
setTimeout(function(){
setSDriveComponentTitle();
},200);
}
else{
element.innerHTML = 'CyanGate S-Drive';
}
}

function setDriveComponentBrandLogo(){
var element = document.querySelector("img[title='S-Drive']");
if(!element){
setTimeout(function(){
setDriveComponentBrandLogo();
},200);
}
else{
element.setAttribute('src', 'https://www.cyangate.com/wp-content/uploads/2019/10/cyangate_logo.png');
}
}

function setSurlPageSlogan(){
var element = document.querySelector("span[class='slogan']");
if(!element){
setTimeout(function(){
setSurlPageSlogan();
},200);
}
else{
element.innerHTML = 'CyanGate Storage';
}
}

function setSurlPageSloganUrl(){
var element = document.querySelector("a[id='slogan-url']");
if(!element){
setTimeout(function(){
setSurlPageSloganUrl();
},200);
}
else{
element.innerHTML = 'CyanGate.com';
element.setAttribute('href', 'https://www.cyangate.com/');
}
}

function setSurlPageButton1(){
var element = document.querySelector("a[id='surl-button-1']");
if(!element){
setTimeout(function(){
setSurlPageButton1();
},200);
}
else{
element.innerHTML = 'BUTTON 1';
element.setAttribute('href', 'https://www.cyangate.com/');
}
}

function setSurlPageButton2(){
var element = document.querySelector("a[id='surl-button-2']");
if(!element){
setTimeout(function(){
setSurlPageButton2();
},200);
}
else{
element.innerHTML = 'BUTTON 2';
element.setAttribute('href', 'https://www.sdriveapp.com/');
}
}

function setSurlPageBrandLogo(){
var element = document.querySelector("img[id='surl-brand-logo']");
if(!element){
setTimeout(function(){
setSurlPageBrandLogo();
},200);
}
else{
element.setAttribute('src', 'https://www.cyangate.com/wp-content/uploads/2019/10/cyangate_logo.png');
}
}

function setSurlPageBrandLogoUrl(){
var element = document.querySelector("a[id='surl-brand-url']");
if(!element){
setTimeout(function(){
setSurlPageBrandLogoUrl();
},200);
}
else{
element.setAttribute('href', 'https://www.cyangate.com/');
}
}
You can set the Cache Control as public when you upload the static resource.
-
Click on “View File” link in the Static resources page and copy the URLs for both
resources from the browser starting with “/resource”
-
Navigate to S-Drive Configuration page and click on “Micro Services” tab and paste the
URLs for the custom style sheet and the custom script that you installed as a static
resource, respectively. -
Copy the Base URL from the first box and prepend it to the “/resource….” in the custom
boxes as shown.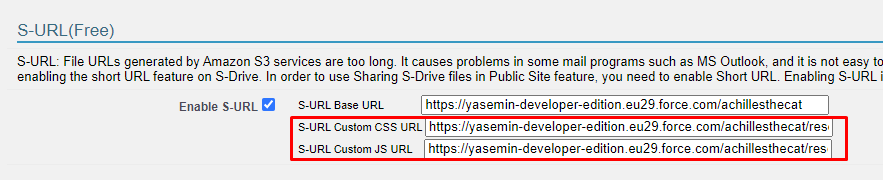
-
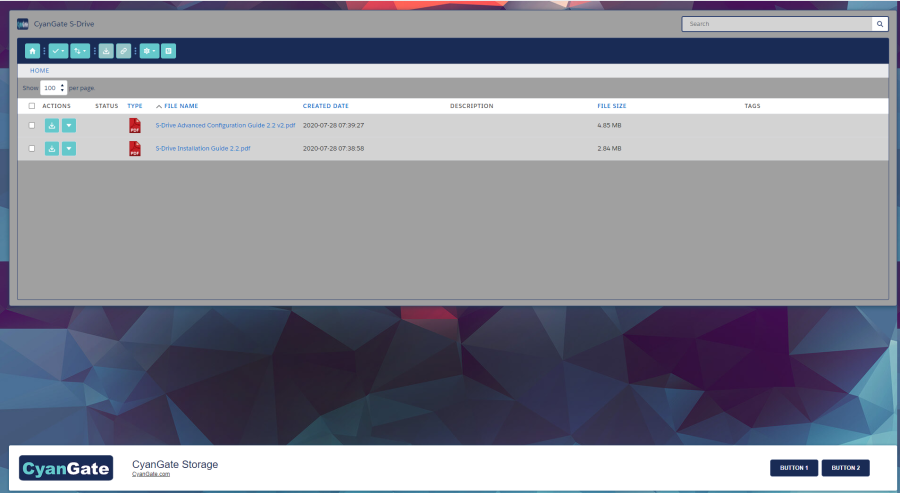
The S-URL page will look like the following screenshot when the example css and js
changes are applied.