
Turn on Records Management and configure Check-In & Check-Out, Legal Hold and Retention Policies. To learn what these features do and how they work, see Records Management.
Getting here: App Launcher › S-Drive Configuration › Services › Records Management › Configure
Setup Overview
-
Open the Configure Records Management page (see above).
-
Select Enable Records Management or Enable Records Management Trial. The other sections become active.
-
Turn on the features you want in Check-In & Check-Out and Legal Hold. For Legal Hold, choose the file objects in File Objects For Legal Hold.
-
Click Save. This saves the Records Management, Check-In & Check-Out and Legal Hold sections.
-
To add retention policies, click Add Retention Policy in the Retention Policy section. Retention policies are saved separately.
Settings Details
Records Management
Enable Records Management Turns on Records Management and makes the Check-In & Check-Out, Legal Hold and Retention Policy sections available. This is a paid feature. See Records Management for pricing.
Enable Records Management Trial Turns on Records Management as a trial.
Remove Locks From All File Objects
-
Removes every lock from every file object, whether the file is checked out or on legal hold.
-
To turn off Records Management: click this button, uncheck Enable Records Management, and click Save. If any files are still locked, saving shows an error.
Check-In & Check-Out
Enable Check-In & Check-Out Adds check-out and check-in actions to the file action menu. See Check-Out and Check-In
Enable Auto-Download After Check-Out Downloads the file automatically when a user checks it out.
Enable Check-In Redirect To Upload Page When a user checks a file in, asks whether they want to upload a new version of the file.
Remove Locks From All Checked Out Files
-
Checks in every checked-out file.
-
To turn off Check-In & Check-Out: click this button, clear Enable Check-In & Check-Out, and click Save. If any files are still checked out, saving shows an error.
Legal Hold
Enable Legal Hold Adds Put Legal Hold and Remove Legal Hold actions to the file action menu for users who can use them. See Legal Hold.
File Objects For Legal Hold Legal Hold is only available on the file objects in the Selected column.
Remove Locks From All Files Under Legal Hold
-
Removes every file from legal hold.
-
To turn off Legal Hold: click this button, clear Enable Legal Hold, and click Save. If any files are still on legal hold, saving shows an error.
Retention Policy
This section lists your retention policies with their Retention Policy Name, File Object, Created date, Time and Status. Use the Status toggle to make a policy active or inactive.
Add Retention Policy Opens the form for a new retention policy.
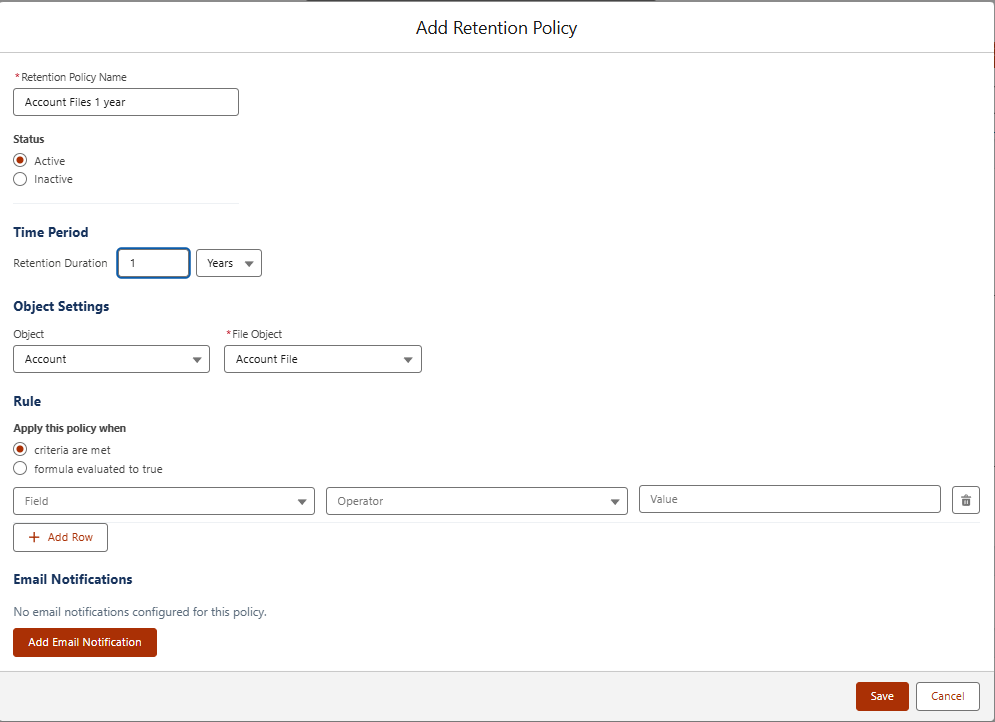
|
Field |
What it does |
|---|---|
|
Name |
The name of the retention policy. |
|
Status |
Active or inactive. |
|
Time Period |
How long files are kept, counted from the date each file was created. Files that reach the end of the period are deleted. |
|
Object Settings |
The parent object and S-Drive file object the policy applies to. |
|
Rule |
Criteria or a formula that limits which files are deleted. With no criteria, every file past the time period is deleted. Files on legal hold are skipped unless the rule includes Lock State equals legalHold. |
|
Add Email Notification |
Sends an email before files are deleted. You choose how far in advance. |
Retention policies run once a day. Set the time in System & Scheduler Settings › Daily retention policy batch jobs execution time.
Learn about this feature: Records Management