
You can configure the S-Drive Lightning Component to work with your custom file object. The configuration is similar to using one of the file objects that comes with S-Drive.
Open a record from your custom object (My_Example_Object__c) and click on the Setup gear wheel on the top right and click “edit page.”
To display the S-Drive file component on Lightning pages for your custom objects (or standard objects that don’t come with an S-Drive file object) you need to edit the object’s pages, add the S-Drive Lightning Component to the page and configure it.
-
Edit the Lightning page for a MyExampleObject: Go to an MyExampleObject, click on the "Setup" icon (gear wheel) on the top right corner and choose "Edit Page" option.
-
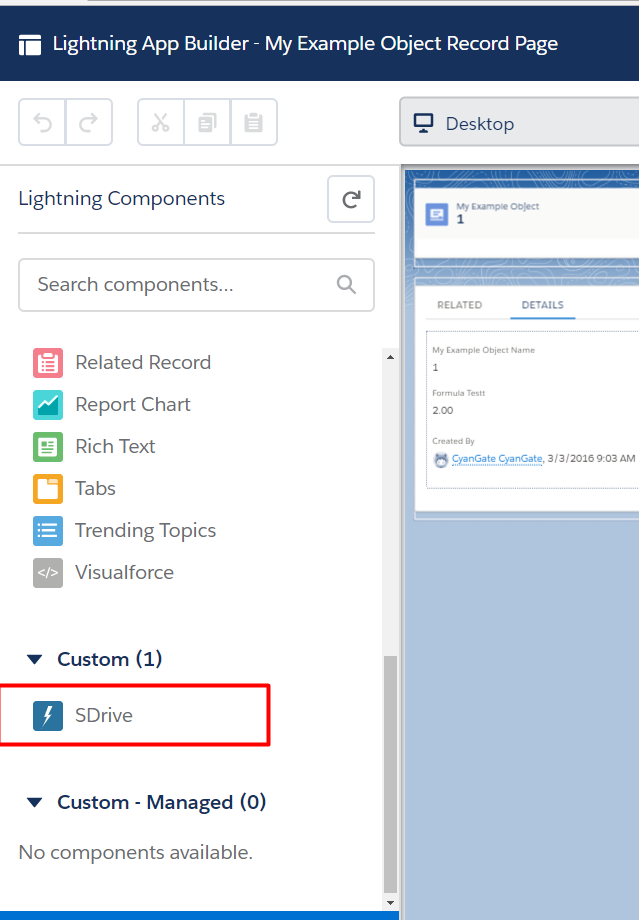
You will see "Lightning Components" section on the left-hand side. Scroll down to see the "SDrive" component, under "Custom".
-
Grab the SDrive component and drag it onto the page. Drop wherever you want the S-Drive component to be placed.
-
Edit the following required fields correctly to configure the S-Drive component for your object. You can also change the settings for a selection of checkboxes , which are explained next in the Component Attributes section.
Component Attributes
The component attributes shown above are discussed in this section in detail. For the API names of these attributes, see S-Drive Configuration Attribute API Names
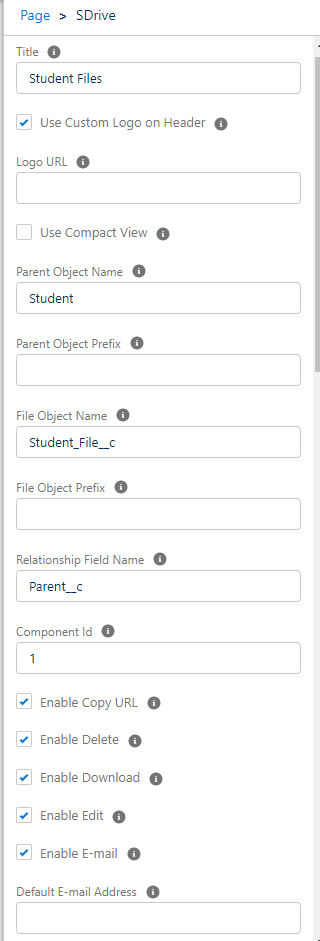
Title This is the title of the page block inside the object page. You can set it to "Account Files" (or Case Files, Contact Files, etc) or whatever title you like. This field is optional and if you don't provide a value for this field, it will be set to "S-Drive Files".
Use Custom Logo on Header Checking this box will enable inserting a custom logo, which will show on the top left of the S-Drive component in place of the S-Drive logo.
Logo Url Add the url for your logo. Note that if it is an external site, you will need to add that site to CSP Trusted Sites. (Go to Setup->CSP Trusted Site.)
Use Compact View Checking this box will enable a compact view of S-Drive which will help users to fit S-Drive into narrow spaces. In compact view, toolbar operations will be limited to the following: navigate to Home, upload files, download files and folders, create folders, navigate to recycle bin.
Parent object name This is the name of the object that the files will be attached to.
Parent object prefix This is the object's namespace prefix, if it has one.
File object name This is the name of the S-Drive file object that we created in previous sections. This object holds the information regarding the attached files. For our example, it is "My_Example_Object_File__c".
File object prefix This is the file object's namespace prefix. Since you created the file object and it’s not part of a managed package, this should be left blank.
Relationship field name Master-detail or lookup relation used for selected standard/custom object. This should be set to 'Parent__r'. The name of your lookup field on your file object should be Parent.
Component Id If multiple S-Drive components are used in a page, this attribute should be set to a unique key for each component. For example: '1', 'a', etc.
Enable copy URL This option is used to enable/disable "Copy URL" link in the page. If the checkbox is checked, you will be able to see the "Copy URL" link for each asset. The default value for this checkbox is checked.
Enable delete This option is used to enable/disable "Delete" option for all attachments in the page. If the checkbox is checked, you will be able to see the "Delete" link for each asset. The default value for this checkbox is checked.
Enable download This option is used to enable/disable "Download" option for all attachments in the page. If the checkbox is checked, you will be able to see the "Download" link for each asset. The default value for this checkbox is checked.
Enable edit This option is used to enable/disable "Edit" option for all attachments in the page. If the checkbox is checked, you will be able to see the "Edit" link for each asset. The default value for this checkbox is checked.
Enable e-mail This option is used to enable/disable "E-Mail" option for all attachments in the page. If the checkbox is checked, you will be able to see the "E-Mail" link for each asset. The default value for this checkbox is checked.
Default email address You can use this option, if you want to set a default "Additional To" email address for sending emails from your S-Drive Attachments. For example, if you select an Account S-Drive Attachment for an account and click "Email" button, "Email Files" screen will be opened and "Additional To" field will be filled with the email address you have provided here.
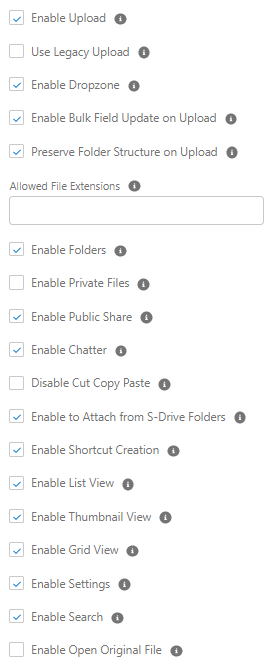
Enable upload This option is used to enable/disable "Upload" option for all attachments in the page. If the checkbox is checked, you will be able to see the "Upload File(s)" link for each asset. The default value for this checkbox is checked.
Use Legacy Upload If this is checked, a visualforce upload page is used instead of the Lightning upload page
Enable Drop Zone This option is used to configure drop zone in S-Drive components. Select/deselect the checkbox to enable or disable the drop zone.
Enable Bulk Field Update on Upload This option enables the Bulk Field Update pullout menu on the Lightning Upload page. It is ignored for Legacy upload.
Preserve Folder Structure on Upload If this is checked, then when dropping a folder on the Lightning upload page, the files will remain in the folders and subfolders, not “flattened” into the same level. Available only on Lightning upload, not Legacy upload.
Allowed file extensions You can use this option if you want to limit the file types to be uploaded into selected object's S-Drive attachments. Semicolon separated list of file extensions that are allowed to be uploaded can be written here. This attribute is optional and leaving this empty will allow all kind of files to be uploaded. For example, "*.jpg, *.txt" will limit the files to be uploaded to jpg and txt files.
Enable folders This option is used to enable/disable folder support for S-Drive attachments in the page. If the checkbox is checked, you will be able to see the "New Folder" button. The default value for this checkbox is checked. If the box is not checked, the "New Folder" button will be removed from the toolbar section.
Enable private files This option is used for enabling public/private file access to the S-Drive attachments and commonly used to limit the customer portal users' access to individual files. The ability for users to configure this is determined by the main configuration settings in S-Drive Configuration Tab. If the checkbox is checked, you will see the public/private flag. Set this attribute to true by checking the checkbox, if you want to enable private/public flag. Setting the private flag on a file hides the file from customer portal users. The default value for this checkbox is unchecked.
Enable Public Share This option is used to configure public share in S-Drive components. Select the checkbox to see Public Share option in Actions Menu. Deselect the checkbox to disable Public Share in Actions Menu.
Enable Chatter This option is used for enabling/disabling Chatter for Account files. If you enable this option, you will be able to use functions such as 'Post to Chatter' and will be able to view the Chatter feed of each Account file.
Disable Cut Copy Paste This option is used for enabling/disabling cut/copy-paste options. Set this attribute to true by checking the checkbox if you want to disable cut/copy-paste operations.
Enable Shortcut Creation This option is used to configure Shortcut Creation in S-Drive components. Select the checkbox to see Create Shortcut button on toolbar. Deselect the checkbox to disable Create Shortcut button on toolbar.
Enable List View This is checked by default and enables the option to show files in list view (rather than Thumbnail or Grid view) if Preview and Thumbnail is enabled.
Enable Thumbnail View This enables the toolbar button to show files in Thumbnail view (rather than List View or Grid view) if Preview and Thumbnail is enabled.
Enable Grid View This enables the toolbar button to show files in Grid view (rather than List or Thumbnail view) if Preview and Thumbnail is enabled.
Enable Settings This enables the Settings (gear wheel) toolbar button, which allows users to set the view type, sort field and whether the bread crumbs and folder tree show. The settings only save for the session unless the user has Admin privileges.
Enable Search Shows the search box if checked
Enable Open Original File Setting this to true adds the “open original file” action to shortcut files
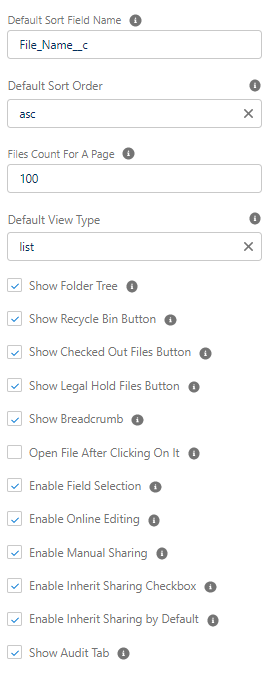
Default sort field name This option is used to order/sort S-Drive documents based on a field. You need to set the name of the field that should be used to order the list of files. For this example, it we used "File_Name__c".
Default sort order This option is used to set the sort order direction of the S-Drive documents. There are two possible values for this attribute: "asc" or "desc". The default value is "asc" which stands for ascending. You can change this option from the settings button located at the toolbar of S-Drive attachments anytime. See "S-Drive Lightning User Guide" for more information about using the S-Drive attachments.
Files Count for A Page This option is to set the number of files to be shown in an attachment page. The default value for this section is set to 100. If this value is set to '30' and object has 91 total items, the files will be displayed in 4 pages. You can change this option from the pagination setting located under the toolbar of S-Drive attachments. See "S-Drive Lightning User Guide" for more information about using the S-Drive attachments.
Default view type This option is to set the default view type of the file list table. There are 3 options you can choose: List, Thumbnail and Grid. You can change this option from the toolbar of S-Drive attachments and set it as default by using the settings button. See "S-Drive Lightning User Guide" for more information about using the S-Drive attachments.
Show Folder Tree This option sets the default behavior of the folder tree component located on the left-hand side of the S-Drive attachments page. You can choose to hide or show the Folder Tree component by using the settings button on the toolbar of S-Drive attachments. See "S-Drive Lightning User Guide" for more information about using the S-Drive attachments.
Show Recycle Bin Button The option determines whether the green Recycle Bin button that can be shown below the folder tree is displayed. When active, this button shows all files in the recycle bin.
Show Checked Out Files Button The option determines whether the blue Checked Out Files button that can be shown below the folder tree is displayed. When active, this button shows all files that are checked out.
Show Legal Hold Files Button The option determines whether the blue Legal Hold Files button that can be shown below the folder tree is displayed. When active, this button shows all files that have a legal hold on them.
Show Breadcrumb This option sets the default behavior of the breadcrumbs located on the left-hand side of the S-Drive attachments page, above the folder tree component. You can choose to hide or show the breadcrumbs by using the settings button on the toolbar of S-Drive attachments. See "S-Drive Lightning User Guide" for more information about using the S-Drive attachments.
Open File After Clicking on It This option is used to configure the behavior when a file is clicked on. Select the checkbox to open the file when it is clicked on. Deselect the checkbox to go to the Details view of the file.
Enable Field Selection This option is used to configure Fields button on toolbar which is used to select and display fields. Select the checkbox to enable the button on toolbar and deselect the checkbox to hide.
Enable Manual Sharing This option determines whether manual sharing is allowed on files. It is only used on customer file objects that have a lookup relationship to the parent.
Enable Inherit Sharing Checkbox This option controls whether the Inherit Sharing checkbox is shown or hidden when creating subfolders and uploading files. If checked, it is shown.
Enable Inherit Sharing by Default This option controls whether the Inherit Sharing checkbox is checked or unchecked by default. If you hide the Inherit Sharing checkbox, you still need to use this setting to determine whether Inherit Sharing is true or false when subfolders are created and files are uploaded.
Show Audit Tab This option determines whether or not the Audit Tab is shown when clicking on file details.